I’ve always loved how certain desserts can change the whole mood of a room, and this cake does that every single time.
The first time I made it for my family, the table went quiet for a moment—not because anyone was shy, but because the rich chocolate scent took over the space before I even sliced it.
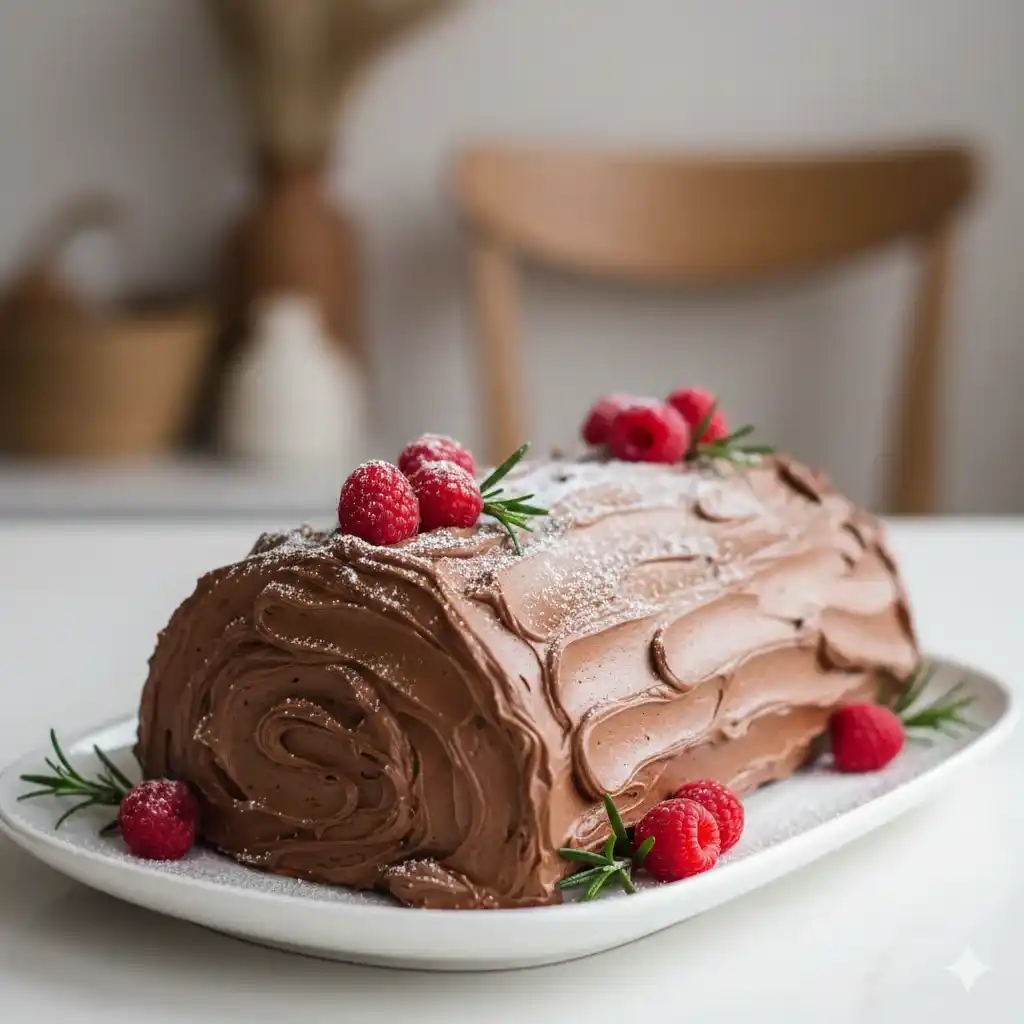
The rolled sponge, the creamy filling, and the smooth frosting make it feel like a special treat that belongs at the center of the table.
Growing up, I would watch holiday desserts being prepared with slow, careful hands. This cake reminds me of that same calm joy.
It looks impressive, but what matters most to me is the feeling it brings when it’s finally set down in front of everyone.
The swirl inside, the soft frosting lines on the outside, and the bright berries on top turn it into something that draws people closer without a single word.
Whenever I make it now, I can sense the same anticipation around me, the kind that makes you breathe a little deeper and smile without trying.
This is the kind of dessert that stays in your memory long after the plates are cleared.
It has a way of making an ordinary day feel warmer, and that is why it has become a tradition in my home.
Table of Contents
Chocolate Yule Log Cake Recipe (Bûche De Noël)
Ingredients
For The Chocolate Sponge Cake
- 4 large eggs, room temperature
- ½ cup fine white sugar
- 1 teaspoon vanilla extract
- ¼ teaspoon salt
- ⅓ cup all-purpose flour
- ¼ cup cocoa powder
- 1 teaspoon baking powder
- 2 tablespoons warm milk
For The Chocolate Cream Filling
- 1 cup heavy whipping cream, chilled
- 2 tablespoons powdered sugar
- 2 tablespoons cocoa powder
- ½ teaspoon vanilla extract
For The Chocolate Buttercream Frosting
- 1 cup unsalted butter, softened
- 2 cups powdered sugar
- ½ cup cocoa powder
- 2 tablespoons milk (add more if needed)
- ½ teaspoon vanilla extract
For Decoration
- Fresh raspberries
- Small rosemary sprigs or any soft-stem herb
- Light dusting of powdered sugar
Instructions
- Preheat the oven to 180°C (350°F). Line a 10×15 inch swiss roll pan (jelly roll pan) with baking paper, making sure it covers the edges so the cake releases easily.
- Separate the eggs. Place the yolks in one bowl and the whites in another. Beat the yolks with sugar until thick, pale, and creamy. Add the vanilla and warm milk and mix again.
- In a small bowl, sift the flour, cocoa powder, baking powder, and salt. Add this dry mixture to the yolk mixture and fold very gently until smooth.
- Beat the egg whites until stiff peaks form. Add one spoonful of the whites into the chocolate batter and fold to loosen it. Then add the remaining whites and fold slowly and carefully to avoid deflating the mixture.
- Pour the batter into the prepared pan and spread it evenly using a spatula. Bake for 10–12 minutes. The cake should be soft but spring back when touched lightly.
- While the cake is baking, lay a clean kitchen towel on your counter and dust it generously with powdered sugar. This prevents sticking and helps form a smooth roll.
- Once the cake is out of the oven, immediately flip it onto the sugared towel. Peel off the baking paper slowly. Starting from the short side, roll the cake gently with the towel inside it. Let it cool completely while rolled; this step creates a flexible sponge that will not crack later.
- Make the filling: Whip the cold cream, powdered sugar, cocoa powder, and vanilla together until thick and fluffy. Keep it chilled.
- When the cake has cooled, unroll it carefully. Spread the chocolate cream filling evenly all over, leaving a small empty border at the end to prevent overflow.
- Roll the cake back up tightly (this time without the towel). Place it seam-side down on a tray and refrigerate for at least 20 minutes so it firms up.
- Prepare the frosting: Beat the softened butter until creamy. Add the powdered sugar and cocoa powder, mixing slowly at first, then increasing speed. Add the milk and vanilla, beating until smooth, thick, and spreadable. If it feels too stiff, add a few more drops of milk.
- Frost the rolled cake generously. Use the back of a spoon or an offset spatula to create rough, bark-like swirls and lines across the whole surface.
- Place fresh raspberries on top and around the cake. Tuck in a few rosemary sprigs for a natural festive look. Lightly dust with powdered sugar to mimic a snowy finish.
- Refrigerate the cake for at least 1 hour before slicing. This helps the shape set, improves the texture, and creates clean slices with a visible spiral.
Why Should You Roll The Sponge Cake While Warm?
Rolling the sponge while it is still warm is the key to a perfect Yule Log. Warm sponge is soft and flexible, which allows it to bend without cracking.
If you wait until it cools completely, the cake becomes stiff and is likely to break when rolled. Rolling it while warm creates a smooth, neat spiral that holds the chocolate cream filling perfectly.
How Can You Make The Chocolate Cream Filling Smooth And Fluffy?
A silky, fluffy filling makes the Yule Log extra indulgent. Follow these tips for the best result:
- Use Cold Cream: Cold heavy cream whips more easily and holds its shape longer.
- Sift Cocoa Powder: Sifting prevents lumps and ensures a smooth texture.
- Whip Carefully: Start at a low speed and gradually increase to avoid overbeating, which can make the cream grainy.
By keeping the cream cold and gentle, you get a filling that spreads evenly and stays light.
How Do You Prevent The Cake From Cracking During Final Rolling?
Even after rolling warm once, the second roll with filling can crack if you’re not careful. Here’s how to avoid it:
- Leave A Small Border: Don’t spread cream all the way to the edges; leave about 1 inch free to prevent overflow.
- Roll Gently: Roll the sponge slowly and evenly with light pressure.
- Chill Before Frosting: Refrigerate for 20 minutes before adding frosting. This helps the cake firm up and reduces the risk of cracking.
How Should You Frost The Chocolate Yule Log?
Frosting gives the Yule Log its signature rustic, bark-like appearance. Keep these points in mind:
- Beat Butter Well: Softened butter should be creamy before adding powdered sugar and cocoa powder.
- Adjust Milk Gradually: Add small amounts of milk if the frosting is too stiff to make it spreadable.
- Create Texture: Use the back of a spoon or an offset spatula to make natural lines and swirls, mimicking tree bark.
How Can You Decorate Your Yule Log Cake?
Decorations make the cake festive and visually appealing while keeping it simple:
- Fresh Raspberries: Place them on top or along the sides for a vibrant touch.
- Soft Herb Sprigs: Small rosemary sprigs or similar herbs add a natural, wintery look.
- Powdered Sugar: Lightly dust to resemble snow, adding elegance and contrast.
How Should You Store The Chocolate Yule Log Cake?
Proper storage keeps your cake fresh and delicious:
- Refrigeration: Keep the cake in an airtight container for up to 3–4 days to prevent frosting from drying out.
- Freezing: Wrap the cake tightly in plastic wrap and foil for up to 2 months. Thaw in the fridge overnight before serving.
- Avoid Humidity: Store away from humid areas to prevent the sponge from becoming soggy.
Can You Make The Yule Log Cake Ahead Of Time?
Yes! The Yule Log is perfect for preparing in advance:
- Bake The Sponge A Day Before: Roll it in a sugared towel, let it cool, and refrigerate overnight.
- Prepare Filling And Frosting Ahead: Whip the cream and buttercream a day before and keep chilled.
- Assemble On Serving Day: Spread the filling, roll, frost, and decorate for the freshest result.
How Can You Ensure Clean Slices With A Beautiful Spiral?
Perfect slices showcase the cake’s spiral and make serving easy:
- Chill First: Refrigerate the cake for at least 1 hour before slicing.
- Use A Sharp Knife: Wipe the knife clean between cuts to keep slices neat.
- Cut Slowly: Apply gentle, even pressure for slices that show the spiral clearly.
You May Also Like To Check Out These Articles
- 55 Creative Christmas Cake Ideas To Spark Holiday Cheer
- 40 Christmas Cheesecake Recipes For A Joyful Holiday Season
- 50 Easy Christmas Cupcakes You’ll Want To Bake All Season
- 50 Time-Saving Christmas Cookie Recipes Everyone Will Devour
- 130 Yummy Christmas Treats For The Perfect Celebration
- 118 Christmas Desserts To Make Your Holidays Sweet
- 180+ Mouthwatering Christmas Dinner Recipes To Try This Holiday Season
- 55 Delicious Christmas Appetizer Ideas
- 160 Easy And Festive Christmas Potluck Ideas
- 55 Best Christmas Snacks For Party
- 20 Best Non Alcoholic Christmas Drinks
- 72 Joyful Christmas Baking Ideas For The Festive Season
- 26 Easy Christmas Candy Recipes
- 40 Best Christmas Side Dishes
- 10 Simple Tips For A Cozy Christmas Coffee Bar
- Christmas Cake Pops
- Christmas Tree Cake Pops
- Christmas Cookie Cake
- Christmas Tree Cake Cheesecake
- Cranberry Christmas Cake
- Grinch Christmas Cake
- Cranberry Pecan Cheese Ball
- Crock Pot Cranberry Meatballs
- Sugared Cranberries
- Authentic Cacio E Pepe Recipe
- Cheese Straws With Puff Pastry
- Best Mince And Cheese Pie Recipe
- Sweet And Sour Meatballs With Pineapple Chunks
- Honey Sriracha Meatballs
- Meatballs On A Stick
- Creamy Carbonara Recipe With Cream Of Mushroom
- Chicken Pot Pie
- Lamb Loin Chops
- Meat Lasagna Recipe With Ricotta
- Broccoli Cheese Casserole
- Broccoli Bake
- Roast Beef Sliders Hawaiian Rolls
- Beef Wellington
- Chicken Pot Pie