When I think about baking, I think about those special moments when you want to share something sweet with someone who matters.
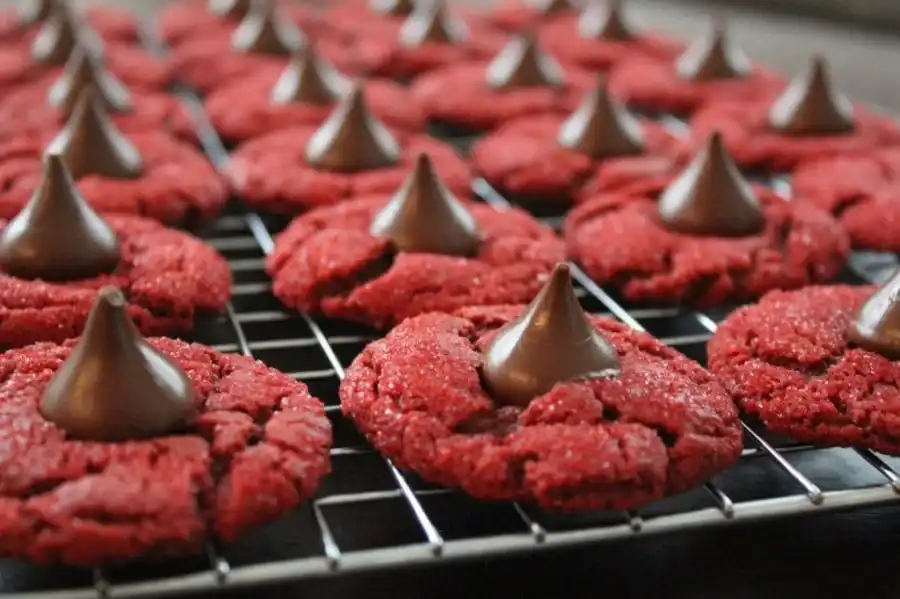
Valentine’s Day is just around the corner, and these red velvet peanut butter blossom cookies are perfect for that. They’re soft, rich, and have that signature peanut butter crunch.
What makes them extra special is the vibrant red color that gives them a festive touch, ideal for showing someone you care.
Plus, they’re so simple to make, and the best part is the Hershey’s Kiss on top that makes every bite even sweeter.
I love sharing these recipes because I know you’re all about making those sweet moments happen.
Whether you’re baking for your family, your friends, or that special someone, these cookies are an easy way to make someone’s day a little brighter.
Red Velvet Peanut Butter Blossom Cookies Recipe
Ingredients
- 1 bag of chocolate kisses
- 1/2 cup butter (use non-dairy butter for vegan version)
- 3/4 cup peanut butter
- 1 1/3 cups sugar (use coconut sugar or any preferred sweetener for vegan or gluten-free alternatives)
- 1 egg (for vegan: replace with 1 tablespoon ground flaxseed mixed with 3 tablespoons water)
- 2 tablespoons milk (use almond milk or oat milk for dairy-free or vegan options)
- 2 teaspoons vanilla extract
- 1 teaspoon red gel food coloring
- 3 tablespoons unsweetened cocoa powder
- 1 1/2 cups all-purpose flour (or use a gluten-free flour blend)
- 1 teaspoon baking soda
- Pinch of salt
- 1/4 cup red sanding sugar (optional)
Instructions
- Preheat the oven to 375°F (190°C).
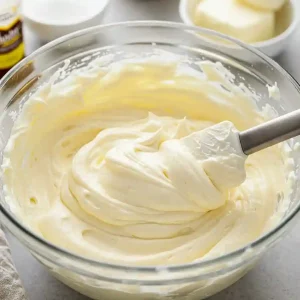
- In a large mixing bowl, use a stand mixer or hand mixer to beat the room-temperature butter and peanut butter together with the sugar on medium speed for about 2 minutes until light and fluffy.
- On low speed, add the egg (or flax egg), milk, vanilla, and red food coloring. Mix for 30 seconds, then increase to medium-high speed and beat until the mixture is fluffy and well combined.
- In a separate bowl, sift together the cocoa powder, flour, baking soda, and salt. Slowly add the dry mixture to the wet ingredients while mixing on low speed. Mix until just combined — be careful not to overmix.
- Use a small scoop (about 2 teaspoons) to portion the dough and roll each portion into a ball.
- Pour the red sanding sugar onto a small plate. Roll each dough ball in the sugar, then place them on an ungreased cookie sheet about 2 inches apart.
- Bake for 8-10 minutes, or until the edges start to crack.
- While the cookies bake, unwrap your chocolate kisses. As soon as the cookies come out of the oven, press one chocolate kiss into the center of each cookie while they are still soft and warm. The cookie edges should crack slightly.
- Allow the cookies to cool completely on a wire rack before serving or packing them up to share.
Tips For Perfect Red Velvet Peanut Butter Blossom Cookies
Baking these cookies is fun and easy, but a few simple tips can make sure they turn out perfectly every time. Here’s how you can make your red velvet peanut butter blossom cookies even better:
- Ensure Even Cookie Size: For evenly baked cookies, use a small ice cream scoop or tablespoon to portion out the dough. This way, all the cookies will bake at the same rate, giving you a uniform texture throughout.
- Balance the Peanut Butter Flavor: If you want the peanut butter flavor to shine but not overpower the red velvet, use a peanut butter that’s not too salty or sweet. Look for a natural, unsweetened peanut butter for the best taste.
- Add a Pinch of Cinnamon or Nutmeg: If you’re looking to take these cookies up a notch, try adding a pinch of cinnamon or nutmeg to the dough. It will give them an extra hint of warmth, perfect for Valentine’s Day or any cozy gathering.
- Make the Dough Ahead of Time: If you’re prepping for a special occasion, make the dough a day ahead and refrigerate it. This lets the flavors meld together and also makes the dough easier to handle when you’re rolling it into balls.
- Watch the Bake Time: Every oven is different, so start checking your cookies around 7 minutes into baking. The edges should be slightly firm, and the center may still look a little soft. This ensures a chewy, soft texture once they cool.
How To Store Red Velvet Peanut Butter Blossom Cookies?
Proper storage can make a big difference in how long your cookies stay fresh. Here’s how you can store your red velvet peanut butter blossom cookies for maximum freshness:
- Airtight Containers at Room Temperature: If you want your cookies to stay fresh for up to 4-5 days, store them in an airtight container at room temperature. This keeps them soft and chewy, just like when they were first baked.
- Layered Storage: To avoid sticking or crushing, place a sheet of parchment paper between the layers of cookies in your container. This will keep them from sticking together and preserve their shape.
- Freezing for Later: If you want to store them for longer, freezing is a great option. Just let the cookies cool completely before placing them in a zip-top bag or airtight container. They’ll keep in the freezer for up to 3 months. To thaw, just let them sit at room temperature for about 15-20 minutes.
- Freeze the Dough: Want to bake these cookies fresh later? Freeze the dough! After rolling the dough into balls, place them on a baking sheet and freeze for 1-2 hours. Then, transfer the frozen dough balls to a bag or container. When you’re ready, bake them straight from the freezer—just add an extra minute or two to the baking time.
Can I Make Red Velvet Peanut Butter Blossom Cookies Ahead Of Time?
Yes, you can make these red velvet peanut butter blossom cookies ahead of time, and it can actually make your baking process easier and more efficient. Here’s how:
- Prepare the Dough and Chill It: If you want to bake the cookies later, you can prepare the dough ahead of time. Just shape it into dough balls and chill them in the refrigerator for up to 2-3 days. Chilling helps the dough hold its shape better when baking.
- Freeze the Dough: You can also freeze the dough for even longer storage. After shaping the dough into balls, freeze them on a baking sheet for 1-2 hours. Then, transfer them to a freezer-safe bag or container. When you’re ready to bake, take them straight from the freezer and bake as usual—just add an extra minute or two to the baking time.
- Bake and Store: If you prefer to bake them ahead of time, you can store the cooled cookies in an airtight container at room temperature for up to 5 days. Alternatively, freeze the baked cookies for up to 3 months.

How Do I Prevent Red Velvet Peanut Butter Blossom Cookies From Spreading Too Much?
No one wants flat cookies! If your red velvet peanut butter blossom cookies spread too much during baking, follow these tips to keep them thick and chewy:
- Chill the Dough: One of the most effective ways to prevent spreading is to chill the dough. If the dough is too warm when you put it on the baking sheet, the cookies will spread too much. Chilling the dough for 30 minutes or longer helps it firm up, preventing excessive spreading during baking.
- Use Enough Flour: Make sure you’re measuring the flour correctly. Too little flour can cause the dough to spread too much. Spoon the flour into the measuring cup and level it off for the most accurate measurement.
- Don’t Overmix the Dough: Overmixing can cause the dough to become too soft and spread. Mix until everything is just combined—this helps keep the dough firm and helps it hold its shape during baking.
- Baking Soda and Baking Powder: Double-check that you’re using the right amount of leavening agents. Too much baking soda can cause the dough to spread too much. Stick to the measurements in the recipe for best results.
Why Did My Red Velvet Peanut Butter Blossom Cookies Turn Out Dry?
If your red velvet peanut butter blossom cookies turned out dry, don’t worry—it happens! Let’s look at why this may have occurred and how to fix it:
- Too Much Flour: If you accidentally added too much flour, it could dry out your cookies. Always make sure to measure the flour correctly by spooning it into the measuring cup and leveling it off with a knife. Too much flour can lead to a crumbly, dry texture.
- Overbaking: If you baked your cookies for too long, they may have dried out. Even a minute or two too long in the oven can make a big difference. Keep an eye on them, and take them out when the edges are just starting to firm up, but the center is still soft.
- Not Enough Fat: If your dough was missing enough butter or peanut butter, it could lead to dry cookies. Make sure you’re using the correct amount of fat, as it helps keep the cookies moist and soft.
- Using the Wrong Peanut Butter: Some peanut butters, especially the low-fat or powdered varieties, can make your cookies drier. Use a creamy, full-fat peanut butter for the best texture.
To fix dry cookies next time, remember to measure carefully, keep an eye on the baking time, and ensure the right balance of ingredients for that soft, chewy texture.
You May Also Like To Check Out These Recipes
- Mardi Gras King Cake
- Strawberry Crunch Cupcakes
- Chocolate Peanut Butter Cupcakes
- Red Velvet Cake Pops
- Valentine’s Day Sugar Cookies
- Baby Shower Cookies
- Red Velvet Cinnamon Rolls
- Red Velvet Pancakes
- Red Velvet Cheesecake Brownies
- Red Velvet Cheesecake Swirl Brownies
- Valentine’s Day Vanilla Nougat Candy Bar Bites
- Valentine’s Day Mini Heart Mousse Cakes
- Breakfast Egg Muffins
- Egg In A Hole
- Galentines Day Dessert Charcuterie Board
- Pina Colada
- Sweetheart Valentine Cake
- Red Velvet Cake
- Conversation Heart Cookies
- Valentine’s Day Heart Pizza
- Cherry Cobbler
- Red Velvet Crinkle Cookies
- Gluten-Free Black Bean Brownies
- Non-Alcoholic Italian Cream Soda
- Non-Alcoholic Strawberry Margarita
- Non-Alcoholic Cranberry Shirley Temple
- Non-Alcoholic Pineapple Mocktail
- Chocolate Strawberry Cake
- Chocolate Raspberry Cake
- Strawberry Sugar Cookies
- Red Velvet Cookies
- Lemon Raspberry Cookies
- Strawberries And Cream Cake
- Marble Heart Sugar Cookies
- Flourless Peanut Butter Chocolate Chunk Cookies
- Red Velvet Cake Mix Cookies
- Pink Ombre Cake
- Strawberry Cake Mix Cookies
- Strawberry Crunch Cookies
- Strawberry Shortcake Cookies
- Disneyland Raspberry White Chocolate Cookies
- Raspberry Cheesecake Cookies
- Heart Shaped Decorated Cookies
- Chocolate Cherry Cake
- Roasted Strawberry Cheesecake
- Pink Heart Shaped Cake With Strawberry Cream Cheese Frosting
- Chocolate Covered Strawberry Cake
- Beet Hummus
- Chocolate Chip Gooey Butter Cake
- Chocolate Raspberry Cupcakes From Cake Mix
- Panna Cotta With Raspberry Gelee
- Mini Dutch Baby Pancakes With Nutella
- Mini Dutch Pancakes With Warm Blueberry Sauce
- Chocolate Truffles With Condensed Milk
- Oreo Truffles Without Cream Cheese
- 3 Ingredient Oreo Balls Without Chocolate