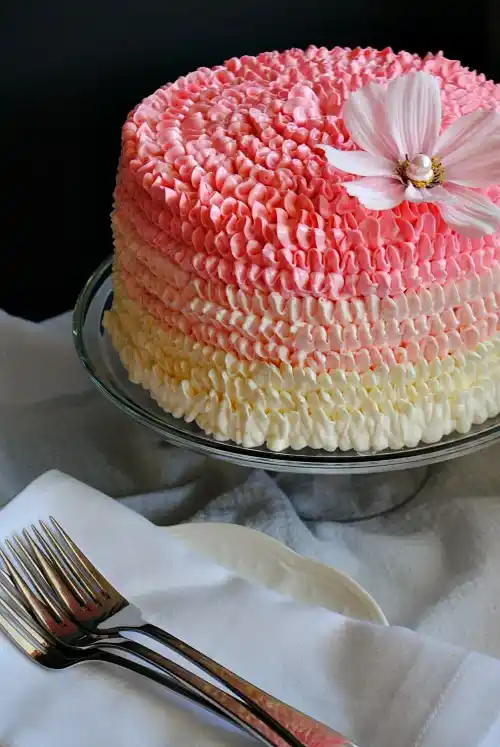
The first time I laid eyes on a pink ombre cake, I was captivated. The smooth, faded pink layers and elegant design seemed like something out of a dream.
I knew I had to try making one. My first attempt wasn’t perfect, but it sparked something in me—a love for creating cakes that are as beautiful as they are delicious.
This pink ombre cake is the perfect treat for any celebration. It’s simple enough to make at home, yet stunning enough to impress.
With easy-to-follow steps and a dreamy look, you’ll be able to create a showstopper cake that’s sure to be the highlight of any occasion.
Pink Ombre Cake Recipe
Ingredients
Cake Layers
- 2 ½ cups all-purpose flour (substitute with gluten-free all-purpose flour for gluten-free)
- 2 ½ tsp baking powder
- ½ tsp salt
- 1 cup unsalted butter, softened (use vegan butter for a vegan option)
- 2 cups granulated sugar
- 4 large eggs (replace with flax eggs for a vegan option: 1 tbsp flaxseed meal + 3 tbsp water per egg)
- 1 tsp vanilla extract
- 1 cup milk (use almond, oat, or soy milk for a vegan option)
- Pink food coloring (plant-based food colors work for vegan needs)
Frosting
- 8 large egg whites (replace with aquafaba for vegan: use 3 tbsp aquafaba per egg white)
- 2 cups granulated sugar
- 2 cups unsalted butter, room temperature (use vegan butter for a plant-based option)
- 2 tsp vanilla extract
Filling
- 1 small box instant chocolate pudding mix (use vegan chocolate pudding mix if needed)
- 1 cup milk (substitute with non-dairy milk for a vegan option)
- 4 oz cream cheese (use vegan cream cheese if required)
Instructions
For The Cake Layers
- Preheat the oven to 350°F (175°C). Grease and flour three 8-inch round cake pans or line them with parchment paper.
- In a bowl, whisk together flour, baking powder, and salt.
- In a separate bowl, beat the butter and sugar until fluffy. Add the eggs (or flax eggs), one at a time, mixing well after each addition. Stir in vanilla.
- Gradually alternate adding the dry ingredients and milk, starting and ending with the dry mixture. Mix until just combined.
- Divide the batter into three equal portions. Add increasing amounts of pink food coloring to each portion to create three shades. Pour each into its own prepared pan.
- Bake for 20–25 minutes or until a toothpick inserted in the center comes out clean. Cool completely on wire racks before assembling.
For The Frosting
- Combine egg whites (or aquafaba) and sugar in a heatproof bowl. Place it over a pot of simmering water, ensuring the bowl doesn’t touch the water. Whisk continuously until the sugar dissolves and the mixture is warm to the touch.
- Transfer the mixture to a stand mixer and beat on high until stiff peaks form and the bowl feels cool.
- Gradually add butter, one tablespoon at a time, until smooth and fluffy. Mix in vanilla extract.
For The Filling
- Beat cream cheese until smooth.
- Add pudding mix and a third of the milk, mixing well. Gradually incorporate the rest of the milk until smooth. Chill until ready to use.
Assembling The Cake
- Slice each cake layer horizontally to create six thin layers. Place one layer on your cake stand. Pipe a circle of frosting along the edge to act as a dam. Fill the center with a layer of pudding mixture. Repeat with remaining layers, ending with a cake layer on top.
- Apply a thin layer of frosting over the entire cake to seal in crumbs. Chill for 30 minutes.
- Divide the remaining frosting into three portions. Tint two portions with different shades of pink. Frost the cake starting with the darkest shade at the bottom, blending into lighter shades as you move up. Use a piping tip for decorative ruffles or smooth layers for a sleek look.
Expert Tips For A Show-Stopping Pink Ombre Cake
To make your pink ombre cake as perfect as possible, try these advanced tips that go beyond the basics:
- Use a scale for accuracy: Weigh your ingredients instead of using measuring cups. This ensures the right balance of wet and dry ingredients, helping your cake achieve a light, fluffy texture.
- Split the batter into even portions: When dividing the batter to create your ombre layers, use a kitchen scale to ensure each layer gets the same amount of batter for a balanced rise.
- Soften the frosting using a bit of milk: If your buttercream is too stiff, add a tablespoon of milk or cream to loosen it. This helps achieve a smoother finish when frosting your cake.
- Chill the layers before frosting: After your cake layers have cooled, place them in the fridge for about 30 minutes. Chilled cakes are easier to frost and handle, preventing the frosting from melting or slipping.
- Use a piping bag for smooth, clean edges: When adding the ombre effect to your frosting, use a piping bag with a flat tip for precision. This helps create neat, controlled color gradients and smooth edges.
How To Store Pink Ombre Cake?
To keep your cake as fresh and delicious as possible, follow these tips that ensure it stays perfect:
- Separate layers with parchment paper: If you need to store multiple cake layers, place a sheet of parchment paper between each one to prevent sticking and preserve the shape.
- Store in a cake box for stability: Use a cake box for added protection if you’re transporting your cake. It helps maintain its shape and prevents smudging.
- Wrap tightly for extra moisture: To keep your cake moist for longer, wrap it in plastic wrap, even if it’s refrigerated. This helps lock in the moisture and prevents the cake from drying out.
- Freeze the layers individually: If you’re prepping ahead, freeze your cake layers individually before assembling them. This preserves freshness and texture when you’re ready to frost.
How Far In Advance Can You Decorate A Pink Ombre Cake?
You can decorate a cake a day or two ahead of time, but there are a few things to keep in mind to ensure it stays fresh and looks its best:
- Decorate up to 24 hours in advance: A pink ombre cake can be decorated the day before serving, and it will still be fresh. Just make sure it’s stored properly so the frosting doesn’t dry out.
- Refrigerate the cake: If you’re decorating ahead of time, store the cake in the fridge. Cover it loosely with plastic wrap or place it in a cake box to keep it from absorbing any unwanted odors from the fridge.
- Leave the final touches for the day of serving: If you’re adding any delicate or fresh decorations (like edible flowers or fresh berries), it’s best to add them on the day of serving to prevent them from wilting or losing their look.
How Do You Make Cake Frosting Easier To Work With?
Sometimes frosting can be tricky to apply, but these tips will make the process smoother:
- Use softened butter: Cold butter can make your frosting too stiff. Make sure your butter is at room temperature to get a smooth, creamy consistency.
- Add a little milk or cream: If your frosting is too thick, add a tablespoon of milk or cream at a time to loosen it. This will make it easier to spread.
- Beat the frosting longer: If you find the frosting hard to work with, keep mixing it. The more you beat it, the smoother it will become.
- Chill the cake before frosting: After baking, let the cake cool completely before frosting it. If the cake is warm, the frosting will melt and slide off. Chilling the cake makes it easier to apply a smooth layer of frosting.
Why Is My Frosting Sliding Off The Cake?
If your frosting is sliding off the cake, don’t worry—here’s why it happens and how to fix it:
- The cake is too warm: If the cake is not fully cooled before frosting, the heat will cause the frosting to melt and slide off. Make sure the cake is completely cool before frosting.
- The frosting is too soft: If your frosting is too runny or soft, it won’t stick to the cake. Try adding more powdered sugar to thicken it, or refrigerate the frosting for 15-20 minutes before using it.
- Frosting consistency is off: Sometimes, frosting can be too thin or too thick. If it’s too thin, it won’t adhere properly. If it’s too thick, it will be hard to spread. Add a little milk or sugar to adjust the consistency until it’s just right.
- The cake isn’t crumb-coated: Before applying the final layer of frosting, apply a thin layer (crumb coat) to seal in any crumbs. This creates a smooth surface and helps the final frosting layer stick better.
You May Also Like To Check Out These Recipes
- Mardi Gras King Cake
- Strawberry Crunch Cupcakes
- Chocolate Peanut Butter Cupcakes
- Red Velvet Cake Pops
- Valentine’s Day Sugar Cookies
- Baby Shower Cookies
- Red Velvet Cinnamon Rolls
- Red Velvet Pancakes
- Red Velvet Cheesecake Brownies
- Red Velvet Cheesecake Swirl Brownies
- Valentine’s Day Vanilla Nougat Candy Bar Bites
- Valentine’s Day Mini Heart Mousse Cakes
- Breakfast Egg Muffins
- Egg In A Hole
- Galentines Day Dessert Charcuterie Board
- Pina Colada
- Sweetheart Valentine Cake
- Red Velvet Cake
- Conversation Heart Cookies
- Valentine’s Day Heart Pizza
- Cherry Cobbler
- Red Velvet Crinkle Cookies
- Gluten-Free Black Bean Brownies
- Non-Alcoholic Italian Cream Soda
- Non-Alcoholic Strawberry Margarita
- Non-Alcoholic Cranberry Shirley Temple
- Non-Alcoholic Pineapple Mocktail
- Chocolate Strawberry Cake
- Chocolate Raspberry Cake
- Strawberry Sugar Cookies
- Red Velvet Cookies
- Lemon Raspberry Cookies
- Strawberries And Cream Cake
- Marble Heart Sugar Cookies
- Red Velvet Peanut Butter Blossom Cookies
- Flourless Peanut Butter Chocolate Chunk Cookies
- Red Velvet Cake Mix Cookies
- Strawberry Cake Mix Cookies
- Strawberry Crunch Cookies
- Strawberry Shortcake Cookies
- Disneyland Raspberry White Chocolate Cookies
- Raspberry Cheesecake Cookies
- Heart Shaped Decorated Cookies
- Chocolate Cherry Cake
- Roasted Strawberry Cheesecake
- Pink Heart Shaped Cake With Strawberry Cream Cheese Frosting
- Chocolate Covered Strawberry Cake
- Beet Hummus
- Chocolate Chip Gooey Butter Cake
- Chocolate Raspberry Cupcakes From Cake Mix
- Panna Cotta With Raspberry Gelee
- Mini Dutch Baby Pancakes With Nutella
- Mini Dutch Pancakes With Warm Blueberry Sauce
- Chocolate Truffles With Condensed Milk
- Oreo Truffles Without Cream Cheese
- 3 Ingredient Oreo Balls Without Chocolate