Valentine’s Day has a way of making everything feel a little more special. For me, it’s not just about flowers or fancy dinners; it’s about creating something thoughtful and homemade.
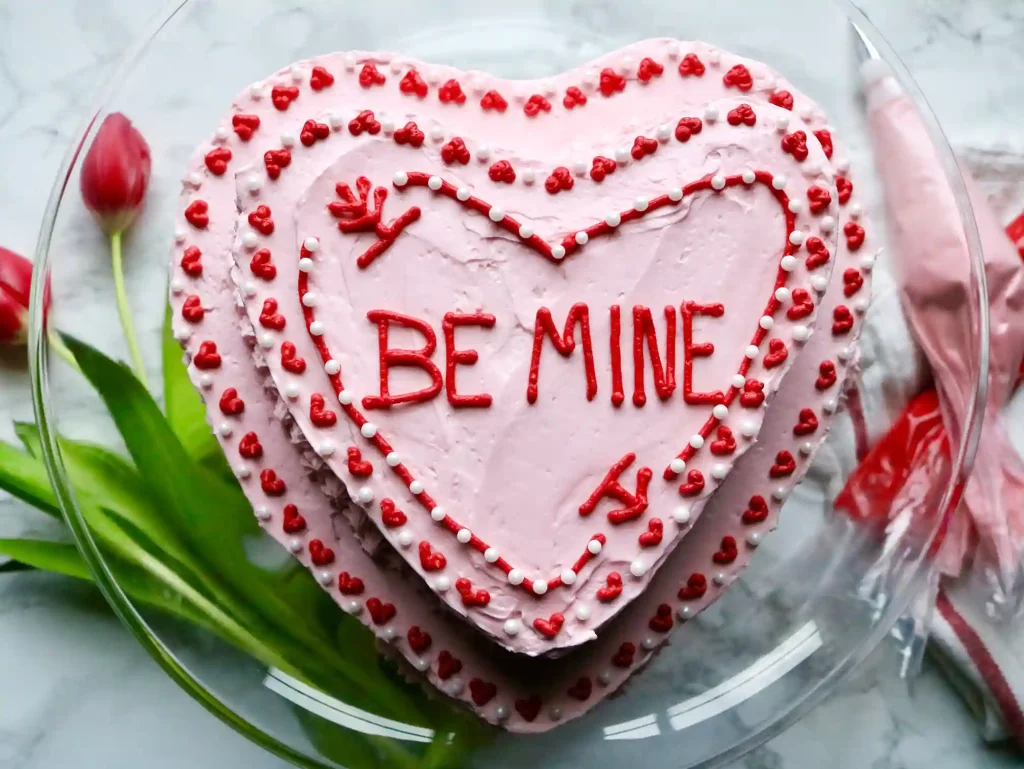
And nothing says “I care” quite like baking a beautiful cake for someone you love. Over the years, I’ve tried many Valentine’s-themed desserts, but there’s a charm in a heart-shaped cake that feels timeless and sweet. It’s not just a treat—it creates a memory.
I started experimenting with this recipe when I wanted a festive yet simple dessert to make without stress.
I also wanted it to feel personal, with just the right touch of color and flavor to match the holiday mood.
After a few tweaks and taste tests, this sweetheart Valentine cake became a favorite in my home.
It’s soft, moist, and infused with just the right hint of cherry flavor, balanced perfectly with a smooth vanilla frosting.
Whether you’re surprising your partner, your kids, or even your best friend, this cake is a heartfelt way to say “I love you.”
Sweetheart Valentine Cake Recipe
Ingredients
For The Cake
- 2 ½ cups + 1 tablespoon all-purpose flour
- 1 ½ cups granulated sugar
- ½ cup unsalted butter, softened
- ¾ cup plain yogurt or sour cream alternative
- ½ cup whole milk
- ½ cup cherry syrup or maraschino cherry juice
- 3 ½ teaspoons baking powder
- 1 teaspoon salt
- 1 teaspoon vanilla extract
- 3 large eggs
- ½ cup maraschino cherries, chopped
For The Frosting (Vanilla Buttercream)
- 4 large egg whites
- 1 cup granulated sugar
- 1 ½ cups (3 sticks) unsalted butter, at room temperature
- 1 teaspoon vanilla extract
- ½ teaspoon almond extract (optional)
- Pinch of salt
Instructions
For The Cake
- Preheat your oven to 350°F (175°C). Prepare two heart-shaped cake pans by greasing and lightly dusting with flour, then lining the bottoms with parchment paper.
- In a large mixing bowl, cream the sugar and softened butter together using a hand mixer or stand mixer until light and fluffy.
- Add the eggs one at a time, beating well after each addition. Mix in the vanilla extract and yogurt until smooth.
- In a separate bowl, whisk together 2 ½ cups of flour, baking powder, and salt.
- In a measuring cup, combine the milk and cherry syrup.
- Gradually add the dry ingredients and the milk mixture to the batter, alternating between the two and beginning and ending with the dry ingredients. Mix just until combined.
- Toss the chopped cherries with the remaining tablespoon of flour to prevent them from sinking in the batter, then gently fold them into the mixture.
- Divide the batter evenly between the prepared pans and smooth the tops with a spatula.
- Bake for 35-40 minutes or until a toothpick inserted in the center comes out clean. Let the cakes cool in the pans for 10 minutes, then transfer them to a wire rack to cool completely.
For The Frosting (Vanilla Buttercream)
- In a heatproof bowl (such as the bowl of a stand mixer), combine the egg whites and sugar. Place the bowl over a saucepan of simmering water, ensuring the bottom of the bowl doesn’t touch the water.
- Whisk constantly until the sugar dissolves completely. You can test by rubbing a little mixture between your fingers—there should be no grainy texture.
- Remove the bowl from the heat and attach it to a stand mixer fitted with a whisk attachment. Beat on high speed until stiff peaks form and the mixture cools to room temperature (about 8-10 minutes).
- Switch to the paddle attachment. Add the butter a few tablespoons at a time, beating well after each addition. The mixture may look curdled at first but will come together with continued mixing.
- Once smooth, mix in the vanilla extract, almond extract (if using), and a pinch of salt. Beat until fully incorporated and fluffy.
Cake Assembly
- Trim one of the cakes if necessary to create a concentric design. This ensures the smaller layer sits neatly on top of the larger one.
- Apply a thin layer of frosting (crumb coat) to both cakes separately.
- Stack the smaller cake on top of the larger one. Cover the entire cake with a thicker layer of frosting, smoothing it out evenly with a spatula.
- For decoration, use pink food coloring for the main frosting and red for writing or details. Use a piping bag with different tips for intricate designs like hearts, stars, or borders.
- Sprinkle sugar pearls or other decorations as desired.
Tips For Making The Sweetheart Valentine Cake
Want your cake to truly impress? These tips are specifically designed to help you elevate your cake game.
- Add a Surprise Center: Before baking, hollow out a small portion of the center of one cake layer. Once baked, fill it with a sweet filling like raspberry jam or chocolate ganache, then cover it with frosting. When you slice into the cake, you’ll reveal a delicious surprise inside!
- Swap Regular Sugar for Coconut Sugar: For a unique flavor twist, try swapping regular sugar with coconut sugar. It gives a subtle caramel-like flavor that works well with the sweetness of the cake and frosting.
- Use a Cake Flour Blend: If you want a super soft and fluffy cake, mix half regular flour and half cake flour. Cake flour makes cakes lighter and airier, giving your Valentine’s cake a melt-in-your-mouth texture.
- Bake at a Lower Temperature: If your cake often gets dry in the oven, try baking it at a slightly lower temperature (around 325°F) for a longer time. This allows the cake to bake more evenly and prevents the outside from becoming too dry before the inside is fully cooked.
- Frosting Tip: Let Your Frosting Set: After frosting the cake, allow it to sit at room temperature for about 15 minutes before adding any decorative touches like sprinkles or piping. This helps the frosting firm up a bit, making it easier to work with and giving a cleaner finish.
- Infuse Your Frosting: Want to take your frosting up a notch? Add a teaspoon of flavored extract like rose water, almond, or even a hint of vanilla bean paste to the buttercream. This will give the frosting a unique, aromatic flavor that pairs beautifully with the sweet cherry cake.
Variations For Sweetheart Valentine Cake
Here are some unexpected twists you can try that’ll make your cake extra special:
- Swap the Cherry Juice with Pomegranate Juice: If you’re not keen on maraschino cherries, use pomegranate juice to flavor the cake. It adds a gorgeous color and a sweet, tart flavor.
- Try a Layered Cake: Instead of just frosting the outside, turn the cake into a stunning layered masterpiece by spreading frosting and jam between multiple layers. Each slice will reveal beautifully stacked colors and textures.
- Chill Your Cake Layers: After baking, let your cake layers chill in the fridge for at least 30 minutes before frosting. This makes frosting much easier to spread evenly and prevents it from sliding off the cake.
- Use Natural Food Color: Instead of artificial food coloring, try using beet juice or matcha powder to tint your frosting. These natural alternatives add vibrant color without the artificial additives.
- Play with Edible Flowers: Garnish the cake with edible flowers such as rose petals, lavender, or violets. They add a delicate and romantic touch that’s perfect for Valentine’s Day.
What To Serve With Valentine Cake?
Want a little extra on the side to make your Valentine’s celebration even more special? Try these options:
- Roasted nuts (almonds, cashews, or pistachios)
- Mini quiches or savory tartlets
- Chocolate mousse
- Panna cotta
- Chocolate truffles
- Fresh strawberry or raspberry sorbet
- Lemon or berry granita
- Lightly sweetened whipped mascarpone cheese
How To Store Your Sweetheart Valentine Cake?
Properly storing your cake will keep it fresh and tasting great for longer. Here’s how to do it the right way:
- Storing Unfrosted Cake Layers: If you’ve baked the cake ahead of time, store the unfrosted cake layers in an airtight container. They can be kept at room temperature for up to 3 days or in the fridge for up to a week.
- Keep Frosting Separate: If you plan to store leftover frosting, keep it in an airtight container in the fridge for up to a week. When ready to use, let it come to room temperature and re-whip for a smooth consistency.
- Store Assembled Cake in the Fridge: Once the cake is frosted, wrap it tightly in plastic wrap or place it in an airtight container. Keep it in the fridge for up to 4 days. This helps the flavors to meld and the frosting to firm up a little.
- Freezing the Cake: For long-term storage, wrap the assembled cake tightly in plastic wrap and then foil. Freeze for up to 2 months. Thaw overnight in the fridge before serving, and refresh the frosting if needed.
7 Essential Rules For Baking The Perfect Cake
Baking a perfect cake doesn’t need to be complicated. These 7 rules will ensure your cake comes out moist, fluffy, and delicious every time.
- Measure Ingredients Correctly: Accurate measurements are the key to a perfect cake. Too much or too little of an ingredient can change the texture and taste of your cake. Always use measuring cups and spoons, or better yet, a kitchen scale for precise amounts.
- Use Room Temperature Ingredients: Butter, eggs, and other ingredients should be at room temperature before mixing. This helps them blend smoothly, creating a consistent batter and a light, fluffy texture.
- Preheat Your Oven: Always preheat your oven to the correct temperature before you start baking. A cold oven can lead to uneven baking, affecting both texture and appearance.
- Don’t Overmix the Batter: Mixing the cake batter for too long can make it dense. Once the wet and dry ingredients are combined, mix gently until just incorporated. Overmixing activates gluten, which can toughen your cake.
- Grease and Line Your Pans Properly: Greasing and flouring your pans, or using parchment paper, ensures the cake comes out smoothly after baking. It also prevents any sticking and uneven edges.
- Use the Right Baking Pans: Using the correct size and shape of baking pans is important. If your pans are too small or too large, the cake will bake unevenly. Always check the recipe for pan size recommendations.
- Test for Doneness: Before removing the cake from the oven, check for doneness by inserting a toothpick into the center. If it comes out clean or with a few crumbs, the cake is done. If it’s still wet, let it bake for a few more minutes.
How Far In Advance Can You Make Your Cake?
It’s important to plan when you bake your cake, especially if it’s for a special event. Here’s the best timing for preparing your cake ahead of time:
- Make It 1-2 Days Before the Event: For the freshest cake, aim to bake it 1 to 2 days before your event. This gives you enough time to frost and decorate the cake, while still keeping it fresh. The flavors also have a chance to develop, and the cake will be easier to cut.
- Refrigerate the Cake: If you make your cake more than a day ahead, store it in an airtight container in the fridge. This helps preserve its freshness. Just make sure to bring it to room temperature before serving.
- Freezing for Longer Storage: If you need to bake the cake even further in advance, you can freeze it. Wrap the un-frosted cake layers tightly in plastic wrap and foil, and freeze for up to 2-3 months. When you’re ready to use, thaw it in the fridge overnight and frost it.
You May Also Like To Check Out These Recipes
- Mardi Gras King Cake
- Strawberry Crunch Cupcakes
- Chocolate Peanut Butter Cupcakes
- Red Velvet Cake Pops
- Valentine’s Day Sugar Cookies
- Baby Shower Cookies
- Red Velvet Cinnamon Rolls
- Red Velvet Pancakes
- Red Velvet Cheesecake Brownies
- Red Velvet Cheesecake Swirl Brownies
- Valentine’s Day Vanilla Nougat Candy Bar Bites
- Valentine’s Day Mini Heart Mousse Cakes
- Homemade In N Out Burger With In N Out Sauce
- Crockpot Butter Chicken
- Spinach Stuffed Chicken Breasts
- Marry Me Chicken
- How To Make Ribeye Steak In The Oven
- Breakfast Egg Muffins
- Egg In A Hole
- Galentines Day Dessert Charcuterie Board
- Red Velvet Cake
- Conversation Heart Cookies
- Valentine’s Day Heart Pizza
- Chicken Fettuccine Alfredo
- Baked Asparagus With Parmesan Cheese
- Steak Marinade
- Cherry Cobbler
- Red Velvet Crinkle Cookies
- Gluten-Free Black Bean Brownies
- Non-Alcoholic Italian Cream Soda
- Non-Alcoholic Strawberry Margarita
- Non-Alcoholic Cranberry Shirley Temple
- Non-Alcoholic Pineapple Mocktail
- Chocolate Strawberry Cake
- Chocolate Raspberry Cake
- Strawberry Sugar Cookies
- Red Velvet Cookies
- Lemon Raspberry Cookies
- Strawberries And Cream Cake
- Marble Heart Sugar Cookies
- Red Velvet Peanut Butter Blossom Cookies
- Flourless Peanut Butter Chocolate Chunk Cookies
- Red Velvet Cake Mix Cookies
- Pink Ombre Cake
- Strawberry Cake Mix Cookies
- Strawberry Crunch Cookies
- Strawberry Shortcake Cookies
- Disneyland Raspberry White Chocolate Cookies
- Raspberry Cheesecake Cookies
- Heart Shaped Decorated Cookies
- Chocolate Cherry Cake
- Roasted Strawberry Cheesecake
- Pink Heart Shaped Cake With Strawberry Cream Cheese Frosting
- Chocolate Covered Strawberry Cake
- Beet Hummus
- Chicken Tetrazzini
- Beef Manicotti
- Strawberry Fudge
- Shrimp Dip
- Corn Dip
- Herb Olive Oil Dip
- Bean Dip
- Air Fryer Jalapeno Poppers
- Creamy Carbonara With Cream Of Mushroom
- Chocolate Chip Gooey Butter Cake
- Chocolate Raspberry Cupcakes From Cake Mix
- Pina Colada