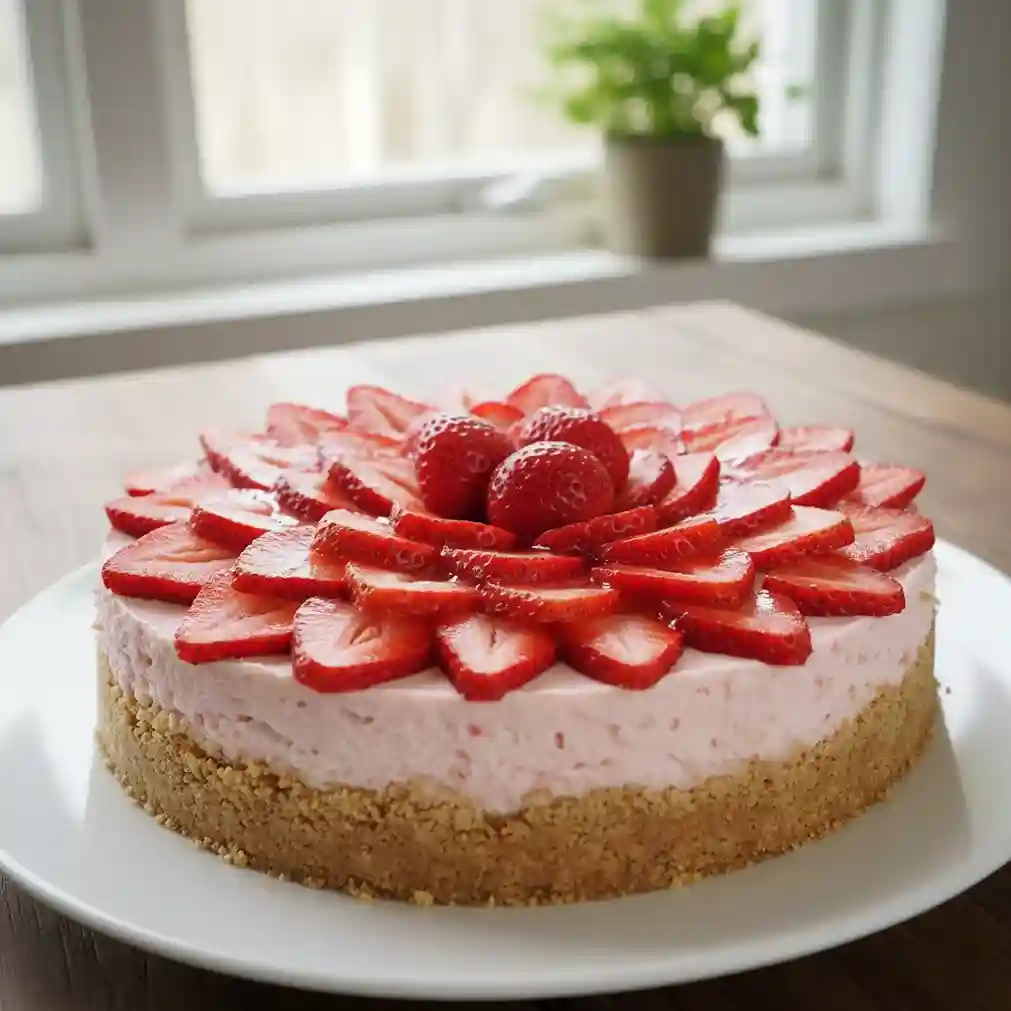
Need a showstopping dessert that looks bakery-fancy but secretly takes almost zero effort? This no bake strawberry cheesecake is your answer.
It’s the perfect make-ahead dessert for warm days, dinner parties, family gatherings, or anytime you want something impressive without turning on the oven.
The special magic here is how quickly it comes together and how it chills into pure creamy luxury, giving you maximum “wow” with minimum stress.
One bite and you get a dreamy mix of fresh strawberry flavor and sweet, tangy creaminess. The filling is silky and light, yet rich enough to feel indulgent.
Juicy bursts of strawberries inside the cheesecake add freshness, while the glossy strawberry topping brings bright fruit flavor in every forkful.
Underneath it all is a buttery, slightly crumbly biscuit crust that gives just the right contrast to the smooth, mousse-like center.
Fresh strawberries and a simple homemade strawberry layer are the real stars, turning this into a dessert that tastes as beautiful as it looks.
You don’t need advanced skills or special equipment. This recipe is beginner-friendly and mostly hands-off once it’s chilling. You can even switch the berries or make mini versions if you like.
Follow along and you’ll end up with a stunning, sliceable cheesecake that’s guaranteed to become one of your most requested desserts.
Table of Contents
No Bake Strawberry Cheesecake Recipe
Ingredients
- 200 g digestive biscuits or graham crackers, finely crushed
- 100 g unsalted butter, melted
- 400 g cream cheese, softened to room temperature
- 200 ml whipping cream, cold
- 120 g powdered sugar
- 1 tsp vanilla extract
- 150 g fresh strawberries, finely chopped
- 2 tbsp cold water
- 2 tsp agar agar powder
For the strawberry topping
- 200 g fresh strawberries, chopped
- 60 g granulated sugar
- 1 tbsp lemon juice
- 1 tsp cornstarch
- 2 tbsp water
For decoration
- 6–8 fresh strawberries, halved
Instructions
- In a bowl, mix the 200 g crushed biscuits with 100 g melted butter until the texture looks like wet sand and holds together when pressed.
- Tip the mixture into an 8-inch (20 cm) springform pan. Press it down firmly and evenly using the back of a spoon or the bottom of a glass. Make sure the edges are slightly raised for a neat crust.
- Place the pan in the refrigerator for at least 20–30 minutes so the base can firm up.
- In a small saucepan, combine 2 tbsp cold water and 2 tsp agar agar powder. Let it sit for 5 minutes, then heat gently while stirring until it comes to a light simmer. Cook for 1–2 minutes until fully dissolved, then remove from heat and let it cool slightly (do not let it set).
- In a large mixing bowl, beat 400 g softened cream cheese, 120 g powdered sugar, and 1 tsp vanilla extract until completely smooth and creamy with no lumps.
- In a separate bowl, whip 200 ml cold whipping cream until soft to medium peaks form. It should be fluffy but not stiff.
- Gently fold the whipped cream into the cream cheese mixture in batches, keeping the mixture light and airy.
- Stir the slightly cooled agar mixture into the cheesecake filling and mix quickly but gently to combine evenly.
- Fold in 150 g finely chopped fresh strawberries, distributing them throughout the filling.
- Pour the cheesecake mixture over the chilled crust and smooth the top with a spatula. Tap the pan lightly on the counter to remove air bubbles.
- Place the cheesecake in the refrigerator and chill for at least 4 hours, or until fully set and firm to the touch.
- For the topping, add 200 g chopped strawberries, 60 g sugar, and 1 tbsp lemon juice to a small saucepan. Cook over medium heat until the strawberries release juice and soften.
- In a small bowl, mix 1 tsp cornstarch with 2 tbsp water to make a slurry. Stir this into the strawberry mixture and cook for another 1–2 minutes until thick and glossy.
- Remove the topping from heat and let it cool completely to room temperature. It will thicken more as it cools.
- Once the cheesecake is fully set, gently spread the cooled strawberry topping over the surface in an even layer.
- Arrange the halved fresh strawberries around the edge or on top as desired.
- Chill the cheesecake for another 30–60 minutes to let the topping set before slicing.
Why Is My No Bake Strawberry Cheesecake Not Setting Properly?
If your no bake strawberry cheesecake feels too soft or loose, it usually comes down to balance and temperature. This dessert sets by chilling, not baking, so every step matters. The most common reasons include:
- Cream cheese temperature: if it is too cold, it won’t blend smoothly and can weaken the structure.
- Whipping cream consistency: if the cream is under-whipped, it cannot hold the filling firm.
- Chilling time: this cheesecake needs enough time in the refrigerator to fully set.
To fix this, always use room-temperature cream cheese, whip the cream to soft but stable peaks, and chill the cheesecake for at least 6 hours or overnight. Patience is what gives you clean slices.
Can I Use Frozen Strawberries For No Bake Strawberry Cheesecake?
Yes, you can use frozen strawberries, but you need to handle them carefully to avoid excess moisture. Here’s how to use them properly:
- Thawing: let the strawberries thaw completely in the refrigerator.
- Draining: strain out all excess liquid before chopping or mashing.
- Concentrating flavor: lightly mash them with sugar to keep the taste strong without watering down the filling.
Fresh strawberries give the best texture, but frozen ones work well when fresh fruit is not available.
How Long Does No Bake Strawberry Cheesecake Need To Chill?
No bake strawberry cheesecake needs enough chilling time to become sliceable and creamy at the same time. For best results:
- Minimum chill time: 6 hours for basic firmness.
- Ideal chill time: overnight for clean cuts and full flavor.
- Before serving: let it sit at room temperature for 5–10 minutes so it slices smoothly.
Rushing the chill time is the most common mistake, so give it the time it deserves.
Can I Make No Bake Strawberry Cheesecake Ahead Of Time?
This dessert is perfect for making ahead, which is one of its biggest advantages. Making it in advance helps because:
- Flavor development: the strawberry and cream cheese flavors blend better over time.
- Better texture: chilling longer improves firmness and slice quality.
- Stress-free serving: dessert is already done when you need it.
You can prepare it up to 24 hours before serving and keep it refrigerated until ready to decorate and slice.
How Do I Store Leftover No Bake Strawberry Cheesecake?
Proper storage keeps your cheesecake fresh, creamy, and safe to eat. Follow these storage tips:
- Refrigerator: store leftovers in an airtight container or cover the pan tightly for up to 3 days.
- Separation: keep it away from strong-smelling foods to prevent flavor absorption.
- Slicing: store slices flat so the topping stays neat.
Always return the cheesecake to the refrigerator as soon as possible after serving.
Can You Freeze No Bake Strawberry Cheesecake?
Yes, no bake strawberry cheesecake freezes well if done correctly. To freeze successfully:
- Without topping: freeze the cheesecake without fresh strawberry topping for best texture.
- Wrapping: wrap tightly in plastic wrap, then foil to prevent freezer burn.
- Freezing time: freeze for up to 1 month for best quality.
To thaw, move it to the refrigerator and let it thaw slowly overnight. Add fresh strawberries after thawing for the best finish.
Why Did My Biscuit Base Turn Too Hard Or Too Crumbly?
The biscuit base depends on the correct butter-to-crumb ratio. If the base feels wrong, here’s why:
- Too hard: too much butter or pressing too firmly into the pan.
- Too crumbly: too little butter or uneven mixing.
- Uneven texture: crumbs not crushed finely enough.
The base should feel compact but still easy to cut with a fork.
Can I Make This No Bake Strawberry Cheesecake Without A Springform Pan?
Yes, you can still make it even if you don’t have a springform pan. Good alternatives include:
- Regular cake pan: line it fully with parchment paper so you can lift it out.
- Glass dish: serve directly from the dish for a casual presentation.
- Individual cups: layer the base and filling in glasses for easy serving.
The taste stays the same; only the presentation changes.
How Do I Get Clean, Neat Slices When Serving?
Clean slices make your cheesecake look professional and polished. For perfect slices:
- Knife temperature: use a warm knife and wipe it clean between cuts.
- Chilled cheesecake: slice only when fully set and cold.
- Gentle pressure: press straight down without dragging the knife.
These small steps make a big difference in presentation.

No Bake Strawberry Cheesecake
Ingredients
Method
- In a bowl, mix the 200 g crushed biscuits with 100 g melted butter until the texture looks like wet sand and holds together when pressed.
- Tip the mixture into an 8-inch (20 cm) springform pan. Press it down firmly and evenly using the back of a spoon or the bottom of a glass. Make sure the edges are slightly raised for a neat crust.
- Place the pan in the refrigerator for at least 20–30 minutes so the base can firm up.
- In a small saucepan, combine 2 tbsp cold water and 2 tsp agar agar powder. Let it sit for 5 minutes, then heat gently while stirring until it comes to a light simmer. Cook for 1–2 minutes until fully dissolved, then remove from heat and let it cool slightly (do not let it set).
- In a large mixing bowl, beat 400 g softened cream cheese, 120 g powdered sugar, and 1 tsp vanilla extract until completely smooth and creamy with no lumps.
- In a separate bowl, whip 200 ml cold whipping cream until soft to medium peaks form. It should be fluffy but not stiff.
- Gently fold the whipped cream into the cream cheese mixture in batches, keeping the mixture light and airy.
- Stir the slightly cooled agar mixture into the cheesecake filling and mix quickly but gently to combine evenly.
- Fold in 150 g finely chopped fresh strawberries, distributing them throughout the filling.
- Pour the cheesecake mixture over the chilled crust and smooth the top with a spatula. Tap the pan lightly on the counter to remove air bubbles.
- Place the cheesecake in the refrigerator and chill for at least 4 hours, or until fully set and firm to the touch.
- For the topping, add 200 g chopped strawberries, 60 g sugar, and 1 tbsp lemon juice to a small saucepan. Cook over medium heat until the strawberries release juice and soften.
- In a small bowl, mix 1 tsp cornstarch with 2 tbsp water to make a slurry. Stir this into the strawberry mixture and cook for another 1–2 minutes until thick and glossy.
- Remove the topping from heat and let it cool completely to room temperature. It will thicken more as it cools.
- Once the cheesecake is fully set, gently spread the cooled strawberry topping over the surface in an even layer.
- Arrange the halved fresh strawberries around the edge or on top as desired.
- Chill the cheesecake for another 30–60 minutes to let the topping set before slicing.
You May Also Like To Check Out These Recipes
- Strawberry Crunch Cupcakes
- Chocolate Peanut Butter Cupcakes
- Red Velvet Cake Pops
- Valentine’s Day Sugar Cookies
- Baby Shower Cookies
- Red Velvet Cinnamon Rolls
- Red Velvet Pancakes
- Red Velvet Cheesecake Brownies
- Red Velvet Cheesecake Swirl Brownies
- Valentine’s Day Vanilla Nougat Candy Bar Bites
- Valentine’s Day Mini Heart Mousse Cakes
- Sweetheart Valentine Cake
- Red Velvet Cake
- Conversation Heart Cookies
- Cherry Cobbler
- Red Velvet Crinkle Cookies
- Gluten-Free Black Bean Brownies
- Chocolate Strawberry Cake
- Chocolate Raspberry Cake
- Strawberry Sugar Cookies
- Red Velvet Cookies
- Lemon Raspberry Cookies
- Strawberries And Cream Cake
- Marble Heart Sugar Cookies
- Red Velvet Peanut Butter Blossom Cookies
- Flourless Peanut Butter Chocolate Chunk Cookies
- Red Velvet Cake Mix Cookies
- Pink Ombre Cake
- Strawberry Cake Mix Cookies
- Strawberry Crunch Cookies
- Strawberry Shortcake Cookies
- Disneyland Raspberry White Chocolate Cookies
- Raspberry Cheesecake Cookies
- Heart Shaped Decorated Cookies
- Chocolate Cherry Cake
- Roasted Strawberry Cheesecake
- Pink Heart Shaped Cake With Strawberry Cream Cheese Frosting
- Chocolate Covered Strawberry Cake
- Beet Hummus
- Strawberry Fudge
- Chocolate Chip Gooey Butter Cake
- Chocolate Raspberry Cupcakes From Cake Mix
- Panna Cotta With Raspberry Gelee
- Chocolate Truffles With Condensed Milk
- Oreo Truffles Without Cream Cheese
- 3 Ingredient Oreo Balls Without Chocolate
- Pink Princess Cupcakes
- Strawberry Pretzel Jello Salad
- Fruit Dip With Marshmallow Fluff
- Pink Velvet Cake
- Strawberry Mousse