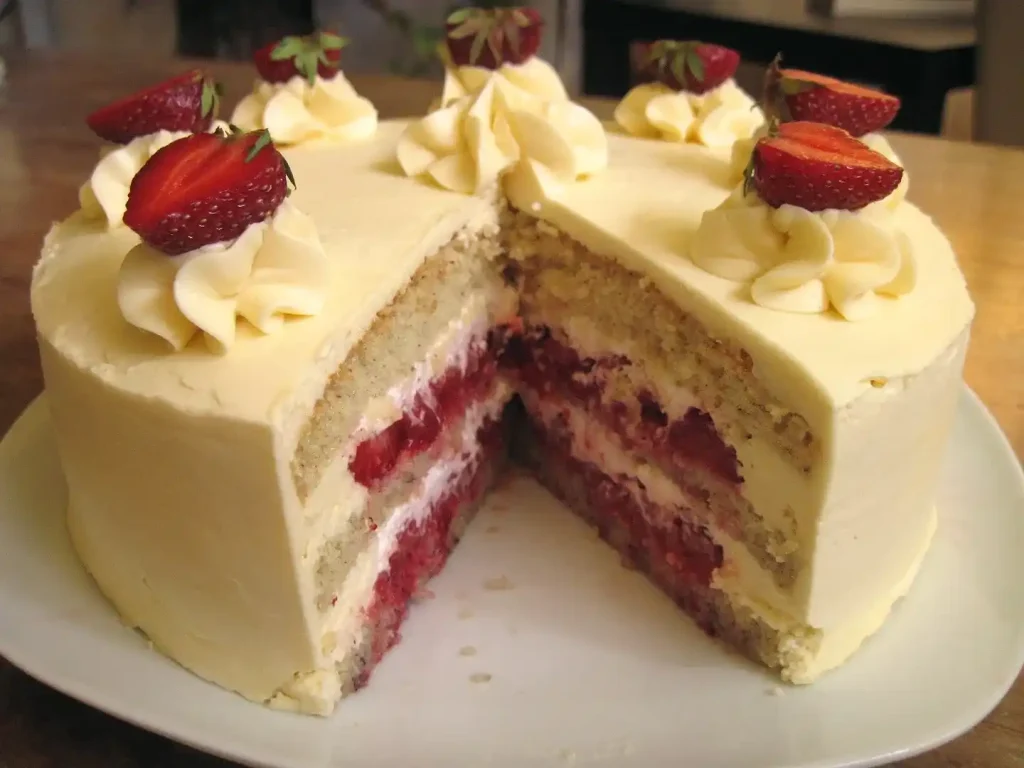
Sometimes the simplest things bring the most joy, and for me, that’s a homemade strawberries and cream cake.
I’ve been thinking about making this cake for a while now—it’s that perfect blend of fresh fruit, creamy goodness, and just the right amount of sweetness.
Whether it’s for a birthday, a celebration, or just because, this cake feels like a gift all on its own.
There’s something incredibly satisfying about baking a cake from scratch, especially when it turns out just as you hoped.
The idea of layering soft, delicate cake with fresh strawberries and rich cream is something I can’t resist.
The best part? It’s not just a treat for your taste buds—it’s a cake that looks as good as it tastes.
Trust me, once you slice into this beauty, you’ll know exactly what I mean! Ready to make it? Let’s get started.
Strawberries And Cream Cake Recipe
Ingredients
For The Hazelnut Genoise Cake
- 1 cup cake flour (sifted)
- 1/3 cup ground hazelnuts (or substitute with ground almonds for a nut-free option)
- 1 tbsp white sugar
- 1/8 tsp salt
- 4 large eggs (room temperature)
- 1/2 cup sugar (less 1 tbsp)
- 1 tsp vanilla extract
- 2 tbsp unsalted butter (for non-dairy use, substitute with vegetable oil or coconut oil)
For The Vanilla Custard Buttercream
- 2 egg yolks (for a vegan version, use 2 tbsp cornstarch mixed with 1/4 cup water)
- 2 tbsp sugar
- 2/3 cup whole milk (use almond or oat milk for a dairy-free option)
- 1/2 tsp vanilla extract
- 2 cups unsalted butter (use vegan butter or coconut oil as a substitute)
- 1/3 cup sugar (for meringue)
- 2 egg whites (for vegan option, substitute with aquafaba)
For The Strawberries And Cream Filling
- 2 pints fresh strawberries (hulled and sliced)
- 1/4 – 1/3 cup sugar (adjust to taste)
- 1/2 cup heavy cream (use coconut cream for a dairy-free version)
- 1 tbsp sour cream (use dairy-free sour cream if needed)
- 1 tsp sugar
Instructions
Step 1: Preparing The Cake
- Preheat your oven to 350°F (175°C). Grease an 8-inch cake pan and line it with parchment paper.
- Sift together cake flour, ground hazelnuts, sugar, and salt into a large bowl. Set aside.
- In a mixer, beat the eggs and sugar on high speed until the mixture is thick, pale, and fluffy (about 3-4 minutes). Add vanilla extract.
- Melt the butter and keep it warm. Gently fold the flour mixture into the egg mixture, one-third at a time, being careful not to deflate the batter.
- Take 1 cup of the batter and mix it into the melted butter, then fold it back into the rest of the batter.
- Pour the batter into the prepared cake pan and bake for 25-27 minutes. Check for doneness by gently pressing the center; it should spring back.
- Allow the cake to cool for 5 minutes, then remove it from the pan and let it cool completely.
Step 2: Making The Custard Buttercream
- In a saucepan, heat the milk and vanilla extract until it simmers. In a separate bowl, whisk the egg yolks and sugar until thick and pale.
- Slowly temper the egg mixture with hot milk, whisking constantly, then return it all to the saucepan. Cook over medium heat until it reaches 185°F (85°C).
- Strain the custard into a bowl and let it cool completely, covering the surface with plastic wrap to prevent a skin from forming.
- Beat the butter in a mixer until light and fluffy. Gradually add the cooled custard, mixing until smooth.
- In a separate bowl, whisk the egg whites (or aquafaba) and sugar until stiff peaks form. Gently fold the meringue into the butter-custard mixture.
Step 3: Preparing The Strawberries And Cream Filling
- Mix the sliced strawberries with sugar and let them macerate for about an hour. Gently crush them with a fork to release their juices.
- Whip the heavy cream (or coconut cream) with sugar until medium peaks form.
Step 4: Assembling The Cake
- Once the genoise cake is completely cooled, slice it into three even layers.
- Place the bottom layer on your cake stand or serving plate. Pipe a border of buttercream around the edge to contain the filling.
- Fill the inside with half of the macerated strawberries, followed by half of the whipped cream.
- Repeat the process with the second cake layer, strawberries, and whipped cream.
- Place the final layer of cake on top and gently press down.
- Coat the cake with a thin layer of buttercream to crumb-coat it, and refrigerate for about 20 minutes.
- Once chilled, frost the cake with a smooth layer of buttercream and decorate with rosettes on top.
Step 5: Final Touches
- Let the cake chill in the refrigerator for several hours (or overnight) to allow the flavors to meld together.
- Before serving, let the cake sit at room temperature for a few minutes so the buttercream softens slightly.
Tips For Making Strawberries And Cream Cake A Success
Creating a strawberry and cream cake is a rewarding experience, but a few tips can ensure your cake turns out even better. Here are some simple pointers to help you achieve the best results:
- Use Fresh Strawberries: Fresh strawberries work best for a juicy, sweet flavor that adds to the cake’s richness. Choose berries that are ripe but not overripe.
- Don’t Overmix the Cake Batter: Mix just until the ingredients are combined to keep the cake light and fluffy.
- Chill the Cake Layers: After baking, let the cake cool completely before frosting. This makes it easier to work with and prevents the frosting from melting.
- Use a Light Hand with the Frosting: The cream layer should complement the strawberries, not overpower them. Spread it lightly for the best balance.
- Assemble Just Before Serving: To keep your cake fresh and prevent sogginess, assemble the cake just before serving.
How To Store Strawberries And Cream Cake?
Storing a strawberry and cream cake properly is essential for keeping it fresh and tasty. Here’s how to store it the right way:
- Refrigerate: Always store your strawberry and cream cake in the fridge to keep the fresh cream and strawberries from spoiling.
- Cover with Plastic Wrap or an Airtight Container: Wrap the cake in plastic wrap or place it in an airtight container to prevent it from drying out and absorbing any odors from the fridge.
- Serve Within a Few Days: For the best flavor and texture, try to eat the cake within 2-3 days. After this, the cake may start to lose its freshness.
How To Keep Strawberries From Getting Soggy On Cakes?
Strawberries can add a refreshing, juicy flavor to cakes, but sometimes they can become soggy and make your cake messy.
Here’s how to keep strawberries fresh and prevent them from making the cake soggy:
- Pat Strawberries Dry: Before placing strawberries on your cake, make sure they’re dry. Excess moisture can lead to sogginess, so gently pat them with a paper towel.
- Slice Strawberries Just Before Using: Slice your strawberries right before you use them. This prevents them from releasing too much liquid and making the cake soggy.
- Macerate Strawberries with Sugar: If you want to bring out the sweetness of the berries, lightly sprinkle sugar over sliced strawberries and let them sit for about an hour. The sugar draws out the juice, but it can help firm up the strawberries, preventing them from becoming too watery.
- Use a Barrier: If you’re using whipped cream, custard, or another layer between the strawberries and the cake, this can act as a protective barrier, preventing the moisture from soaking into the cake.
How Long Will A Cake With Fresh Strawberries Last?
Fresh strawberry cakes are delicious, but they don’t last as long as other cakes. Here’s how to store them and keep them fresh:
- Refrigeration: Store your cake in the fridge right away. With proper storage, it will stay fresh for 2-3 days. Be sure to cover it with plastic wrap or place it in an airtight container to prevent it from drying out.
- Texture Issues: Over time, the moisture from the strawberries can make the cake soggy. To enjoy it at its best, try to finish the cake within 2 days.
- Freezing: If you want to save some for later, it’s best to freeze the cake without the fresh strawberries on top, as freezing alters their texture. Wrap the cake well, and freeze for up to 1-2 months. Add fresh strawberries when you’re ready to serve.
You May Also Like To Check Out These Recipes
- Mardi Gras King Cake
- Strawberry Crunch Cupcakes
- Chocolate Peanut Butter Cupcakes
- Red Velvet Cake Pops
- Valentine’s Day Sugar Cookies
- Baby Shower Cookies
- Red Velvet Cinnamon Rolls
- Red Velvet Pancakes
- Red Velvet Cheesecake Brownies
- Red Velvet Cheesecake Swirl Brownies
- Valentine’s Day Vanilla Nougat Candy Bar Bites
- Valentine’s Day Mini Heart Mousse Cakes
- Breakfast Egg Muffins
- Egg In A Hole
- Galentines Day Dessert Charcuterie Board
- Pina Colada
- Sweetheart Valentine Cake
- Red Velvet Cake
- Conversation Heart Cookies
- Valentine’s Day Heart Pizza
- Cherry Cobbler
- Red Velvet Crinkle Cookies
- Gluten-Free Black Bean Brownies
- Non-Alcoholic Italian Cream Soda
- Non-Alcoholic Strawberry Margarita
- Non-Alcoholic Cranberry Shirley Temple
- Non-Alcoholic Pineapple Mocktail
- Chocolate Strawberry Cake
- Chocolate Raspberry Cake
- Strawberry Sugar Cookies
- Red Velvet Cookies
- Lemon Raspberry Cookies
- Marble Heart Sugar Cookies
- Red Velvet Peanut Butter Blossom Cookies
- Flourless Peanut Butter Chocolate Chunk Cookies
- Red Velvet Cake Mix Cookies
- Pink Ombre Cake
- Strawberry Cake Mix Cookies
- Strawberry Crunch Cookies
- Strawberry Shortcake Cookies
- Disneyland Raspberry White Chocolate Cookies
- Raspberry Cheesecake Cookies
- Heart Shaped Decorated Cookies
- Chocolate Cherry Cake
- Roasted Strawberry Cheesecake
- Pink Heart Shaped Cake With Strawberry Cream Cheese Frosting
- Chocolate Covered Strawberry Cake
- Beet Hummus
- Chocolate Chip Gooey Butter Cake
- Chocolate Raspberry Cupcakes From Cake Mix