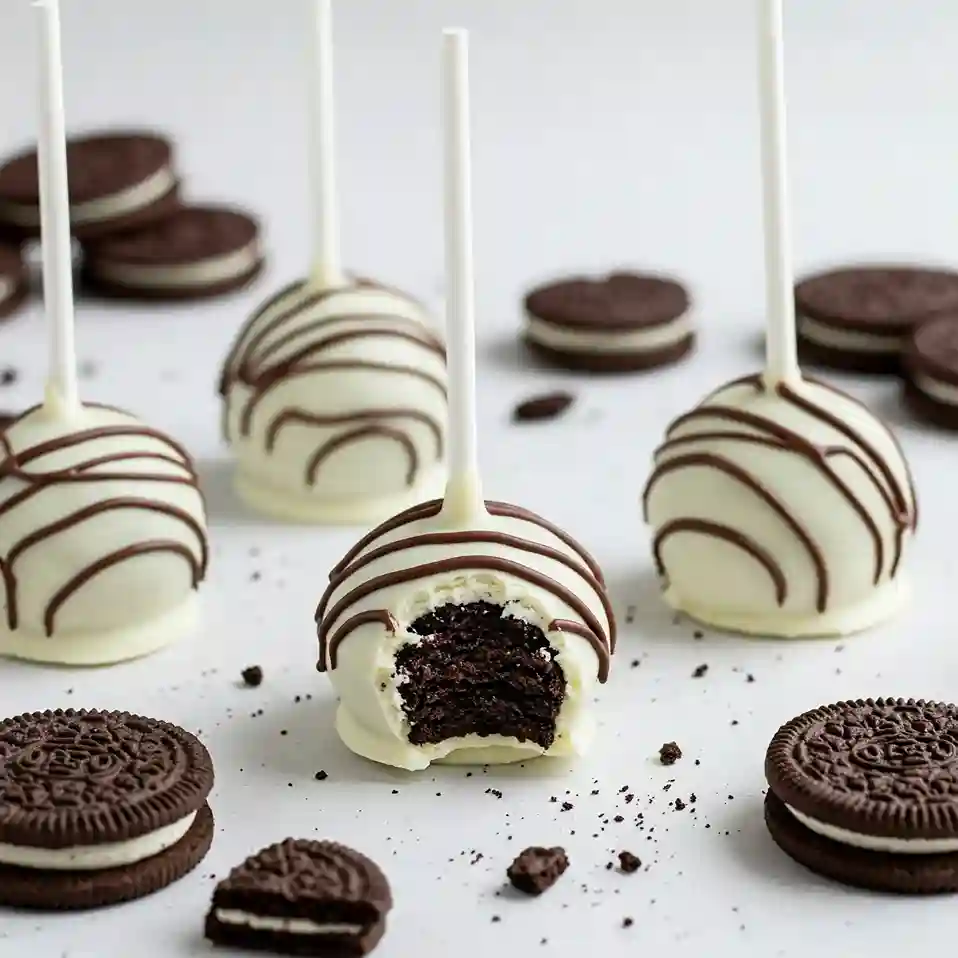
If you’re the kind of person who loves Oreos straight out of the pack, wait until you try them in cake pop form.
These Oreo cake pops are soft, rich, and coated in smooth chocolate with a little swirl on top to make them look even fancier.
I made these once for a family get-together, and they disappeared faster than anything else on the table.
They’re the kind of sweet that makes people ask, “Where did you buy these?” — and it feels pretty great to say you made them yourself.
Oreo Cake Pops Recipe
Ingredients
- 36 Oreo cookies (original, not double-stuffed)
- 5 oz cream cheese, softened to room temperature
- 12 oz white chocolate chips or melting wafers
- 2 oz milk chocolate chips (for drizzling)
- Lollipop sticks
- Optional: 1 teaspoon coconut oil (to thin chocolate if needed)
Instructions
- Place all the Oreos into a food processor and pulse into fine crumbs. Make sure there are no big chunks left; the texture should be evenly sandy.
- Set aside about 2 tablespoons of Oreo crumbs for sprinkling if you want, but it’s optional for this look.
- Add the softened cream cheese into the food processor. Pulse again until a thick, sticky dough forms and pulls together. Scrape the sides as needed to make sure everything is blended evenly.
- Scoop out small portions (about 1 tablespoon each) and roll into tight, smooth balls using your hands. Make sure there are no cracks or loose crumbs on the surface.
- Place the Oreo balls onto a parchment-lined baking sheet. Chill in the freezer for 15 minutes so they firm up but don’t freeze completely.
- While they chill, melt the white chocolate chips slowly using a double boiler or microwave. If using the microwave, heat in 20-second bursts, stirring in between, until smooth. If the chocolate feels too thick, stir in 1 teaspoon of coconut oil to thin it slightly.
- Remove the chilled Oreo balls from the freezer. Dip the tip of each lollipop stick into the melted white chocolate, then push it about halfway into the center of each ball. This helps secure the stick inside the cake pop.
- Carefully dip each pop into the white chocolate, covering it completely. Tap off any excess chocolate by gently rotating and tapping the stick against the edge of the bowl.
- Place the dipped pops upright on a piece of styrofoam or a cake pop stand so they can dry smoothly without touching anything. Let them set fully before moving on to decorating.
- Melt the milk chocolate chips using the same method as the white chocolate. Spoon the melted milk chocolate into a small piping bag or a zip-top bag with a tiny corner cut off.
- Drizzle the milk chocolate in swirly patterns over each white chocolate-coated pop. Keep your hand steady to get even, thin lines.
- Allow the cake pops to dry completely at room temperature or in the fridge for quicker setting.
- Serve once set or store them in an airtight container in the fridge for up to 5 days.
Tips For Making Oreo Cake Pops
Making Oreo cake pops is fun, but a few smart tips can make everything even easier and better:
- Use room-temperature cream cheese: Cold cream cheese is hard to mix and can leave lumps in your Oreo dough. Let it sit out until soft and smooth.
- Crush Oreos into fine crumbs: The finer the crumbs, the smoother the texture of your cake pops. A food processor works best.
- Chill the Oreo balls before dipping: Freezing them for about 15 minutes helps them stay firm and not fall apart when you dip them into melted chocolate.
- Dip the stick in chocolate first: Before inserting the stick into the Oreo ball, dip it slightly into melted chocolate. This acts like glue and helps hold the stick in place.
- Tap gently after dipping: After coating in chocolate, gently tap the stick on the side of the bowl to remove extra chocolate without breaking the pop.
- Use good-quality chocolate: Melting wafers or high-quality chocolate chips melt smoother and taste better in the final pop.
Oreo Cake Pops Variations
If you want to mix things up a little, here are some fun and delicious ideas:
- Use golden Oreos: Swap regular Oreos for golden ones to get a vanilla flavor instead of chocolate.
- Add a little peanut butter: Mix a spoonful of creamy peanut butter into the Oreo and cream cheese mixture for a nutty twist.
- Coat with dark chocolate: Instead of white chocolate, dip the pops in dark chocolate for a richer and less sweet finish.
- Decorate with sprinkles: Before the chocolate coating hardens, roll the pops in colorful sprinkles or crushed nuts for extra crunch.
- Flavor the chocolate drizzle: Add a drop of mint or orange extract to the melted chocolate drizzle for a fun flavor boost.
How To Store Oreo Cake Pops?
Keeping your Oreo cake pops fresh is simple if you follow these easy tips:
- Store at room temperature: If you plan to eat them within 1-2 days, keep them in an airtight container at room temperature.
- Refrigerate for longer freshness: To keep them fresh for up to 5-7 days, place them in the fridge in a sealed container. Let them sit out for a few minutes before eating so the chocolate softens a little.
- Freeze for later: You can freeze the cake pops by wrapping each one tightly in plastic wrap and placing them in a freezer bag. They stay good for about 2 months. Thaw them in the fridge overnight before serving.
Common Problems And Solutions For Oreo Cake Pops
Sometimes small problems can pop up when making cake pops. Here’s how to fix them:
- Cake pops keep falling off the stick: Make sure the Oreo ball is chilled before inserting the stick and dip the stick in melted chocolate first to secure it.
- Chocolate coating cracks after drying: This usually happens if the cake pop is too cold and the chocolate is too hot. Let the Oreo balls sit for a couple of minutes after freezing before dipping.
- Chocolate is too thick for dipping: Stir in a tiny bit of coconut oil or vegetable oil to the melted chocolate to thin it out without changing the flavor.
- Cake pops have air bubbles or rough spots: Tap the stick gently while turning the pop after dipping to let any air bubbles escape and smooth out the surface.
- Chocolate drizzle looks messy: Make sure the melted chocolate is slightly cooled but still pourable before drizzling. If it’s too runny, it will spread too much and look messy.
You May Also Like To Check Out These Recipes
- Banana Bars With Cream Cheese Frosting
- French Crème Caramel
- Peach Ice Cream
- Chocolate Cream Cheese Frosting
- Strawberry Cream Cheese Frosting
- Velvety Cream Cheese Frosting
- Applesauce Muffins
- Baby In Bloom Cake
- Baby Shower Cookies
- Baby In Bloom Cupcakes (Tutorial)
- Cinnamon Rice Pudding With Fresh Cherries
- Vegan Banana Muffins
- Chocolate Banana Bread
- Moist Banana Chocolate Chip Muffins
- Cheese Danish
- Apple Cider Donuts
- Cheesecake Stuffed Strawberries
- German Chocolate Cake
- Chocolate Banana Bread
- Chocolate Drip Cake With Fresh Fruit
- Cat Birthday Cake
- Gluten-Free Black Bean Brownies
- Chocolate Strawberry Cake
- Chocolate Raspberry Cake
- Strawberries And Cream Cake
- Pink Ombre Cake
- Beach Cake
- Sonic Birthday Cake
- Ice Cream Sandwich Cake
- Banana Split Cake
- Chocolate Chip Pound Cake
- Strawberry Sheet Cake