One bite of these elegant bride and groom cake pops, and you’ll understand why they belong at every celebration that deserves a little extra magic.
These aren’t just desserts—they’re edible centerpieces that instantly elevate your dessert table, turning a simple sweet into a conversation-starting showstopper your guests won’t forget.
Perfect for weddings, engagement parties, bridal showers, or anniversaries, these cake pops combine visual charm with irresistible flavor.
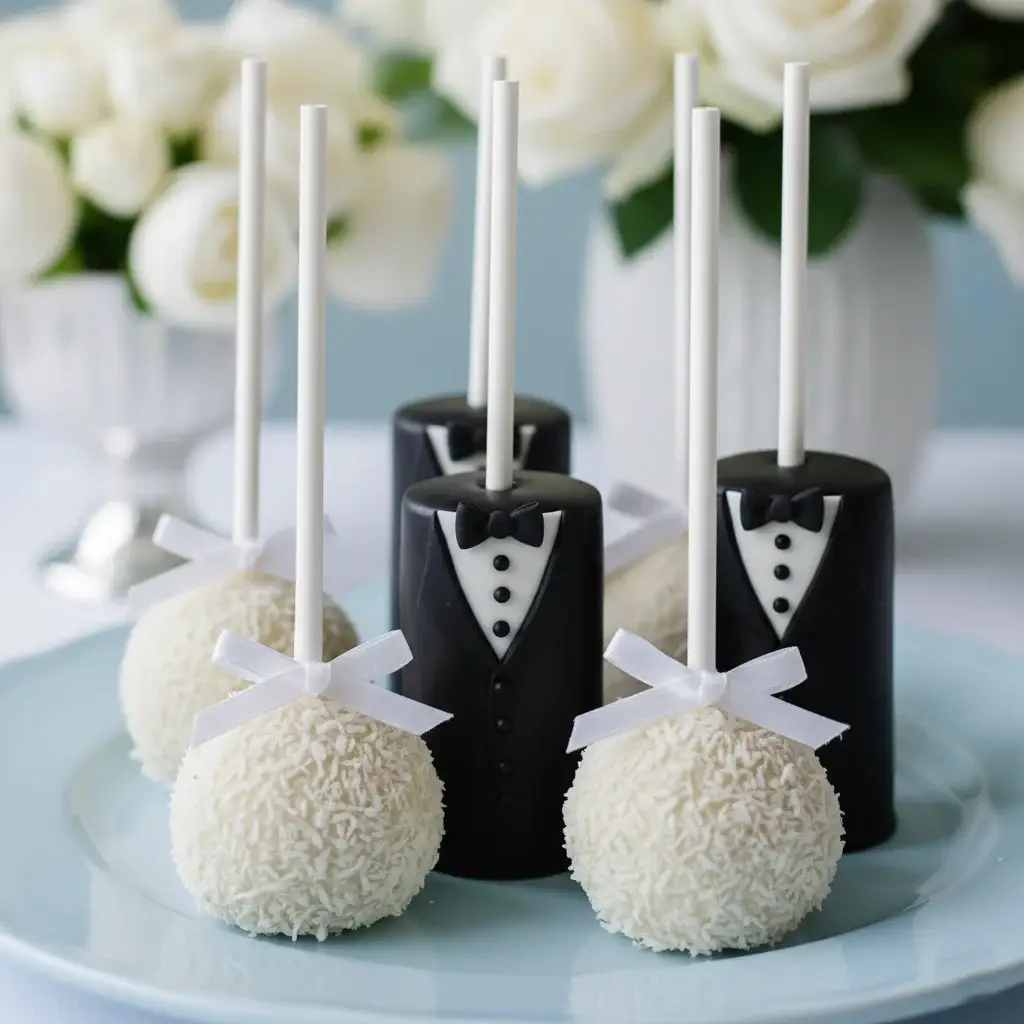
What makes them truly special is their dual design—classic tuxedo-coated pops paired with delicate white coconut-covered “bride” pops—giving you a stunning contrast that feels both playful and sophisticated.
They’re surprisingly simple to make ahead, which means less stress and more time enjoying your event while still impressing everyone.
Biting into one is pure delight. The outer shell gives way with a gentle snap, revealing a soft, moist cake center that melts in your mouth.
You’ll taste rich vanilla and subtle chocolate notes, balanced with creamy sweetness and a hint of coconut on the bride pops.
The textures are just as satisfying—smooth candy coating, tender cake filling, and the light chew of shredded coconut—all coming together in perfect harmony.
A good-quality vanilla cake and smooth melted chocolate are the stars here, transforming simple ingredients into something unforgettable.
You don’t need advanced baking skills to create these. With a little patience and about a couple of hours, you’ll have a batch ready to wow your guests. You can even customize flavors or colors to match your theme.
Follow along, and you’ll end up with a dessert that not only looks professional but might just become your signature celebration treat.
Table of Contents
Bride And Groom Cake Pops Recipe
Ingredients
- 1 box vanilla cake mix (plus ingredients listed on the box: usually eggs, oil, water)
- 200 g plain cream cheese, softened
- 2 cups white chocolate or white candy melts
- 2 cups dark or black candy melts
- 1 cup desiccated coconut
- 20 lollipop sticks
- 1 tablespoon vegetable oil (optional, for thinning chocolate)
For Decoration (Groom Tuxedo Details)
- 1/2 cup white candy melts (for shirt detail)
- Small amount black fondant or melted chocolate (for buttons and bow tie)
For Decoration (Bride Pops)
- 10 small white ribbon bows
Instructions
- Bake the vanilla cake according to the package instructions. Let it cool completely at room temperature.
- Once cooled, crumble the cake into fine crumbs using your hands in a large bowl.
- Add the softened cream cheese and mix thoroughly until the mixture becomes moist and holds together like dough.
- Scoop about 1 to 1.5 tablespoons of the mixture and roll into smooth balls. Place them on a lined tray.
- Refrigerate the cake balls for 1 hour or until firm.
- Melt a small portion of white or dark candy melts. Dip the tip of each lollipop stick into the melted coating, then insert it halfway into each cake ball. Chill again for 15 minutes to secure.
- Melt the remaining dark candy melts in a microwave-safe bowl, stirring every 20–30 seconds until smooth. Add a little vegetable oil if needed for a smoother consistency.
- Dip half of the cake pops into the dark coating to create the groom pops. Let excess drip off, then place upright to set.
- Before the coating fully hardens, decorate with a white triangle (shirt front), small buttons, and a bow tie using melted white chocolate or fondant details.
- Melt the white chocolate or white candy melts in the same way.
- Dip the remaining cake pops into the white coating, then immediately roll them in desiccated coconut to create texture for the bride pops.
- While still slightly tacky, attach a small white ribbon bow at the base of each stick.
- Place all cake pops upright in a stand or foam block and allow them to set completely at room temperature.
How Do You Keep Bride And Groom Cake Pops From Falling Off The Stick?
Keeping your cake pops secure is one of the most important steps, and it’s easier than it seems when you follow the right method. The trick is creating a strong bond between the stick and the cake ball.
Before inserting the stick, always dip the tip into melted candy coating. This acts like edible glue and helps anchor the stick firmly inside the cake pop. Here’s what you should always do to prevent falling:
- Proper coating seal: dip the stick into melted chocolate before inserting it into the cake ball
- Correct chilling: chill the cake balls for about 15 minutes after inserting the stick so they firm up
- Balanced texture: make sure your cake mixture is not too soft or too greasy
- Gentle dipping: avoid swirling too aggressively when coating the pops
If your cake pops are too soft, they may slide down. If they’re too cold, they can crack when dipped. Aim for slightly chilled but not rock hard.
Why Are My Bride And Groom Cake Pops Cracking?
Cracking usually happens because of a sudden temperature difference between the cake ball and the melted coating.
If your cake pops are very cold and you dip them into warm chocolate, the coating expands and cracks as it sets. To avoid this issue, follow these simple steps:
- Temperature balance: let chilled cake pops sit at room temperature for a few minutes before dipping
- Smooth coating: do not overheat your chocolate; keep it warm, not hot
- Thin coating: add a small amount of oil to make the coating smoother and easier to work with
Small cracks won’t affect the taste, but if you want a flawless finish, temperature control is key.
How Do You Get Smooth Coating On Bride And Groom Cake Pops?
A smooth finish makes your cake pops look professional and elegant. The coating process is where most people struggle, but it becomes easy with the right technique.
Start by melting your candy melts slowly and stirring often until smooth. The consistency should be like thick cream, not too thick or too runny. For best results, follow these tips:
- Proper melting: melt in short intervals and stir well to avoid lumps
- Correct consistency: add a little oil if the coating feels too thick
- Deep dipping: dip the cake pop fully in one motion instead of rolling it around
- Tap gently: lightly tap off excess coating instead of shaking the pop
This will give you that clean, polished look, especially important for the tuxedo design.
Can You Make Bride And Groom Cake Pops Ahead Of Time?
Yes, you can absolutely make these ahead, which makes them perfect for events and celebrations. Planning in advance helps reduce stress on the day of your event. You can prepare different parts at different times:
- Cake balls: make and refrigerate up to 2 days in advance
- Fully assembled pops: prepare 1 to 2 days before serving
- Decorations: add final details the day before for best appearance
Store them properly in a cool place to maintain their texture and look. Avoid decorating too early if your environment is warm, as details may soften.
How Should You Store Bride And Groom Cake Pops?
Proper storage keeps your cake pops fresh, moist, and visually appealing. The method you choose depends on how soon you plan to serve them. Here’s how to store them correctly:
- Room temperature: store in an airtight container for up to 2 days in a cool, dry place
- Refrigerator: store for up to 1 week, but bring to room temperature before serving
- Humidity control: keep away from moisture to prevent sticky coating or condensation
Always place them upright or in a single layer to avoid damaging the decorations.
Can You Freeze Bride And Groom Cake Pops?
Freezing is a great option if you want to prepare well in advance. Cake pops freeze very well when done properly. Follow these steps for best results:
- Before coating: freeze plain cake balls for up to 2 months
- After coating: freeze fully decorated pops in an airtight container
- Thawing process: thaw in the refrigerator first, then bring to room temperature slowly
Avoid unwrapping them immediately after removing from the fridge, as condensation can ruin the finish.
What Is The Best Cake To Use For Bride And Groom Cake Pops?
The best cake is one that is soft, moist, and easy to crumble. Vanilla cake is a popular choice because it pairs well with both white and dark coatings. You can also experiment with other flavors:
- Vanilla cake: classic, light, and perfect for elegant designs
- Chocolate cake: rich and pairs well with dark coating
- Red velvet: adds a slight tang and beautiful color contrast
Make sure your cake is not dry. A moist cake will bind better with the frosting or cream cheese and create smooth cake pops.
How Do You Shape Perfect Cake Balls Every Time?
Getting evenly shaped cake balls ensures your cake pops look neat and professional. It also helps them coat evenly. The easiest way to get perfect shapes is by being consistent:
- Use a scoop: measure equal portions for uniform size
- Roll gently: avoid pressing too hard to prevent cracks
- Smooth finish: roll until there are no visible cracks on the surface
If the mixture sticks to your hands, lightly grease your palms or chill the mixture for a few minutes.
How Do You Decorate Groom Tuxedo Cake Pops?
Creating the tuxedo design is easier than it looks and adds a beautiful touch to your dessert.
Start with a fully coated dark cake pop, then add details while the coating is still slightly soft. Here’s a simple method:
- Shirt detail: pipe or place a small white triangle on the front
- Buttons: add tiny dots using melted chocolate or fondant
- Bow tie: shape a small bow or pipe it carefully at the top
Work slowly and keep your hands steady. Even simple details can look elegant when placed neatly.
How Many Calories Are In Bride And Groom Cake Pops?
The calorie count depends on the size and ingredients used, but you can estimate a general range for one standard cake pop. On average, one cake pop contains:
- Calories: around 150 to 180 per piece
- Fat: moderate due to chocolate coating
- Sugar: relatively high due to cake and coating
If you want to reduce calories, you can use less coating or opt for lighter cake and filling options.

Bride And Groom Cake Pops
Ingredients
Method
- Bake the vanilla cake according to the package instructions. Let it cool completely at room temperature.
- Once cooled, crumble the cake into fine crumbs using your hands in a large bowl.
- Add the softened cream cheese and mix thoroughly until the mixture becomes moist and holds together like dough.
- Scoop about 1 to 1.5 tablespoons of the mixture and roll into smooth balls. Place them on a lined tray.
- Refrigerate the cake balls for 1 hour or until firm.
- Melt a small portion of white or dark candy melts. Dip the tip of each lollipop stick into the melted coating, then insert it halfway into each cake ball. Chill again for 15 minutes to secure.
- Melt the remaining dark candy melts in a microwave-safe bowl, stirring every 20–30 seconds until smooth. Add a little vegetable oil if needed for a smoother consistency.
- Dip half of the cake pops into the dark coating to create the groom pops. Let excess drip off, then place upright to set.
- Before the coating fully hardens, decorate with a white triangle (shirt front), small buttons, and a bow tie using melted white chocolate or fondant details.
- Melt the white chocolate or white candy melts in the same way.
- Dip the remaining cake pops into the white coating, then immediately roll them in desiccated coconut to create texture for the bride pops.
- While still slightly tacky, attach a small white ribbon bow at the base of each stick.
- Place all cake pops upright in a stand or foam block and allow them to set completely at room temperature.
You May Also Like To Check Out These Recipes
- No-Bake Chocolate Date Cookies
- Strawberry Shortcake
- Blueberry Dump Cake
- Atlantic Beach Pie
- Angel Food Cake
- Blue Velvet Cake
- Super Moist Chocolate Zucchini Cake
- Chocolate Tres Leches Cake
- Blueberry Cobbler
- Funfetti Cupcakes
- Chocolate Raspberry Cake
- Homemade Blueberry Crisp
- No Bake Blueberry Cheesecake
- Ice Cream Cone Cupcakes
- Pineapple Juice Cake
- Mango Cake With Whipped Cream
- Raspberry Cake
- Bakery-Style Lemon Bars
- Rhubarb Custard Bars
- Rhubarb Pie
- Peach Cobbler Cupcakes
- Peach Dump Cake
- Chocolate Lava Cake
- Peach Sheet Cake
- Peach Coffee Cake
- Lemon Blueberry Cake
- Lemon Raspberry Cake
- Watermelon Cupcakes
- Tres Leches Cake
- Strawberry Icebox Cake
- Strawberry Oatmeal Bars
- Healthy Chocolate Chip Zucchini Bread
- Zucchini Carrot Muffins
- Strawberry Sheet Cake
- Peach Cobbler
- Peach Crisp With Fresh Peaches
- Cookies And Cream Cupcakes
- Fathers Day Cake
- Strawberry Rhubarb Pie With Frozen Fruit
- Mango Sago Dessert With Coconut Milk
- Beach Cake
- Gemini Cake
- Sonic Birthday Cake
- Ice Cream Sandwich Cake
- Strawberry Greek Yogurt Bites
- Banana Split Cake
- Chocolate Chip Pound Cake
- Fudgy Zucchini Brownies
- Mango Cookies
- Chocolate Banana Bread
- High Protein Cottage Cheese Brownies
- Banana Oatmeal Bars
- Greek Yogurt Brownies
- Banana Greek Yogurt Smoothie
- Greek Yogurt Strawberry Kiwi Smoothie
- Strawberry Banana Greek Yogurt Smoothie
- Coffee Protein Smoothie
- Greek Yogurt Mango Smoothie
- Greek Yogurt pineapple Smoothie
- Greek Yogurt Banana Peanut Butter Smoothie
- Pumpkin Chia Seeds Pudding
- Chocolate Chia Seed Pudding With Berries
- Greek Yogurt Chia Seed Pudding
- Coffee Cake Muffins
- Protein Cottage Cheese Cookie Dough
- Frozen Peanut Butter Snack Bites
- High Protein Strawberry Cheesecake Bowl
- Chewy Banana Bread Cookies
- Chocolate Frozen Peanut Butter Bites
- Tiramisu Wedding Cake Recipe
- Wedding Sheet Cake
- Polvorones (Mexican Wedding Cookies)
- Decorated Wedding Cookies
- DIY Wedding Charcuterie Cups
- Beautiful Wedding Cupcakes