There’s something unforgettable about a dessert that doubles as a keepsake—one that stops guests mid-conversation and instantly elevates your celebration.
These decorated wedding cookies aren’t just sweets; they’re edible artistry designed to impress, delight, and create lasting memories without the stress of complicated desserts.
With their elegant shapes and intricate detailing, these cookies bring a bakery-level finish right into your kitchen.
What makes them truly special is how customizable they are—perfect for matching wedding themes, colors, and personal touches—while still being approachable enough for a dedicated home baker.
The reward? That moment when your guests admire them before taking a bite… and then immediately reach for another.
Each bite delivers a delicate balance of buttery vanilla sweetness and subtle almond warmth, with a soft yet structured crumb that melts just slightly on the tongue.
The royal icing adds a gentle crispness that contrasts beautifully with the tender cookie beneath, while details like floral piping and smooth glazed finishes bring both visual and textural elegance.
Ingredients like pure vanilla extract and finely sifted powdered sugar quietly elevate the entire experience.
With a little patience and a few simple techniques, you can achieve professional-looking results at home. These cookies require moderate time and attention, but the process is incredibly rewarding.
You can even prepare the dough in advance or freeze finished cookies for convenience. Follow along, and you’ll create a stunning, bakery-worthy treat that just might become your signature celebration recipe.
Table of Contents
Decorated Wedding Cookies Recipe
Ingredients
For The Sugar Cookies
- 250 g unsalted butter, softened
- 200 g granulated sugar
- 1 large egg, room temperature
- 2 tsp pure vanilla extract
- 1/2 tsp almond extract
- 400 g all-purpose flour
- 1/2 tsp baking powder
- 1/2 tsp salt
For The Royal Icing
- 500 g powdered sugar, sifted
- 3 tbsp meringue powder
- 6–8 tbsp warm water
- 1 tsp vanilla extract
- Gel food colors (white, blush pink, black, gold, lavender)
For Decorating Details
- Edible gold paint or gold luster dust
- Piping bags and fine round tips
- Toothpicks or scribe tool
Instructions
- In a large mixing bowl, cream the softened butter and granulated sugar until light and fluffy, about 2–3 minutes.
- Add the egg, vanilla extract, and almond extract. Mix until fully combined and smooth.
- In a separate bowl, whisk together flour, baking powder, and salt.
- Gradually add the dry ingredients into the wet mixture, mixing just until a soft dough forms. Do not overmix.
- Divide the dough into two portions, flatten into discs, wrap, and chill for at least 1 hour.
- Roll out chilled dough on a lightly floured surface to about 1/4 inch thickness.
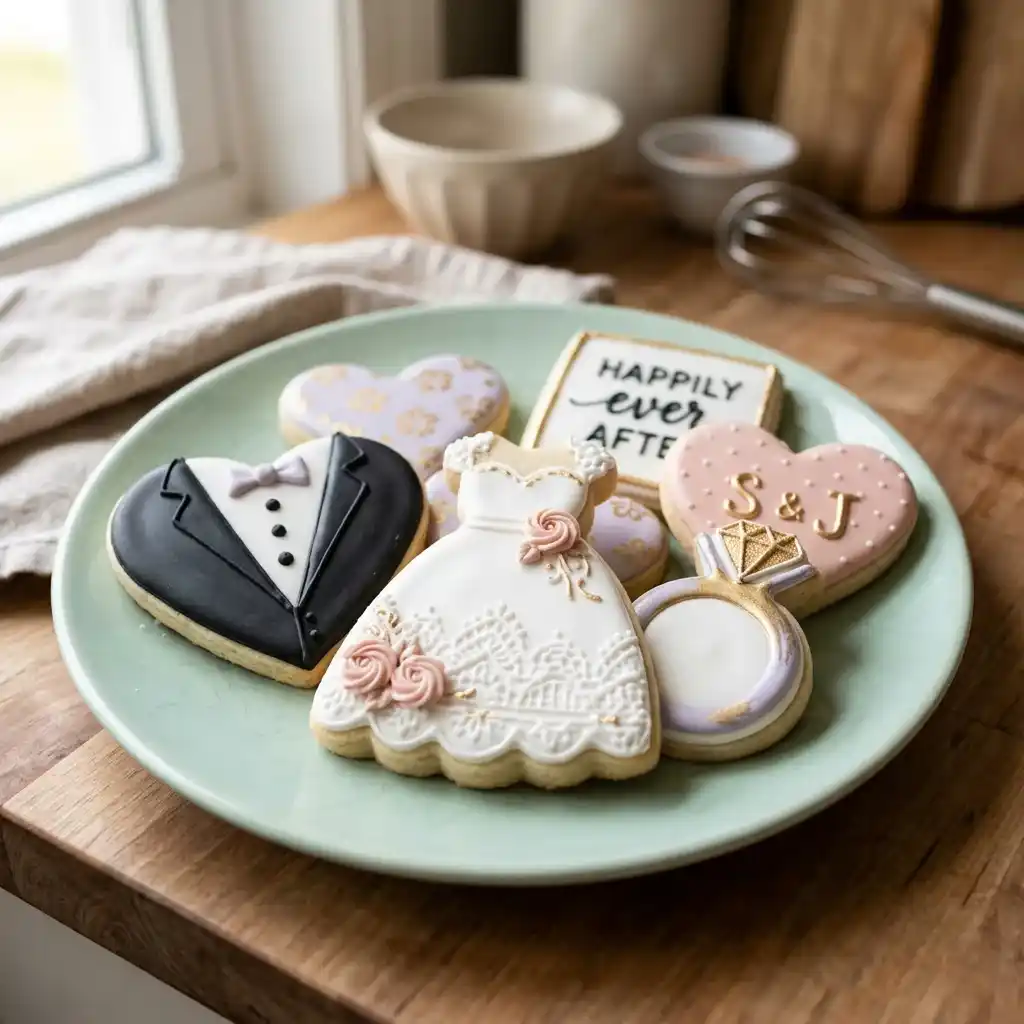
- Cut into wedding-themed shapes like hearts, dresses, tuxedos, rings, and plaques.
- Transfer to a lined baking sheet and chill again for 10–15 minutes to help maintain shape.
- Bake at 175°C (350°F) for 10–12 minutes, until edges are set but not browned. Cool completely.
Preparing The Royal Icing
- In a bowl, mix powdered sugar and meringue powder.
- Add water gradually while mixing until you reach a thick, smooth consistency.
- Add vanilla extract and mix well.
- Divide icing into separate bowls and color as needed.
- Adjust consistency: thicker icing for outlining, slightly thinner for flooding.
Decorating The Cookies
- Start by outlining each cookie with a thicker icing using a piping bag.
- Fill (flood) the inside with thinner icing and use a toothpick to spread evenly.
- Let the base layer dry for at least 1–2 hours before adding details.
- Pipe decorative elements like lace patterns for dresses, buttons for tuxedos, and initials on plaques.
- Add small floral accents using pink icing and fine piping tips.
- Use edible gold paint or dust to highlight details like rings or lettering.
- Allow cookies to dry completely, preferably overnight, for a firm finish.
What Are Decorated Wedding Cookies And Why Are They So Popular?
Decorated wedding cookies are beautifully designed sugar cookies that are shaped, iced, and detailed to match a wedding theme. You can think of them as edible decorations that also double as desserts or favors.
They are popular because they serve multiple purposes at once. Instead of having plain desserts, you get something that looks elegant, tastes amazing, and can even be personalized with initials, dates, or colors.
This makes your celebration feel more thoughtful and unique without adding extra complexity to your dessert table.
What Type Of Dough Works Best For Decorated Wedding Cookies?
The best dough is a firm sugar cookie dough that holds its shape during baking. You want cookies that stay smooth and flat so the icing looks clean and professional. Here’s what makes a dough perfect for decorating:
- Low spread: the cookies don’t puff or lose shape in the oven
- Smooth surface: helps icing glide evenly
- Balanced texture: soft inside but sturdy enough to handle decorating
A dough with butter, sugar, egg, and flour—like the one in this recipe—is ideal because it gives you both structure and a delicious flavor.
How Do You Get Smooth Royal Icing For Wedding Cookies?
Getting smooth icing is all about consistency and patience. If your icing is too thick, it won’t spread. If it’s too thin, it will run off the edges. To get it just right, follow these simple guidelines:
- Outline consistency: thick like toothpaste so it holds its shape
- Flood consistency: slightly thinner so it spreads smoothly
- Resting time: let icing sit for a few minutes to remove air bubbles
- Toothpick trick: gently swirl to pop bubbles and smooth the surface
When you take your time here, your cookies will look clean, glossy, and professional.
How Long Do Decorated Wedding Cookies Take To Make?
These cookies are not difficult, but they do require time and planning. You’re not just baking—you’re also decorating in layers. Here’s a realistic breakdown:
- Dough preparation: about 20 minutes
- Chilling time: at least 1 hour
- Baking: 10 to 12 minutes per batch
- Decorating: 1 to 2 hours depending on detail
- Drying time: 6 to 12 hours (or overnight)
The good news is you can spread this process over a couple of days so it never feels overwhelming.
Can You Make Decorated Wedding Cookies Ahead Of Time?
Yes, and you absolutely should if you want less stress. These cookies are perfect for making in advance because they store very well. Here’s how you can plan ahead:
- Bake early: cookies can be baked 3 to 5 days before decorating
- Decorate ahead: finished cookies stay fresh for several days
- Freeze option: both undecorated and decorated cookies freeze well
Making them ahead gives you more time to focus on presentation and details.
How Do You Store Decorated Wedding Cookies Properly?
Proper storage keeps your cookies fresh and protects the delicate designs. To store them correctly, follow these tips:
- Room temperature: keep in an airtight container for up to 5 days
- Layering: place parchment paper between layers to prevent sticking
- Cool environment: store in a dry, cool place away from heat and humidity
Avoid refrigerating decorated cookies, as moisture can ruin the icing finish.
Can You Freeze Decorated Wedding Cookies?
Yes, you can freeze them successfully if you do it the right way. This is a great option if you’re preparing for a big event. Here’s how to freeze them safely:
- Undecorated cookies: freeze in airtight containers for up to 2 months
- Decorated cookies: freeze after icing is fully dry
- Wrapping: wrap each cookie or layer with parchment to protect designs
- Thawing: let them come to room temperature inside the container before opening
This prevents condensation from damaging the icing.
Why Do My Decorated Wedding Cookies Spread Or Lose Shape?
If your cookies spread too much, it usually comes down to dough temperature or ingredient balance. Common causes include:
- Soft dough: not chilling long enough before baking
- Too much butter: makes cookies spread more
- Overmixing: adds too much air into the dough
- Warm baking trays: can cause uneven spreading
Always chill your dough and even your cut shapes before baking for best results.
How Do You Add Fine Details Like Lace And Writing?
Fine details are what make these cookies look elegant and wedding-worthy. It takes a steady hand, but it’s easier than it looks with practice. Here’s how you can improve your detailing:
- Use stiff icing: holds sharp lines for lace and text
- Choose small piping tips: gives better control
- Practice first: try designs on parchment before piping on cookies
- Work in layers: let base icing dry before adding details
Taking your time here makes a huge difference in the final look.
What Flavors Can You Use For Decorated Wedding Cookies?
While classic vanilla-almond is most popular, you can easily customize the flavor to match your event. Some delicious options include:
- Citrus: add lemon or orange zest for a fresh taste
- Chocolate: replace part of the flour with cocoa powder
- Spiced: add cinnamon or cardamom for warmth
- Floral: subtle rose or lavender for a wedding feel
Just make sure the flavor stays light so it doesn’t overpower the icing.
How Do You Package Decorated Wedding Cookies For Gifts Or Favors?
Packaging is just as important as decorating when it comes to presentation. To make them look elegant and stay safe:
- Individual wrapping: use clear bags to show off designs
- Cushioning: add tissue paper or inserts to prevent movement
- Cool storage: keep in a dry place until serving
- Labeling: add names, dates, or thank-you tags for a personal touch
This turns your cookies into beautiful, ready-to-gift treats.
How Many Calories Are In Decorated Wedding Cookies?
The exact number can vary depending on size and icing, but here’s a general idea.
- One medium decorated cookie: around 180 to 250 calories
- Icing contribution: adds most of the sweetness and calories
- Larger or heavily decorated cookies: may go up to 300 calories
Enjoy them as a special treat—they’re meant to be both beautiful and indulgent.

Decorated Wedding Cookies
Ingredients
Method
- In a large mixing bowl, cream the softened butter and granulated sugar until light and fluffy, about 2–3 minutes.
- Add the egg, vanilla extract, and almond extract. Mix until fully combined and smooth.
- In a separate bowl, whisk together flour, baking powder, and salt.
- Gradually add the dry ingredients into the wet mixture, mixing just until a soft dough forms. Do not overmix.
- Divide the dough into two portions, flatten into discs, wrap, and chill for at least 1 hour.
- Roll out chilled dough on a lightly floured surface to about 1/4 inch thickness.
- Cut into wedding-themed shapes like hearts, dresses, tuxedos, rings, and plaques.
- Transfer to a lined baking sheet and chill again for 10–15 minutes to help maintain shape.
- Bake at 175°C (350°F) for 10–12 minutes, until edges are set but not browned. Cool completely.
- In a bowl, mix powdered sugar and meringue powder.
- Add water gradually while mixing until you reach a thick, smooth consistency.
- Add vanilla extract and mix well.
- Divide icing into separate bowls and color as needed.
- Adjust consistency: thicker icing for outlining, slightly thinner for flooding.
- Start by outlining each cookie with a thicker icing using a piping bag.
- Fill (flood) the inside with thinner icing and use a toothpick to spread evenly.
- Let the base layer dry for at least 1–2 hours before adding details.
- Pipe decorative elements like lace patterns for dresses, buttons for tuxedos, and initials on plaques.
- Add small floral accents using pink icing and fine piping tips.
- Use edible gold paint or dust to highlight details like rings or lettering.
- Allow cookies to dry completely, preferably overnight, for a firm finish.
You May Also Like To Check Out These Recipes
- No-Bake Chocolate Date Cookies
- Strawberry Shortcake
- Blueberry Dump Cake
- Atlantic Beach Pie
- Angel Food Cake
- Blue Velvet Cake
- Super Moist Chocolate Zucchini Cake
- Chocolate Tres Leches Cake
- Blueberry Cobbler
- Funfetti Cupcakes
- Chocolate Raspberry Cake
- Homemade Blueberry Crisp
- No Bake Blueberry Cheesecake
- Ice Cream Cone Cupcakes
- Pineapple Juice Cake
- Mango Cake With Whipped Cream
- Raspberry Cake
- Bakery-Style Lemon Bars
- Rhubarb Custard Bars
- Rhubarb Pie
- Peach Cobbler Cupcakes
- Peach Dump Cake
- Chocolate Lava Cake
- Peach Sheet Cake
- Peach Coffee Cake
- Lemon Blueberry Cake
- Lemon Raspberry Cake
- Watermelon Cupcakes
- Tres Leches Cake
- Strawberry Icebox Cake
- Strawberry Oatmeal Bars
- Healthy Chocolate Chip Zucchini Bread
- Zucchini Carrot Muffins
- Strawberry Sheet Cake
- Peach Cobbler
- Peach Crisp With Fresh Peaches
- Cookies And Cream Cupcakes
- Fathers Day Cake
- Strawberry Rhubarb Pie With Frozen Fruit
- Mango Sago Dessert With Coconut Milk
- Beach Cake
- Gemini Cake
- Sonic Birthday Cake
- Ice Cream Sandwich Cake
- Strawberry Greek Yogurt Bites
- Banana Split Cake
- Chocolate Chip Pound Cake
- Fudgy Zucchini Brownies
- Mango Cookies
- Chocolate Banana Bread
- High Protein Cottage Cheese Brownies
- Banana Oatmeal Bars
- Greek Yogurt Brownies
- Banana Greek Yogurt Smoothie
- Greek Yogurt Strawberry Kiwi Smoothie
- Strawberry Banana Greek Yogurt Smoothie
- Coffee Protein Smoothie
- Greek Yogurt Mango Smoothie
- Greek Yogurt pineapple Smoothie
- Greek Yogurt Banana Peanut Butter Smoothie
- Pumpkin Chia Seeds Pudding
- Chocolate Chia Seed Pudding With Berries
- Greek Yogurt Chia Seed Pudding
- Coffee Cake Muffins
- Protein Cottage Cheese Cookie Dough
- Frozen Peanut Butter Snack Bites
- High Protein Strawberry Cheesecake Bowl
- Chewy Banana Bread Cookies
- Chocolate Frozen Peanut Butter Bites
- Tiramisu Wedding Cake Recipe
- Wedding Sheet Cake
- Polvorones (Mexican Wedding Cookies)