Are your pears ripening faster than you can eat them? If you’ve ever been faced with a bounty of sweet, juicy pears and worried about them going bad, canning can be your best solution.
Preserving pears might seem complex, but it’s an effective way to keep their flavor and nutrition intact for months.
With a few simple steps, you can enjoy the taste of summer pears throughout the year.
We’ll guide you through the canning process, so you can turn those fresh fruits into delicious treats that are ready to enjoy whenever you want.
What Are The Best Pears For Canning?
The best pears for canning are those that are ripe but still firm. Varieties like Bartlett, Anjou, and Bosc are ideal because they hold their shape well and have good flavor.
Overripe pears can become mushy during the canning process, so it’s important to choose pears that are not too soft.
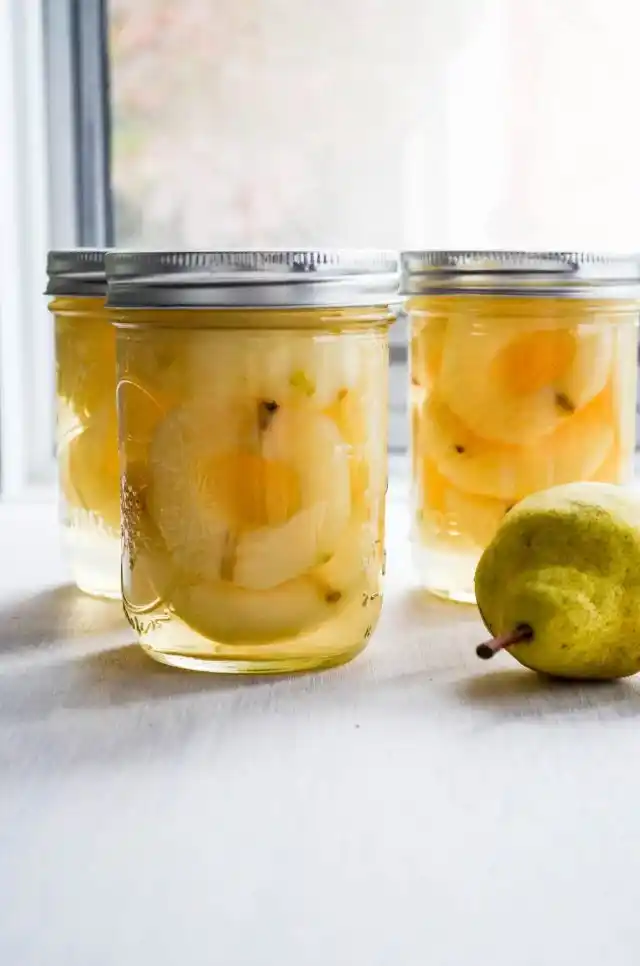
How To Can Pears?
Equipment
- 1 large water bath canner
- 1 canning funnel
- 1 jar lifter
- 4 regular mouth lids and rings
- 4 quart-sized jars
Ingredients
- 10 lbs ripe pears
- 6 cups water
- ⅔ cup granulated sugar
Instructions
- Fill the water bath canner with hot water and keep it on low heat. Make sure your jars, lids, and rings are clean and sterilized.
- Cut the pears into quarters. Remove the core and peel them. For larger pears, slice the quarters into thirds. For smaller pears, cut the quarters in half. To prevent browning, place the prepared pears in a bowl of water mixed with 1 tablespoon of lemon juice.
- In a saucepan, mix the water and sugar. Heat the mixture on the stove, stirring occasionally until the sugar is fully dissolved. Once dissolved, reduce the heat and keep the syrup warm.
- Fill each quart jar with the pear pieces, leaving about ½ inch of space at the top. Pour the warm syrup over the pears, maintaining the same ½ inch of headspace. Clean the rims of the jars with a clean cloth to ensure a good seal. Place the lids and rings on the jars.
- Carefully place the filled jars into the water bath canner. Make sure they are covered with water. Bring the water to a boil and process the jars for 25 minutes. Adjust the processing time based on your altitude if needed (check a canning guide for specifics).
- After processing, remove the jars using the jar lifter and let them cool on a clean towel or rack for 24 hours at room temperature. Once cool, check that the jars are properly sealed. Store the sealed jars in a cool, dark place for up to 18 months.
Can Pears Be Canned Without Sugar?
Yes, pears can be canned without sugar. You can use water, fruit juice, or a sugar substitute if you prefer.
However, using sugar or a sweetener helps to preserve the fruit and enhance its flavor.
If you choose not to use sugar, the pears will still be safe to eat but may not be as sweet.
How To Can Pears Without Sugar?
If you prefer to avoid sugar in your canning process, you can still preserve your pears effectively.
Canning pears without sugar is a straightforward method that lets you enjoy the natural flavor of the fruit. Here’s a step-by-step guide:
- Prepare Your Equipment: Start by sterilizing your canning jars, lids, and rings. Set up your water bath canner with enough hot water to cover the jars by at least an inch.
- Prepare the Pears: Peel, core, and cut the pears into slices or chunks. To prevent browning, place the pear pieces in a bowl of water mixed with 1 tablespoon of lemon juice.
- Pack the Jars: Fill the sterilized jars with the prepared pear slices, leaving about ½ inch of space at the top of each jar.
- Add Liquid: Pour plain water or fruit juice (such as apple or white grape juice) over the pears, ensuring that the pears are fully covered while maintaining the ½ inch of headspace. This liquid helps preserve the pears and prevents them from floating.
- Seal the Jars: Wipe the rims of the jars with a clean, damp cloth to remove any residue. Place the lids on the jars and screw on the rings until they are fingertip-tight.
- Process the Jars: Place the jars in the boiling water bath canner. Ensure they are covered by at least 1 inch of water. Boil for 25 minutes. If you live at a higher altitude, you may need to adjust the processing time according to local guidelines.
- Cool and Store: Once the processing time is complete, carefully remove the jars from the canner using a jar lifter. Let them cool on a clean towel or rack for 24 hours. After cooling, check that the lids have sealed properly (they should not pop back when pressed). Store the sealed jars in a cool, dark place for up to 12-18 months.
How To Can Pears In Light Syrup?
Canning pears in a light syrup adds a touch of sweetness while keeping the flavor of the fruit fresh. Here’s how to do it:
- Prepare Your Equipment: Sterilize your jars, lids, and rings. Set up your water bath canner with enough hot water to cover the jars by at least an inch.
- Prepare the Pears: Peel, core, and cut the pears into slices or chunks. To prevent browning, soak the pear pieces in a bowl of water mixed with 1 tablespoon of lemon juice.
- Make the Light Syrup: In a saucepan, combine 4 cups of water with 1 cup of granulated sugar. Heat the mixture over medium heat, stirring until the sugar is completely dissolved. Keep the syrup warm.
- Pack the Jars: Fill the sterilized jars with the prepared pear slices, leaving about ½ inch of space at the top of each jar.
- Add Syrup: Pour the warm light syrup over the pears, making sure the pears are fully covered while maintaining the ½ inch of headspace. Use a clean, damp cloth to wipe the rims of the jars to ensure a good seal.
- Seal the Jars: Place the lids on the jars and screw on the rings until they are fingertip-tight.
- Process the Jars: Place the jars in the boiling water bath canner. Ensure they are covered by at least 1 inch of water. Boil for 25 minutes. Adjust the processing time if you are at a higher altitude.
- Cool and Store: Remove the jars from the canner using a jar lifter and let them cool on a clean towel or rack for 24 hours. Check that the lids have sealed properly (they should not pop back when pressed). Store the sealed jars in a cool, dark place for up to 12-18 months.
How To Can Pears In A Pressure Cooker?
Using a pressure cooker can be an effective way to can pears, especially if you want to speed up the process. Here’s a simple guide:
- Prepare Your Equipment: Sterilize your canning jars, lids, and rings. Ensure your pressure cooker is clean and in good working condition.
- Prepare the Pears: Peel, core, and cut the pears into slices or chunks. To prevent browning, place the pear pieces in a bowl of water mixed with 1 tablespoon of lemon juice.
- Prepare the Syrup (Optional): You can use a light syrup (similar to the one used for water bath canning) if you prefer. Mix 4 cups of water with 1 cup of sugar in a saucepan, heat until the sugar dissolves, and keep warm.
- Pack the Jars: Fill the sterilized jars with the pear slices, leaving about ½ inch of space at the top. Pour the warm syrup or plain water over the pears, maintaining the ½ inch headspace.
- Seal the Jars: Wipe the rims of the jars with a clean, damp cloth. Place the lids on the jars and screw on the rings until fingertip-tight.
- Process in the Pressure Cooker: Place the jars on the rack inside the pressure cooker. Add enough water to the cooker to reach the level recommended by the manufacturer, usually about 2-3 inches. Lock the lid and bring the pressure cooker to the recommended pressure for your altitude (usually 6-10 pounds of pressure). Process the jars for 10-15 minutes. Adjust the time based on your altitude and the specific recommendations for your pressure cooker.
- Cool and Store: Once processing is complete, turn off the heat and let the pressure cooker cool down before opening. Carefully remove the jars and place them on a clean towel or rack to cool for 24 hours. Check the seals by pressing the center of the lids—if they don’t pop back, the jars are sealed. Store in a cool, dark place for up to 12-18 months.

How To Can Pears With Honey?
Canning pears with honey adds a natural sweetness and a unique flavor to your preserved fruit. Here’s how to do it:
- Prepare Your Equipment: Sterilize your canning jars, lids, and rings. Set up your water bath canner with enough hot water to cover the jars by at least an inch.
- Prepare the Pears: Peel, core, and cut the pears into slices or chunks. To prevent browning, soak the pear pieces in a bowl of water mixed with 1 tablespoon of lemon juice.
- Make the Honey Syrup: In a saucepan, mix 4 cups of water with ½ cup of honey. Heat over medium heat, stirring until the honey is completely dissolved. Keep the syrup warm.
- Pack the Jars: Fill the sterilized jars with the pear slices, leaving about ½ inch of space at the top of each jar.
- Add Honey Syrup: Pour the warm honey syrup over the pears, ensuring that the pears are fully covered while maintaining the ½ inch of headspace. Use a clean, damp cloth to wipe the rims of the jars to ensure a good seal.
- Seal the Jars: Place the lids on the jars and screw on the rings until they are fingertip-tight.
- Process the Jars: Place the jars in the boiling water bath canner. Ensure they are covered by at least 1 inch of water. Boil for 25 minutes. Adjust the processing time if you live at a higher altitude.
- Cool and Store: Remove the jars from the canner using a jar lifter and let them cool on a clean towel or rack for 24 hours. Check that the lids have sealed properly (they should not pop back when pressed). Store the sealed jars in a cool, dark place for up to 12-18 months.
How To Can Pears In Apple Juice?
Canning pears in apple juice is a great way to infuse them with a fruity flavor. Here’s a step-by-step guide:
- Prepare Your Equipment: Sterilize your canning jars, lids, and rings. Set up your water bath canner with enough hot water to cover the jars by at least an inch.
- Prepare the Pears: Peel, core, and cut the pears into slices or chunks. To prevent browning, place the pear pieces in a bowl of water mixed with 1 tablespoon of lemon juice.
- Prepare the Apple Juice: Use 100% pure apple juice. You don’t need to heat it beforehand, but if it’s cold, you might want to warm it slightly to make the process easier.
- Pack the Jars: Fill the sterilized jars with the prepared pear slices, leaving about ½ inch of space at the top of each jar.
- Add Apple Juice: Pour the apple juice over the pears, making sure the pears are fully covered while maintaining the ½ inch of headspace. Wipe the rims of the jars with a clean, damp cloth to remove any residue.
- Seal the Jars: Place the lids on the jars and screw on the rings until they are fingertip-tight.
- Process the Jars: Place the jars in the boiling water bath canner. Ensure they are covered by at least 1 inch of water. Boil for 25 minutes. Adjust the processing time if you live at a higher altitude.
- Cool and Store: Remove the jars from the canner using a jar lifter and let them cool on a clean towel or rack for 24 hours. Check that the lids have sealed properly (they should not pop back when pressed). Store the sealed jars in a cool, dark place for up to 12-18 months.
How To Can Pears In A Pressure Canner?
Canning pears in a pressure canner is a great way to preserve them. Here’s a straightforward guide:
- Prepare Your Equipment: Sterilize your canning jars, lids, and rings. Make sure your pressure canner is clean and in good working condition.
- Prepare the Pears: Peel, core, and cut the pears into slices or chunks. Soak the pear pieces in water with 1 tablespoon of lemon juice to prevent browning.
- Make the Syrup (Optional): Combine 4 cups of water with 1 cup of granulated sugar in a saucepan. Heat until the sugar dissolves, then keep the syrup warm. You can also use fruit juice or just water if you prefer.
- Pack the Jars: Fill the sterilized jars with the pear slices, leaving about ½ inch of space at the top. Pour the warm syrup, fruit juice, or water over the pears, maintaining the ½ inch headspace. Wipe the rims of the jars to ensure a good seal.
- Seal the Jars: Place the lids on the jars and screw on the rings until they are fingertip-tight.
- Process in the Pressure Canner: Place the jars on the rack inside the pressure canner. Add enough water to reach the recommended level, usually about 2-3 inches. Lock the lid, bring the canner to the recommended pressure (6-10 pounds depending on your altitude), and process for 10-15 minutes. Adjust the time based on altitude if needed.
- Cool and Store: Turn off the heat and let the canner cool until the pressure returns to zero. Carefully remove the lid. Let the jars cool on a clean towel or rack for 24 hours. Check that the lids have sealed properly (they should not pop back when pressed). Store the jars in a cool, dark place for up to 12-18 months.

Top Tips For Perfectly Canned Pears
1. Choose The Right Pears
Pick pears that are ripe but still firm. Overripe pears can turn mushy when canned. Bartlett, Anjou, and Bosc pears work well.
2. Keep Your Pears Fresh
To prevent browning, mix 1 tablespoon of lemon juice in a bowl of water and soak the peeled pear slices in it. This helps keep them looking nice and fresh.
3. Use Clean Equipment
Always make sure your jars, lids, and rings are clean and sterilized before use. This helps prevent spoilage and ensures a good seal.
4. Make The Syrup Just Right
The sugar syrup should be warm when you pour it over the pears. This helps the syrup mix well and keeps the pears tasting sweet.
5. Pack The Jars Properly
Leave about ½ inch of space at the top of the jar when packing pears.
This space is important for a good seal and to prevent overflow during processing.
6. Adjust For Altitude
If you live at a higher altitude, you might need to adjust the processing time.
Check a canning guide specific to your altitude to ensure the pears are properly preserved.
7. Check For Seals
After the jars cool, check that the lids are sealed properly. Press down in the center of each lid—if it doesn’t pop back, the jar is sealed.
If it does pop, the jar might not be sealed and should be refrigerated and used soon.
8. Store In The Right Place
Keep your canned pears in a cool, dark place. A pantry or cupboard is ideal. Proper storage helps keep the pears fresh for up to 18 months.
Can The Skin Be Left On The Pears?
It is recommended to peel the pears before canning.
While it is possible to can pears with the skin on, the skin can become tough and chewy after canning, affecting the texture and taste.
Peeling the pears ensures a smoother and more pleasant final product.
You May Also Like To Check Out These Recipes
- Cinnamon Nutmeg Waffles
- Crockpot Apple Butter
- Gingerbread Bagels
- Pumpkin French Toast
- Apple Cinnamon Pancakes
- Pumpkin Cream Cheese Swirl Muffins
- Pumpkin French Toast Sticks
- Tomato Soup With Fresh Tomatoes
- 45 Best Apple Desserts
- Elderberry Syrup Recipe
- 46 Best Pear Recipes
- Pumpkin Bars
- Pumpkin Zucchini Bread With Chocolate Chips
- Viral Tiktok Cucumber Salad
- Carmelized Onions Recipe
- Pickled Red Onions Recipe
- Pear Butter Recipe
- Pumpkin Snickerdoodle Cookies
- Orange Spice Cake
- Caramel Apple Dump Cake
- Pumpkin Spice Cake
- Pumpkin Fluff Dip
- Sheet Pan Sweet Potato Hash
- Pumpkin Pie Cookies
- Burrito Bake With Ground Beef
- 60 Fall Crockpot Recipes
- 70 Best Fall Dinner Recipes
- 60 Fall Comfort Food Ideas
- 50 High Protein Breakfast Ideas
- Air Fryer Bang Bang Salmon Bites
- Bang Bang Shrimp
- Neapolitan Cake
- Fall And Winter Pantry Essentials
- 25 Best Habanero Recipes
- 30 Best Fall Dessert Ideas
- 25 Best Fall Cookies
- 41 Best Fall Bread Recipes
- 25 Fall Cake Ideas
- 17 Fall Kitchen Essentials To Get Now
- 50 Best Shiitake Mushroom Recipes
- 50 Best Jalapeño Recipes
- 50 Best Hatch Chili Recipes
- Lemon Garlic Parmesan Shrimp Pasta
- Authentic Thai Red Curry Shrimp Recipe
- Shrimp Alfredo With Cream Cheese