Every Halloween, I like to bring out a treat that makes people stop, laugh, and then lean in for a closer look. These eyeball cookies have become that treat in my kitchen.
At first glance, they look almost too realistic, and you can see everyone’s expression shift from surprise to curiosity, then to excitement when they realize it’s just a soft cookie with sweet icing and a chocolate center.
Kids find them hilarious, and adults secretly enjoy them just as much.
What I love about these cookies is how they turn the table into a scene straight out of a Halloween party.
They’re playful, a little eerie, but still completely delicious. The red icing veins make them look alive, the glossy white icing sets the stage, and the chocolate “pupil” pulls it all together.
By the time the plate is empty, there’s always someone asking if I’ll make them again next year.
Table of Contents
Halloween Eyeball Cookies Recipe
Ingredients
- 1 cup unsalted butter, softened
- 1 cup granulated sugar
- 1 large egg
- 1 teaspoon vanilla extract
- 2 ½ cups all-purpose flour
- 1 teaspoon baking powder
- ¼ teaspoon salt
- 2 cups powdered sugar
- 2–3 tablespoons milk
- ½ teaspoon vanilla extract
- 12–14 round chocolate candies (like chocolate drops or melting wafers)
- Red gel icing for decorating
Instructions
- Preheat your oven to 350°F (175°C) and line a baking sheet with parchment paper.
- In a large mixing bowl, cream together the butter and sugar until light and fluffy.
- Beat in the egg and vanilla extract until smooth.
- In another bowl, whisk together the flour, baking powder, and salt. Gradually add the dry mixture into the wet ingredients, mixing until a soft dough forms.
- Roll the dough into balls about 1 ½ inches in size and place them evenly on the prepared baking sheet.
- Gently flatten each ball with your palm so the tops are smooth and slightly rounded.
- Bake for 9–11 minutes, or until the edges are set but not browned. Remove and let the cookies cool completely on a wire rack.
- While the cookies cool, prepare the icing by whisking together powdered sugar, milk, and vanilla until smooth and spreadable. Add a few extra drops of milk if needed for consistency.
- Spread a generous layer of white icing over the top of each cooled cookie, covering the surface evenly.
- Immediately press a chocolate candy in the center of each cookie to create the “pupil.”
- Using red gel icing, draw thin lines from the center outward to the edges of the cookie to resemble bloodshot veins.
- Let the decorated cookies sit at room temperature until the icing sets before serving.
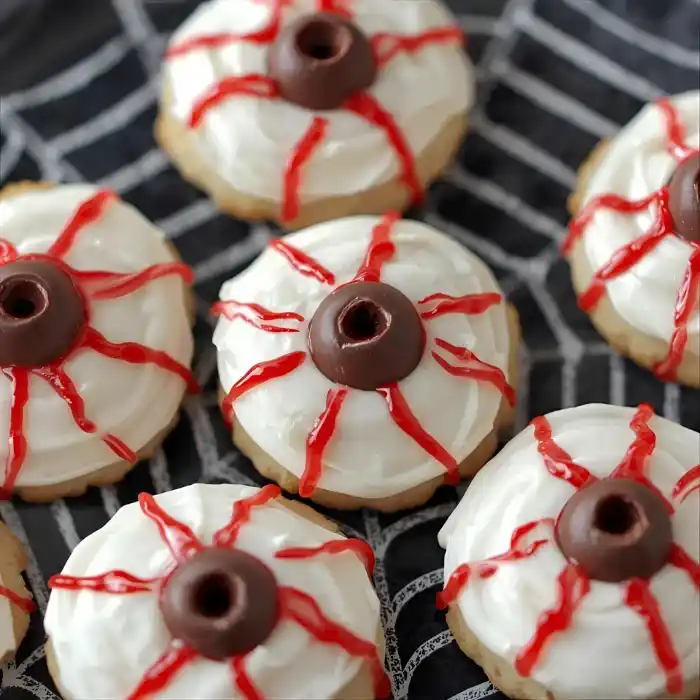
How Do Halloween Eyeball Cookies Get Their Creepy Look?
The striking look of these cookies comes from a few small details that make a big impact. The smooth white icing creates the “eyeball” base, a chocolate candy becomes the “pupil,” and thin red icing lines give that bloodshot effect.
Together, they turn a plain sugar cookie into something playful and eye-catching. Kids usually find them funny, while adults can’t resist the spooky charm either.
Can I Prepare The Cookie Dough In Advance?
Yes, preparing the dough ahead can make Halloween baking less stressful. Cookie dough stays fresh in the refrigerator for up to 3 days if tightly wrapped. For longer storage, it can be frozen.
- Refrigerating: Chill the dough in an airtight container or wrap it tightly in plastic wrap before placing it in the fridge.
- Freezing: Shape the dough into balls, place them on a tray to freeze until solid, then transfer them to a freezer bag. They’ll keep well for up to 2 months.
- Baking From Frozen: Simply bake the frozen dough balls directly, adding 1–2 extra minutes to the baking time.
How Do I Keep Halloween Eyeball Cookies Fresh?
Proper storage keeps the cookies soft and the icing intact. Once decorated, allow the icing to set completely before packing.
- Room Temperature: Store cookies in an airtight container at room temperature for 3–4 days. Keep layers separated with parchment paper to prevent smudging.
- Refrigerator: If you need them to last longer, refrigerate in a sealed container for up to a week. Allow them to come to room temperature before serving.
- Freezing: Undecorated cookies freeze better than decorated ones. Wrap cooled cookies individually, place them in a freezer-safe bag, and freeze for up to 2 months. Decorate only after thawing for best results.
How Do I Stop The Icing From Smudging?
The biggest issue with decorated cookies is icing that smears or sticks. This can be avoided with a little patience.
- Drying Time: Let the iced cookies rest uncovered for at least 2–3 hours before stacking.
- Storage Method: Place parchment or wax paper between layers in the container.
- Transporting: Use a shallow, firm container where cookies don’t slide around during travel.
Can I Use Different Types Of Chocolate For The Pupil?
Yes, you don’t have to stick to one type of chocolate. The idea is to create a bold center that looks like a pupil.
- Milk Chocolate: Gives a smooth, sweet finish that balances well with the icing.
- Dark Chocolate: Adds a richer flavor and makes the pupil stand out visually.
- Colored Candy Melts: For a twist, use green or blue candy melts instead of chocolate to create monster-like eyeballs.
What’s The Best Way To Serve Halloween Eyeball Cookies At A Party?
Presentation makes these cookies even more fun, especially during Halloween gatherings. Arrange them on a tray with playful details to get people excited.
- Spooky Plates: Place cookies on dark or spiderweb-patterned plates for contrast.
- Mix With Other Treats: Combine them with Halloween cupcakes, gummy worms, or candy corn for a festive display.
- Lighting: Serve them under dim light or near glowing pumpkins to highlight their eerie look.
What If My Cookie Dough Turns Out Too Sticky?
Sometimes dough consistency doesn’t feel right, but it can be fixed easily.
- Add Flour: If the dough sticks too much to your hands or rolling surface, add a tablespoon of flour at a time until it’s easier to handle.
- Chill The Dough: Place the dough in the refrigerator for 20–30 minutes. Chilling helps it firm up and makes rolling smoother.
Can Kids Help In Making Eyeball Cookies?
Yes, this recipe is great for family baking because kids enjoy the decorating part most. Just supervise when needed.
- Spreading Icing: Kids can help coat the cookies with white icing.
- Placing Chocolate Pupils: Children love pressing candies into the center.
- Drawing Veins: Older kids can use red gel to make funny or dramatic vein designs.
Why Did My Cookies Spread Too Much?
Cookies spreading can ruin the round eyeball shape. This usually happens when the dough is too soft or warm.
- Chill The Dough: Always chill the dough for 20–30 minutes if it feels sticky or soft. Cold dough holds shape better while baking.
- Measure Flour Correctly: Too little flour makes dough loose. Scoop flour into the cup and level it off rather than packing it down.
- Avoid Over-Beating Butter: Creaming butter and sugar too much can incorporate excess air, causing cookies to flatten in the oven.
Why Is My Icing Too Runny?
Runny icing won’t sit well on the cookie and may drip down the sides.
- Add More Sugar: Mix in a tablespoon of powdered sugar at a time until the icing thickens.
- Use Less Milk: If the icing is watery, reduce the milk slightly and mix again.
- Let It Sit: Sometimes icing thickens a little on its own after resting for 5–10 minutes.
Why Won’t My Icing Dry Or Set?
If icing stays sticky for hours, it makes storage and stacking tricky.
- Humidity: On humid days, icing may need more time. Place cookies in a cool, dry room and allow at least 3 hours to set.
- Consistency: Icing that’s too thin will never set fully. Adjust with extra powdered sugar until it holds its shape when spread.
- Air Circulation: Lay cookies in a single layer on a wire rack, uncovered, to help air dry the icing faster.
Why Do My Red Veins Smear Into The White Icing?
The spooky red effect looks best when the base icing is fully dry. If decorated too soon, the colors may bleed together.
- Patience: Always let the white icing dry for at least 2 hours before piping red gel.
- Use Gel, Not Liquid: Gel icing is thicker and designed for decorating, while liquid food coloring spreads too easily.
- Steady Hands: Apply thin, quick strokes with the tube to avoid pressing too hard into the white icing.
Why Are My Cookies Hard Instead Of Soft?
Halloween eyeball cookies should be soft and chewy, not crunchy unless that’s your goal.
- Overbaking: Remove the cookies from the oven as soon as the edges are set. They continue to cook slightly on the hot baking sheet.
- Thickness Of Dough: Rolling dough too thin makes cookies crispier. Keep them at least ½ inch thick for a soft bite.
- Storage: Keep baked cookies sealed in an airtight container. Exposure to air dries them out quickly.
Why Is My Chocolate Pupil Falling Off?
The chocolate center should stay firmly in place, but sometimes it loosens.
- Press While Wet: Always press the chocolate candy into the center while the icing is still wet so it sticks properly.
- Extra Glue: If one falls off later, dab a tiny bit of fresh icing underneath and press it back in place.
- Flat Surface: Use candies with a flat base rather than perfectly round chocolates to help them stay secure.
You May Also Like To Check Out These Recipes
- Halloween Veggie Tray
- 11 Halloween Sugar Cookies Decorating Ideas
- 150 Fun Halloween Food Ideas
- Halloween Deviled Eggs
- Halloween Brownies
- 75 Easy Halloween Treats
- 75 Best Halloween Appetizers
- Cheeseburger Soup
- Halloween Cheese Dip
- Halloween Oreos
- 60 Halloween Drinks For Kids And Adults
- Halloween Dirt Cake
- Halloween Taco Dip
- Halloween Pretzels
- Halloween Pasta Salad
- Pumpkin Whoopie Pies
- Halloween Spiderweb Pancakes
- 30 Amazing Halloween Side Dishes
- Halloween Witch Hat Cupcakes
- Halloween Melted Witch Cake
- Halloween Cookie Cake
- Halloween Chocolate Covered Strawberries
- Halloween Cake Pops
- 15 Spooky Halloween Pizza Ideas
- 50 Halloween Potluck Ideas
- 50 Halloween Finger Food Ideas
- 50 Halloween Dessert Ideas
- Jack-O’-Lantern Halloween Pumpkin Cake
- Fall And Halloween Coffee Bar: Setup And Decoration Ideas
- Halloween Charcuterie Board
- Spooky Halloween Fruit Platter
- Halloween Chocolate Bark
- Halloween Cookie Cake
- Halloween Dirt Cake
- Halloween Eyeball Pizza
- Halloween Cake Pops
- Halloween Chocolate Covered Strawberries
- Halloween Ghost Pizza
- Halloween Melted Witch Cake
- Halloween Mini Mummy Pizzas
- Best Orange Cake
- Halloween Brownies
- Halloween Vegan Spider Pizza Bites
- 7 Layer Halloween Taco Dip
- Halloween Brownies
- Halloween Ghost Cookies
- Halloween Cheese Dip
- Halloween Deviled Eggs
- Halloween Oreos
- Halloween Rice Krispie Treats
- Halloween Deviled Eggs
- 75 Easy Halloween Treats
- 75 Best Halloween Appetizers
- 150 Fun Halloween Food Ideas
- 60 Halloween Drinks For Kids And Adults
- 30 Amazing Halloween Side Dishes
- Halloween Witch Hat Cupcakes
- 15 Spooky Halloween Pizza Ideas
- 50 Halloween Dessert Ideas
- Halloween Snack Mix
- Halloween Popcorn Balls
- 50 Halloween Potluck Ideas
- 50 Halloween Finger Food Ideas
- Fall And Halloween Coffee Bar: Setup And Decoration Ideas
- Halloween Dirt Cups
- Halloween Mummy Wrap Cookies
- Halloween Pasta Salad
- Halloween Frankenstein Cookies
- Halloween Popcorn Balls
- Halloween Pumpkin Face Cookies
- Halloween Rice Krispie Treats
- Halloween Spiderweb Pancakes
- Halloween Spiderweb Cookies
- Halloween Vampire Teeth Cookies
- Halloween Witch Hat Cupcakes
- Halloween Bat Cookies
- Skeleton Halloween Cupcakes
- Halloween Cauldron Cupcakes
- Halloween Witch’s Broom Cupcakes
- Halloween Black Cat Cookies
- Halloween Bloody Finger Cookies
- Halloween Candy Corn Cookies