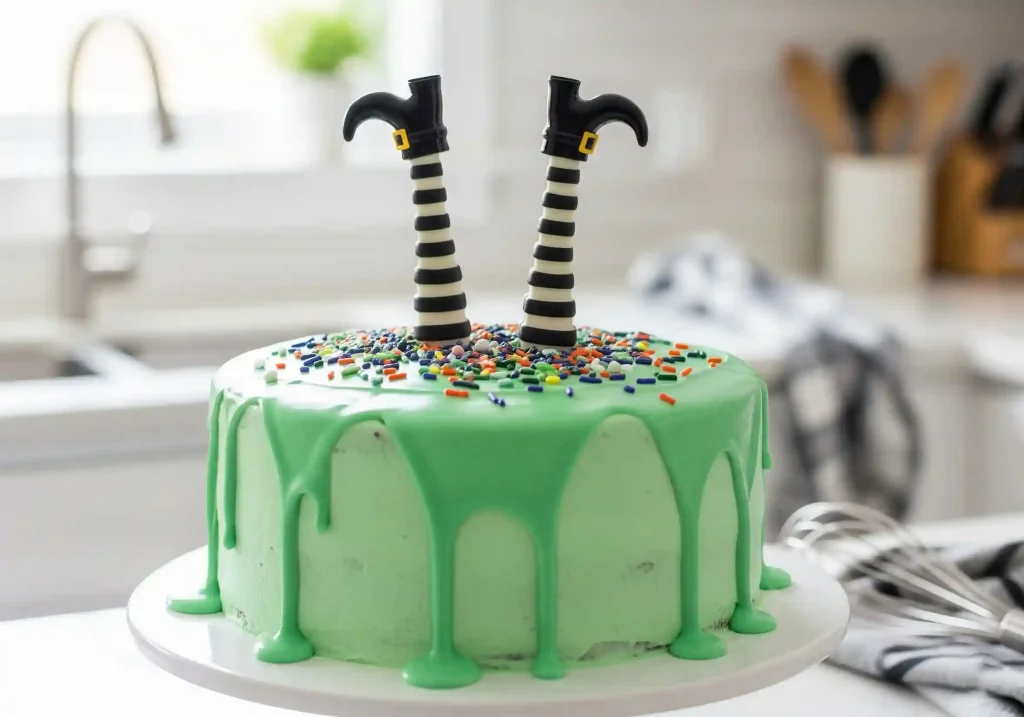
When I first saw the idea of a melted witch cake, it instantly made me smile. It looked playful, a little mischievous, and exactly the kind of dessert that turns heads at a Halloween table.
The striped legs poking out of the bright green frosting tell a whole story without saying a word—it feels like a witch had a rather unlucky landing right into a sweet surprise.
That’s the charm of this cake: it’s not just dessert, it’s a centerpiece that sparks laughter the moment it’s brought out.
The beauty of this recipe is how it mixes lighthearted creativity with a touch of drama. The smooth green frosting, dripping like melting goo down the sides, sets the stage.
A shower of colorful sprinkles gives it a playful pop, while the witch’s legs rising from the top finish the look in the most memorable way.
It’s a cake designed to stop everyone mid-conversation, and then invite them to cut a slice and enjoy.
Halloween is about fun, imagination, and just the right amount of mischief, and this cake captures all of that in one dessert.
It’s playful enough for kids to love and clever enough for adults to appreciate.
Making it feels almost like crafting a little scene for your table, one that tells a story before anyone even tastes a bite.
Table of Contents
Halloween Melted Witch Cake Recipe
Ingredients
For The Cake
- 2 ½ cups all-purpose flour
- 2 ½ tsp baking powder
- ½ tsp baking soda
- ½ tsp salt
- 1 cup unsalted butter, softened
- 1 ¾ cups granulated sugar
- 4 large eggs, room temperature
- 1 tbsp vanilla extract
- 1 cup whole milk, room temperature
For The Frosting And Decoration
- 1 cup unsalted butter, softened
- 4 cups powdered sugar, sifted
- 3–4 tbsp heavy cream or milk
- 1 tsp vanilla extract
- Green gel food coloring
- 1 cup white chocolate chips or candy melts
- ¼ cup heavy cream (for drip)
- Assorted colorful sprinkles
- Witch legs cake toppers (striped legs with black boots)
Instructions
- Preheat your oven to 350°F (175°C). Grease and flour two 8-inch round cake pans, then line the bottoms with parchment paper for easy release.
- In a medium bowl, whisk together flour, baking powder, baking soda, and salt. Set aside.
- In a large mixing bowl, beat softened butter and sugar together with a hand mixer or stand mixer until light and fluffy, about 3–4 minutes.
- Add eggs one at a time, mixing well after each addition, then blend in the vanilla extract.
- Add the dry ingredients to the butter mixture in three parts, alternating with the milk. Start and end with dry ingredients, mixing on low speed until just combined. Do not overmix.
- Divide the batter evenly into the prepared pans, smoothing the tops. Bake for 25–30 minutes or until a toothpick inserted in the center comes out clean.
- Remove cakes from the oven and let them cool in pans for 10 minutes. Transfer to a wire rack and cool completely before frosting.
- For the frosting, beat softened butter until creamy. Gradually add powdered sugar, one cup at a time, mixing well after each addition. Add vanilla extract and 3 tablespoons cream, beating until smooth and fluffy. Adjust consistency with a little extra cream if needed.
- Tint the frosting with green gel food coloring until you get a bright witchy green. Mix thoroughly to avoid streaks.
- Place one cake layer on a serving plate and spread a layer of frosting on top. Place the second cake layer over it and coat the entire cake with a thin crumb coat. Chill for 20 minutes to set.
- Apply a thick, smooth layer of green frosting over the cake. Use a spatula to get clean edges and a flat surface.
- For the drip effect, heat white chocolate chips and heavy cream together in a microwave-safe bowl for 20–30 seconds. Stir until melted and smooth. Tint with a few drops of green food coloring. Let it cool slightly so it thickens but is still pourable.
- Spoon the green chocolate drip along the edges of the cake, allowing it to drip naturally down the sides. Spread a thin layer on top to blend.
- While the drip is still slightly soft, scatter colorful sprinkles evenly across the top for a festive touch.
- Finish by inserting witch legs toppers straight down into the center of the cake so they look like the witch has melted into the dessert.
What Makes A Halloween Melted Witch Cake Special?
A Halloween melted witch cake is more than just a dessert, it’s a playful centerpiece that tells a story. The dripping green frosting, colorful sprinkles, and striped witch legs create a fun design that instantly grabs attention at any party.
What makes it truly special is how it combines creativity with flavor, giving you a cake that looks exciting and tastes delicious.
How Do I Make The Frosting Smooth And Even?
Creating a smooth frosting layer can feel tricky, but with a little patience it’s simple to achieve. Start with a crumb coat to lock in loose crumbs, then chill the cake before applying the final layer.
A flat spatula or cake scraper helps spread the frosting evenly. If you see small gaps, add a little extra frosting and smooth again until the surface looks neat and clean.
How Can I Get The Green Drip Effect Just Right?
The drip effect gives this cake its melted look, and it’s all about timing. The chocolate drip should be thick enough to stay on the cake but thin enough to run down the sides.
- Cool the mixture slightly: Let the melted chocolate and cream sit for a few minutes before using so it’s not too runny.
- Test before pouring: Try one drip on the side of the cake. If it slides too fast, let the mixture cool longer.
- Use a spoon or squeeze bottle: A spoon lets you control each drip, while a squeeze bottle makes it more precise.
Can I Use Different Colors For The Drip And Frosting?
Yes, you can play with different shades depending on the look you want.
- Classic witchy green: The most popular color for a melted witch cake.
- Purple or orange drip: Adds a bold Halloween twist.
- Black frosting base: Makes the green drip stand out even more.
Using food-grade gel coloring gives stronger, brighter results without changing the taste of the cake.
What Kind Of Sprinkles Work Best On A Melted Witch Cake?
Sprinkles add life to the top of the cake, and choosing the right ones makes a big difference.
- Rainbow sprinkles: Brighten the cake and make it kid-friendly.
- Halloween-themed sprinkles: Shapes like bats, pumpkins, or candy eyes add more personality.
- Nonpareils or confetti sprinkles: Create a light, scattered effect.
Mixing two or more types also gives the cake a unique, festive finish.
Where Can I Find Witch Leg Cake Toppers?
Witch legs are the main feature of this cake, and they’re easy to find or make.
Many baking supply shops carry them around Halloween, or you can craft your own using striped paper straws and small boots made of fondant or plastic decorations.
The important part is to choose toppers that are food-safe and sturdy enough to stay upright in the cake.
How Do I Store A Halloween Melted Witch Cake?
Storing the cake properly keeps it fresh and looking its best.
- Short-term storage: Keep the cake covered in a cake container at room temperature for up to 2 days if your kitchen is cool.
- Refrigeration: If the room is warm, refrigerate the cake. Place it in a cake box or cover loosely with plastic wrap to protect the decorations. Bring it to room temperature before serving for the best flavor.
- Freezing unfrosted layers: You can bake the cake layers in advance, wrap them tightly in plastic wrap and foil, and freeze for up to 2 months. Thaw fully before frosting.
Can I Make The Halloween Melted Witch Cake Ahead Of Time?
Yes, this cake can be prepared in stages to save time before your event.
- Cake layers: Bake and freeze or refrigerate them in advance.
- Frosting: Make the frosting a day before and keep it covered in the fridge. Whip it again before use.
- Assembly: Add the drip, sprinkles, and witch legs on the same day you plan to serve so the decorations stay fresh and firm.
This approach makes the process less stressful and ensures the final cake looks bright and fun.
Why Is My Drip Too Runny Or Too Thick?
The drip is the most eye-catching part of the cake, but it can sometimes go wrong. The key lies in the consistency of the melted chocolate and cream.
- If the drip is too runny: The mixture is too warm. Let it cool for a few extra minutes before applying. You can also stir in a little more melted chocolate to thicken it.
- If the drip is too thick: Add a teaspoon of warm cream, mix well, and test again until it flows smoothly down the sides.
Always test on the edge of a bowl or a small section of cake first.
Why Does My Frosting Look Uneven Or Crumbly?
Uneven frosting often comes from skipping the crumb coat or working with cake layers that are too warm.
- Apply a crumb coat: Spread a thin layer of frosting first, then chill the cake for at least 20 minutes before the final coat.
- Work with cooled layers: Warm cakes release crumbs and make the frosting messy, so always let them cool fully.
- Smooth with a scraper: Holding a scraper or flat spatula against the cake while turning it helps create straight, clean edges.
Why Did My Witch Legs Topper Sink Into The Cake?
Sometimes the toppers don’t stay upright, especially if the frosting is too soft.
- Chill the frosted cake first: A cold cake holds decorations better.
- Use supports if needed: Insert a small piece of straw or skewer inside the cake before placing the topper to give it stability.
- Choose lightweight toppers: Heavy decorations can sink, so stick with fondant, lightweight plastic, or hollow designs.
Why Did My Cake Turn Out Dry?
A dry cake can happen if the batter is overmixed or the layers are baked too long.
- Mix until just combined: Overmixing creates dense, dry cakes.
- Check doneness early: Insert a toothpick a few minutes before the baking time ends. If it comes out clean, the cake is ready.
- Store properly: Keep the cake covered once cooled to prevent it from drying out before frosting.
Why Don’t My Colors Look Bright Enough?
Color plays a big role in the melted witch design, and dull shades can make it look less exciting.
- Use gel food coloring: It gives stronger, brighter results than liquid coloring.
- Add color gradually: Mix a few drops at a time until you reach the shade you want.
- Whip thoroughly: Uneven mixing causes streaks, so always blend fully before applying.
You May Also Like To Check Out These Recipes
- Halloween Veggie Tray
- 11 Halloween Sugar Cookies Decorating Ideas
- 150 Fun Halloween Food Ideas
- Halloween Deviled Eggs
- Halloween Brownies
- 75 Easy Halloween Treats
- 75 Best Halloween Appetizers
- Cheeseburger Soup
- Halloween Cheese Dip
- Halloween Dirt Cups
- Halloween Oreos
- Halloween Rice Krispie Treats
- 60 Halloween Drinks For Kids And Adults
- Halloween Dirt Cake
- Halloween Taco Dip
- Halloween Pretzels
- Halloween Pasta Salad
- Pumpkin Whoopie Pies
- Halloween Spiderweb Pancakes
- 30 Amazing Halloween Side Dishes
- Halloween Witch Hat Cupcakes
- Halloween Melted Witch Cake
- Halloween Cookie Cake
- Halloween Chocolate Covered Strawberries
- Halloween Cake Pops
- 15 Spooky Halloween Pizza Ideas
- Halloween Popcorn Balls
- 50 Halloween Potluck Ideas
- 50 Halloween Finger Food Ideas
- 50 Halloween Dessert Ideas
- Halloween Snack Mix
- Jack-O’-Lantern Halloween Pumpkin Cake
- Fall And Halloween Coffee Bar: Setup And Decoration Ideas
- Halloween Charcuterie Board
- Spooky Halloween Fruit Platter
- Halloween Chocolate Bark
- Halloween Cookie Cake
- Halloween Dirt Cake
- Halloween Eyeball Pizza
- Halloween Cake Pops
- Halloween Chocolate Covered Strawberries
- Halloween Ghost Pizza