Welcoming a new baby is a moment full of joy, warmth, and love. For celebrations as precious as these, every detail matters—especially the treats on the table.
These baby shower cookies are more than just sweet bites; they’re tiny works of art that add charm and personality to the occasion.
When I first made these cookies, I wanted them to reflect the happiness of the day. The pastel hues, delicate designs, and soft icing details made each cookie feel unique and heartfelt.
They became conversation starters, little pieces of creativity that everyone admired.
If you’re hosting a baby shower or celebrating the arrival of a little one, these cookies are the perfect way to add that extra layer of thoughtfulness.
And don’t worry, I’ll guide you through every step to ensure yours turn out just as delightful. Let’s make something truly memorable together!
Baby In Bloom Cookies Recipe
Ingredients
For The Sugar Cookies
- 1 cup unsalted butter, softened
- 1 cup granulated sugar
- 1 large egg
- 1 1/2 tsp vanilla extract
- 1/2 tsp almond extract (optional)
- 3 cups all-purpose flour
- 1 tsp baking powder
- 1/2 tsp salt
For The Royal Icing
- 4 cups powdered sugar, sifted
- 3 tbsp meringue powder
- 6 tbsp water (adjust as needed)
- Gel food coloring (pink, light blue, and white for pastel shades)
- Black gel icing or edible black marker
Tools
- Circle and hat-shaped cookie cutters
- Piping bags
- Small round piping tips (e.g., #1 or #2)
- Toothpicks for fine details
- Edible black marker (for baby face details)
- Rolling pin with guides for uniform thickness
- Small flower piping tip for roses (e.g., Wilton #101)
Instructions
Step 1. Prepare The Sugar Cookies
- In a large bowl, cream butter and sugar until light and fluffy (about 2-3 minutes).
- Add the egg, vanilla extract, and almond extract (if using). Beat until combined.
- In a separate bowl, whisk together flour, baking powder, and salt. Gradually add this to the wet ingredients until a dough forms.
- Divide the dough in half, flatten into discs, and wrap in plastic wrap. Chill for at least 1 hour.
- Preheat the oven to 350°F (175°C) and line baking sheets with parchment paper.
- Roll out the chilled dough to 1/4-inch thickness using a rolling pin with guides for even cookies. Cut out circle and hat shapes.
- Place cookies on the prepared baking sheets and bake for 8-10 minutes, or until edges are lightly golden. Cool completely on a wire rack.
Step 2. Make The Royal Icing
- In a mixing bowl, combine powdered sugar and meringue powder. Add water one tablespoon at a time and beat until stiff peaks form (about 5 minutes).
- Divide the icing into bowls and color them using gel food coloring:
- Pink and blue should be lightened by adding white icing for pastel tones.
- Adjust the icing consistency:
- For outlining: Thick enough to hold its shape.
- For flooding: Thin enough to spread smoothly (add a few drops of water).
Step 3. Decorate The Cookies
- Circle Cookies (“Baby in Bloom”)
- Outline the cookie with pink icing and flood the center. Use a toothpick to spread evenly and remove air bubbles. Allow to dry for 2-3 hours.
- Practice piping the words “baby in bloom” on parchment paper using blue icing with a small piping tip. Once confident, pipe onto the dried pink surface.
- To create the rose, use a small flower piping tip and white or light blue icing. Pipe petals in a circular motion, starting from the center outward. Add a green leaf using a leaf tip or a small round tip.
- Hat-Shaped Cookies
- Outline and flood the hat shape with light blue icing. Let dry for 1-2 hours.
- Pipe the trim of the hat using a slightly thicker consistency icing. For the pom-pom, pipe a rounded dot at the tip of the hat, and use a toothpick to create a textured “fuzzy” effect.
- Baby Face Cookies
- Flood the circle with pink icing and let it dry. Pipe a skin-tone oval or circle for the baby’s face.
- Pipe the hat with light blue icing and add a trim or bow detail as shown in the image.
- Once the icing has dried completely, use black icing or an edible marker to draw the baby’s eyes and mouth. For a smooth finish, practice on parchment paper first.
- Drying Time
- Allow the cookies to dry completely, preferably overnight, before handling or packaging to ensure the icing is firm.

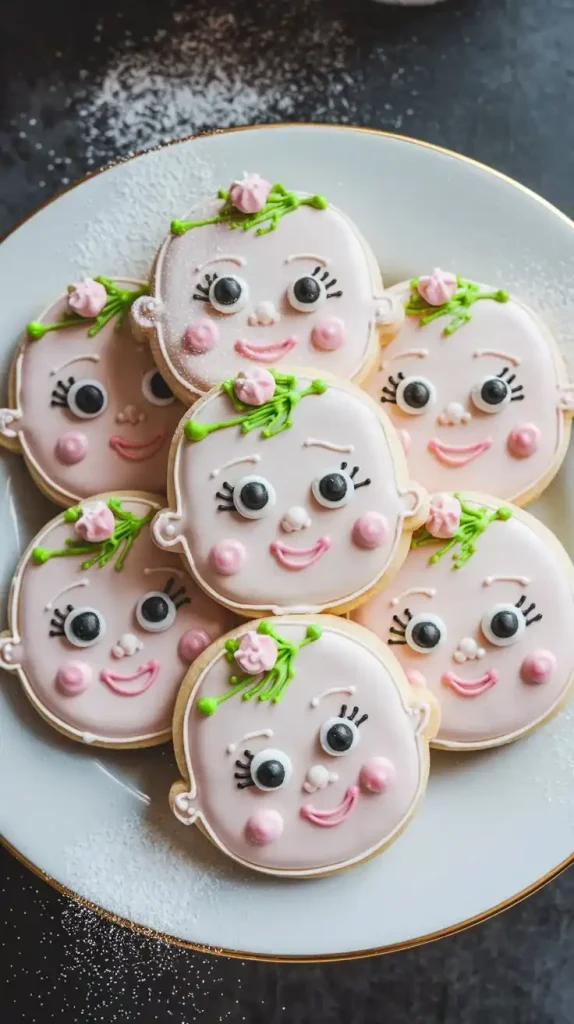
Adorable Baby Face Cookies
Ingredients
For The Sugar Cookies
- 1 cup unsalted butter, softened
- 1 cup granulated sugar
- 1 large egg
- 1 1/2 tsp vanilla extract
- 1/2 tsp almond extract (optional)
- 3 cups all-purpose flour
- 1 tsp baking powder
- 1/2 tsp salt
For The Royal Icing
- 4 cups powdered sugar, sifted
- 3 tbsp meringue powder
- 6 tbsp water (adjust as needed)
- Gel food coloring:
- Pale pink (for the face)
- White (for accents)
- Black (for eyes and lashes)
- Green (for leaves)
- Light pink (for flowers and mouth)
Decorative Elements
- Edible candy eyes (medium size)
- Pink edible pearls (for cheeks)
- Piping bags and fine tips (e.g., #1 or #2 for details, #101 for flowers)
- Toothpicks for fine detailing
Instructions
Step 1. Make The Sugar Cookies
- Prepare the Dough: In a large bowl, cream butter and sugar until light and fluffy (2-3 minutes). Add the egg, vanilla extract, and almond extract (if using) and mix well.
- Combine Dry Ingredients: In a separate bowl, whisk together flour, baking powder, and salt. Gradually add the dry ingredients to the wet mixture until a dough forms.
- Chill the Dough: Divide the dough into two discs, wrap in plastic, and refrigerate for at least 1 hour.
- Shape the Cookies: Preheat the oven to 350°F (175°C) and line baking sheets with parchment paper. Roll out the dough to 1/4-inch thickness on a floured surface and use a round cookie cutter to cut out circles.
- Bake: Place cookies on the prepared baking sheet and bake for 8-10 minutes or until edges are just lightly golden. Cool completely on a wire rack.
Step 2. Prepare The Royal Icing
- Mix the Icing: In a large bowl, combine powdered sugar and meringue powder. Add water gradually and beat on medium-high speed until stiff peaks form (about 5 minutes).
- Color the Icing: Divide icing into bowls and tint with gel food coloring:
- Pale pink for the baby’s face
- White for accents and base details
- Black for eyes and lashes
- Green for leaves
- Light pink for flowers and smiles
- Adjust Consistency
- Thick consistency for outlining.
- Thin consistency for flooding (add water a few drops at a time).
Step 3. Decorate the Cookies
1: Base Layer (Baby’s Face)
- Outline and flood the cookie with pale pink icing. Use a toothpick to smooth out the icing and remove air bubbles. Allow this layer to dry completely (2-3 hours).
2: Eyes And Eyelashes
- Attach edible candy eyes with a small dab of white icing.
- Use black icing to pipe small lashes above the eyes. For added detail, pipe tiny white dots on the eyes to mimic highlights.
3: Cheeks and Mouth
- Attach pink edible pearls for rosy cheeks using a dab of icing.
- Pipe a small light pink smile below the eyes using a fine tip.
4: Floral and Leaf Accents
- Use green icing and a fine tip to pipe small leaves and stems on the top of the face.
- Pipe tiny pink flowers using a small flower tip (e.g., Wilton #101). Let dry completely.
Pro Tips For Making Baby Shower Cookies
Here are expert-level tips to help you achieve stunning results while making these cookies:
Before You Start
- Use Quality Ingredients: Fresh butter, pure vanilla extract, and high-quality food coloring make a big difference in flavor and appearance.
- Weigh Your Ingredients: For precise results, use a kitchen scale instead of measuring cups. Consistency matters in baking.
Preparing The Dough
- Chill Twice: Chill the dough before rolling it out and after cutting the shapes. This double-chill method helps maintain clean, crisp edges during baking.
- Even Thickness: Use rolling pin guide rings or two rulers of equal thickness to roll out your dough evenly. Uneven dough can lead to cookies baking inconsistently.
Cutting The Cookies
- Dip Cutters in Flour: Lightly dust your cookie cutters with flour to prevent sticking. Shake off any excess flour before cutting.
- Cut Close Together: Minimize scraps by placing cutters as close together as possible. Re-rolled scraps can result in tougher cookies.
Baking The Cookies
- Rotate the Tray: For even baking, rotate the cookie tray halfway through. This ensures all cookies bake evenly, regardless of hot spots in your oven.
- Don’t Overbake: Remove cookies as soon as the edges are slightly golden. They will continue cooking slightly as they cool.
Decorating The Cookies
- Plan Your Design: Sketch your icing design on paper before you start decorating. This helps you visualize the final look and avoid mistakes.
- Color Matching: Mix all your icing colors at once to ensure consistency across the batch. Store them in airtight bags to prevent drying out.
- Use Toothpicks for Detail: A toothpick can help fix minor icing mistakes or spread icing into tight corners.
- Drying Time: Place cookies in front of a fan for quicker drying. Avoid stacking or packaging until the icing is completely hard.
Common Mistakes To Avoid
- Skipping the Chill Step: Warm dough is harder to work with and leads to cookies that lose their shape.
- Overloading the Icing Bag: Fill your piping bags halfway to maintain control and avoid hand fatigue.
How To Store Baby Shower Cookies?
Proper storage keeps your cookies fresh and their designs intact. Here’s everything you need to know:
Storing Undecorated Cookies
- Room Temperature: Keep plain cookies in an airtight container at room temperature for up to a week. Separate layers with parchment paper to prevent sticking.
- Freezing: For longer storage, freeze undecorated cookies. Place them in a single layer on a tray to freeze, then transfer them to a zip-top bag or airtight container. They’ll stay fresh for up to three months.
Storing Decorated Cookies
- Allow Full Drying: Let the royal icing dry completely before storing. This can take up to 24 hours, depending on the humidity.
- Layer with Care: Place cookies in an airtight container, separating each layer with wax or parchment paper.
- Avoid the Fridge: Refrigeration can cause the icing to become sticky and ruin the decorations. Store at room temperature instead.
- Freeze Decorated Cookies Properly: If freezing, first wrap each cookie individually in plastic wrap, then layer them in an airtight container. Thaw at room temperature without unwrapping to avoid condensation spoiling the icing.
How Can I Fix My Icing If It’s Too Runny Or Too Thick?
Getting the perfect icing consistency is key to beautifully decorated cookies. Here’s how you can fix common issues:
If Your Icing Is Too Runny
Runny icing can make it hard to pipe designs or stay in place. Here’s how to fix it:
- Add More Powdered Sugar: Gradually add a teaspoon of powdered sugar at a time to thicken the icing. Mix well after each addition.
- Mix Gently: Stir slowly to avoid air bubbles that can affect the texture.
- Check Consistency: Lift a spoon or spatula and let the icing drip back into the bowl. It should fall in a smooth ribbon and hold its shape for a few seconds.
If Your Icing Is Too Thick
Thick icing can be hard to spread or pipe smoothly. Here’s how to adjust it:
- Add Water or Lemon Juice: Add a few drops at a time and mix thoroughly. Be cautious not to over-thin.
- Mix Slowly: Stir until the icing flows easily but still holds its shape when piped.
- Test It: Run a spoon through the icing. It should flow back and smooth out within 10 seconds for flooding, or hold soft peaks for piping.
Why Do My Cookies Crack Or Break During Decoration, And How Can I Prevent It?
Cracked or broken cookies can be frustrating, but there are simple ways to avoid this issue:
Causes Of Cracking Or Breaking
- Overhandling: Picking up or moving cookies too often can cause cracks.
- Thin Cookies: If the dough is rolled too thin, the cookies can become fragile.
- Underdone Cookies: Soft or underbaked cookies may fall apart.
How To Prevent It
- Bake with Care: Roll the dough to an even thickness (about ¼ inch is ideal). Avoid overbaking or underbaking.
- Handle Gently: Use a spatula to lift cookies instead of your fingers to avoid stress points.
- Let Icing Dry: Ensure the icing is fully set before stacking or handling decorated cookies.
- Store Properly: Place cookies in a single layer in an airtight container, or separate layers with parchment paper.
What To Do If A Cookie Breaks
- Fix with Icing: Use royal icing to “glue” broken pieces together. Once dry, the cookie will hold its shape.
- Turn It into Crumbles: If the cookie is beyond repair, use the crumbs as a topping for ice cream or yogurt!
You May Also Like To Check Out These Recipes
- Mardi Gras King Cake
- Strawberry Crunch Cupcakes
- Chocolate Peanut Butter Cupcakes
- Red Velvet Cake Pops
- Valentine’s Day Sugar Cookies
- Red Velvet Cinnamon Rolls
- Red Velvet Pancakes
- Red Velvet Cheesecake Brownies
- Red Velvet Cheesecake Swirl Brownies
- Valentine’s Day Vanilla Nougat Candy Bar Bites
- Valentine’s Day Mini Heart Mousse Cakes
- Homemade In N Out Burger With In N Out Sauce
- Crockpot Butter Chicken
- Spinach Stuffed Chicken Breasts
- Marry Me Chicken
- How To Make Ribeye Steak In The Oven
- Breakfast Egg Muffins
- Egg In A Hole
- Galentines Day Dessert Charcuterie Board
- Pina Colada
- Sweetheart Valentine Cake
- Red Velvet Cake
- Conversation Heart Cookies
- Valentine’s Day Heart Pizza
- Chicken Fettuccine Alfredo
- Baked Asparagus With Parmesan Cheese
- Steak Marinade
- Cherry Cobbler
- Red Velvet Crinkle Cookies
- Gluten-Free Black Bean Brownies
- Non-Alcoholic Italian Cream Soda
- Non-Alcoholic Strawberry Margarita
- Non-Alcoholic Cranberry Shirley Temple
- Non-Alcoholic Pineapple Mocktail
- Chocolate Strawberry Cake
- Chocolate Raspberry Cake
- Strawberry Sugar Cookies
- Red Velvet Cookies
- Lemon Raspberry Cookies
- Strawberries And Cream Cake
- Marble Heart Sugar Cookies
- Red Velvet Peanut Butter Blossom Cookies
- Flourless Peanut Butter Chocolate Chunk Cookies
- Red Velvet Cake Mix Cookies
- Pink Ombre Cake
- Strawberry Cake Mix Cookies
- Strawberry Crunch Cookies
- Strawberry Shortcake Cookies
- Ground Beef Spinach Mushroom Pasta
- Pink Princess Cupcakes
- Strawberry Pretzel Jello Salad
- Fruit Dip With Marshmallow Fluff
- Chipotle Corn Salsa
- Mini Cheese Balls
- Chicken Cacciatore
- Antipasto Skewers
- Herb-Stuffed Tomatoes
- Ricotta-Asparagus Tart
- Arancini (Italian Stuffed Rice Balls)
- Valentines Cake Pops
- Ginger Glazed Salmon
- Slow Cooker Pot Roast
- Instant Pot Beef Short Ribs
- Cheese Danish
- Pink Velvet Cake
- Strawberry Mousse
- Creamy Beet Pasta