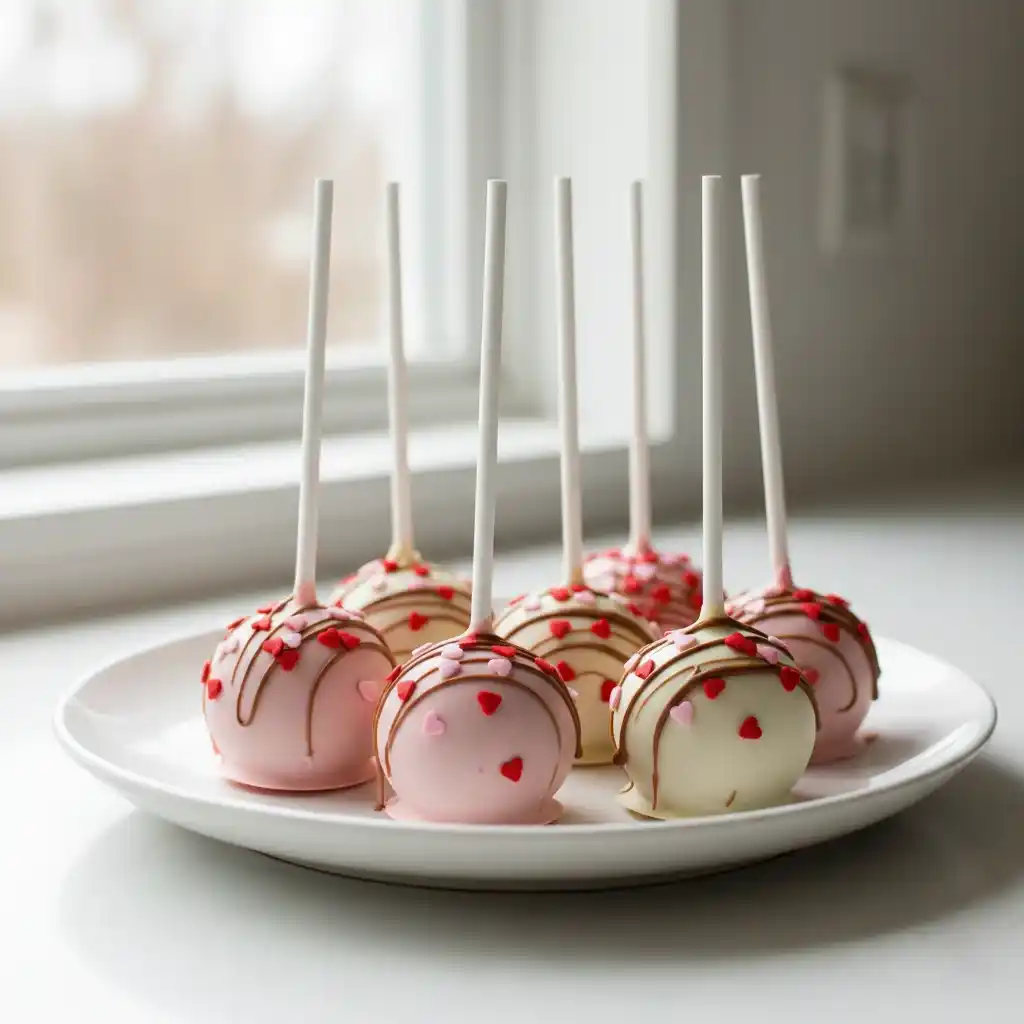
If you want a dessert that says “I love you” without turning your kitchen upside down, Valentine Day cake pops are the answer.
They’re the perfect sweet treat for Valentine’s Day parties, romantic surprises, classroom celebrations, or edible gifts, all wrapped up in one adorable bite.
The special magic of this recipe is how it transforms a simple cake into bakery-style cake pops with a smooth, flawless coating and a pretty pink-and-cream finish—giving you that wow-factor with surprisingly little stress.
The emotional payoff? Pure joy. These cake pops instantly make people feel loved, celebrated, and a little spoiled.
Take a bite and you’ll notice the contrast right away: a soft, moist cake center that almost melts in your mouth, surrounded by a delicate chocolate shell that snaps gently when you bite into it.
The flavors are sweet vanilla cake and creamy white chocolate, balanced with just a hint of richness from butter and cream. The texture is what makes them irresistible—fudgy and tender inside, smooth and silky outside.
Vanilla cake and high-quality white chocolate are the star ingredients here, quietly doing all the heavy lifting to create that classic, crowd-pleasing Valentine’s flavor.
These Valentine Day cake pops are beginner-friendly, don’t require fancy tools, and can be made ahead. You’ll be guided through every tiny detail so you get perfect results on your first try.
Serve them as-is, wrap them as gifts, or customize the colors to match your celebration. Once you make these, they won’t just be a Valentine’s treat—they’ll become your go-to dessert whenever you want to impress with minimal effort.
Table of Contents
Valentines Cake Pops
Ingredients
For The Cake
- 1 cup all-purpose flour
- 1 teaspoon baking powder
- 1/4 teaspoon salt
- 1/2 cup unsalted butter, softened
- 3/4 cup granulated sugar
- 2 large eggs, at room temperature
- 1 teaspoon vanilla extract
- 1/2 cup whole milk, at room temperature
For The Cake Pop Mixture
- 1/3 cup unsalted butter, softened
For Coating And Decorating
- 3 cups white chocolate melting wafers or couverture white chocolate, finely chopped
- 1/2 teaspoon neutral oil (optional, for smoother melting)
- Pink food coloring, as needed
- Red and pink heart sprinkles, as needed
- 20 to 24 cake pop sticks
Instructions
- Preheat your oven to 350°F (175°C) and lightly grease an 8-inch round cake pan. Line the bottom with parchment paper for easy release.
- In a bowl, whisk together the flour, baking powder, and salt. Set this aside.
- In a separate large bowl, beat the softened butter and sugar together until pale, light, and fluffy. This step is important for a soft cake texture.
- Add the eggs one at a time, mixing well after each addition. Stir in the vanilla extract.
- Add the dry ingredients in two parts, alternating with the milk. Mix gently until just combined. Do not overmix, or the cake will be dense.
- Pour the batter into the prepared pan and smooth the top. Bake for 22 to 26 minutes, or until a toothpick inserted in the center comes out clean.
- Let the cake cool completely in the pan, then remove it and crumble it finely into a large bowl using clean hands or a fork. The crumbs should be soft and even, with no large chunks.
- Add the softened butter to the cake crumbs and mix until the mixture holds together when pressed. It should feel moist but not greasy.
- Scoop about 1 tablespoon of the mixture and roll it gently between your palms to form a smooth ball. Place each ball on a parchment-lined tray.
- Chill the cake balls in the refrigerator for at least 30 minutes. This helps them stay firm during dipping.
- Melt the white chocolate in a heatproof bowl over gentle heat or in short microwave bursts, stirring frequently until smooth. Add the oil if needed for a thinner consistency.
- Divide the melted chocolate into bowls if using different colors, and tint some with pink food coloring until you reach a soft pastel shade.
- Dip the tip of a cake pop stick into the melted chocolate, then insert it halfway into a chilled cake ball. Repeat for all cake balls, then chill again for 10 minutes to secure the sticks.
- Holding the stick, dip each cake pop into the melted chocolate, gently rotating to coat it completely. Tap off excess chocolate by lightly tapping your wrist.
- While the coating is still wet, decorate with heart sprinkles.
- Place the finished cake pops upright in a stand or poke the sticks into a foam block to dry completely at room temperature.
What Makes Valentine Day Cake Pops Different From Regular Cake Pops?
Valentine Day cake pops are all about love, color, and presentation, but the base technique is still simple and beginner-friendly.
What makes them special is the focus on soft pastel colors, heart-shaped sprinkles, and a smooth chocolate shell that feels extra celebratory. You’ll notice a few key differences compared to everyday cake pops:
- Color theme: soft pinks, creams, and reds that instantly say Valentine’s Day.
- Flavor balance: gentle vanilla and creamy chocolate flavors that almost everyone loves.
- Presentation style: designed to be gifted, shared, or displayed, not just eaten.
This makes them perfect when you want something festive without learning a brand-new baking skill.
Why Did My Valentine Day Cake Pops Crack After Dipping?
Cracking usually happens because of a temperature shock between the cold cake balls and the warm coating. When the inside expands faster than the coating can handle, small cracks appear. To prevent this, keep these tips in mind:
- Chilling time: let the cake balls chill until firm but not frozen solid.
- Coating temperature: allow the melted chocolate to cool slightly so it is warm, not hot.
- Room rest: let chilled cake balls sit at room temperature for 5 to 10 minutes before dipping.
These small adjustments make a big difference and help you get smooth, professional-looking cake pops.
Can I Make Valentine Day Cake Pops Ahead Of Time?
Yes, Valentine Day cake pops are perfect for making ahead, which is great if you are planning for a party or gifts. You can prepare them in stages to save time and reduce stress. Here is how you can plan ahead:
- Cake base: bake and crumble the cake up to 2 days in advance and keep it covered in the refrigerator.
- Rolled cake balls: store shaped cake balls in the fridge for up to 48 hours before dipping.
- Fully finished cake pops: once dipped and set, they stay fresh for several days when stored correctly.
This flexibility makes them one of the easiest desserts to prepare in advance.
How Do I Store Valentine Day Cake Pops Properly?
Proper storage keeps your cake pops moist inside and smooth on the outside. The key is protecting them from air and moisture. Follow these storage methods:
- Room temperature: store in a cool, dry place for up to 2 days, away from heat and sunlight.
- Refrigerator: place them in an airtight container for up to 5 days.
- Container setup: line the container with paper towel to absorb extra moisture.
Always make sure the coating is fully set before storing to avoid smudging or sticking.
Can You Freeze Valentine Day Cake Pops?
Yes, you can freeze Valentine Day cake pops, and they freeze surprisingly well when done correctly. Freezing is best for undecorated or fully set cake pops. For best results, follow this process:
- Pre-freeze: let the cake pops fully dry after dipping.
- Wrapping: wrap each cake pop gently in plastic wrap.
- Container: place them in a freezer-safe airtight container.
- Freezer time: freeze for up to 6 weeks.
When you are ready to use them, thaw slowly in the refrigerator overnight, then bring to room temperature before serving.
Why Are My Cake Pops Falling Off The Stick?
Cake pops usually fall off the stick if the mixture is too heavy or the stick was not secured properly. This is a very common beginner issue. To fix this, focus on these steps:
- Stick seal: dip the stick in melted chocolate before inserting it into the cake ball.
- Insertion depth: push the stick halfway into the cake ball, not all the way through.
- Chilling: chill the cake pops again after inserting the sticks so they set firmly.
These steps help lock everything in place and prevent sliding.
What Is The Best Chocolate For Valentine Day Cake Pops?
The best chocolate is one that melts smoothly and sets firmly without becoming brittle. This gives you that clean finish and easy dipping experience. Good options include:
- Melting wafers: designed for cake pops and very easy to use.
- Couverture white chocolate: gives a richer taste and smoother texture.
- Oil addition: adding a small amount of neutral oil can improve flow if the chocolate feels thick.
Avoid chocolate chips alone, as they often melt unevenly and can be hard to work with.
How Do I Get Smooth And Even Coating On Cake Pops?
A smooth coating comes from the right consistency and dipping technique. Rushing this step usually leads to thick or uneven results. Use these simple tips:
- Chocolate texture: aim for a smooth, pourable consistency.
- Dipping motion: dip and rotate gently, do not stir the cake pop inside the chocolate.
- Excess removal: tap your wrist lightly to let extra coating drip off.
Taking your time here gives you bakery-style results.
Can I Change The Colors Or Decorations?
Yes, Valentine Day cake pops are very customizable, and changing colors or decorations is easy. You can match them to different themes or preferences without changing the recipe itself. Popular variations include:
- Color swaps: use pastel red, white, or blush tones.
- Sprinkle styles: hearts, pearls, or fine sugar crystals.
- Drizzle finish: add a light chocolate drizzle once the base coating sets.
These small changes let you personalize the cake pops while keeping the same great texture and flavor.
How Many Calories Are In Valentine Day Cake Pops?
The calorie count depends on size and coating thickness, but a standard cake pop is a controlled portion dessert. This makes it easy to enjoy without overindulging. On average:
- One cake pop: approximately 160 to 180 calories.
- Main contributors: cake base, butter, and chocolate coating.
- Portion control: the stick helps naturally limit serving size.
This makes them a fun treat that still feels balanced.

Valentines Cake Pops
Ingredients
Method
- Preheat your oven to 350°F (175°C) and lightly grease an 8-inch round cake pan. Line the bottom with parchment paper for easy release.
- In a bowl, whisk together the flour, baking powder, and salt. Set this aside.
- In a separate large bowl, beat the softened butter and sugar together until pale, light, and fluffy. This step is important for a soft cake texture.
- Add the eggs one at a time, mixing well after each addition. Stir in the vanilla extract.
- Add the dry ingredients in two parts, alternating with the milk. Mix gently until just combined. Do not overmix, or the cake will be dense.
- Pour the batter into the prepared pan and smooth the top. Bake for 22 to 26 minutes, or until a toothpick inserted in the center comes out clean.
- Let the cake cool completely in the pan, then remove it and crumble it finely into a large bowl using clean hands or a fork. The crumbs should be soft and even, with no large chunks.
- Add the softened butter to the cake crumbs and mix until the mixture holds together when pressed. It should feel moist but not greasy.
- Scoop about 1 tablespoon of the mixture and roll it gently between your palms to form a smooth ball. Place each ball on a parchment-lined tray.
- Chill the cake balls in the refrigerator for at least 30 minutes. This helps them stay firm during dipping.
- Melt the white chocolate in a heatproof bowl over gentle heat or in short microwave bursts, stirring frequently until smooth. Add the oil if needed for a thinner consistency.
- Divide the melted chocolate into bowls if using different colors, and tint some with pink food coloring until you reach a soft pastel shade.
- Dip the tip of a cake pop stick into the melted chocolate, then insert it halfway into a chilled cake ball. Repeat for all cake balls, then chill again for 10 minutes to secure the sticks.
- Holding the stick, dip each cake pop into the melted chocolate, gently rotating to coat it completely. Tap off excess chocolate by lightly tapping your wrist.
- While the coating is still wet, decorate with heart sprinkles.
- Place the finished cake pops upright in a stand or poke the sticks into a foam block to dry completely at room temperature.
You May Also Like To Check Out These Recipes
- Valentine Chocolate Covered Strawberries
- Mardi Gras King Cake
- Galentine’s Cake
- Strawberry Crunch Cupcakes
- Valentine’s Day Charcuterie Board
- Valentines Day Cupcakes
- Strawberry Pancakes
- Chocolate Peanut Butter Cupcakes
- Red Velvet Cake Pops
- Valentine’s Day Heart Sugar Cookies
- Baby Shower Cookies
- Red Velvet Cinnamon Rolls
- Red Velvet Pancakes
- Red Velvet Cheesecake Brownies
- Red Velvet Cheesecake Swirl Brownies
- Valentine’s Day Vanilla Nougat Candy Bar Bites
- Valentine’s Day Mini Heart Mousse Cakes
- Homemade In N Out Burger With In N Out Sauce
- Crockpot Butter Chicken
- Spinach Stuffed Chicken Breasts
- Marry Me Chicken
- How To Make Ribeye Steak In The Oven
- Breakfast Egg Muffins
- Egg In A Hole
- Galentines Day Dessert Charcuterie Board
- Pina Colada
- Sweetheart Valentine Cake
- Red Velvet Cake
- Conversation Heart Cookies
- Valentine’s Day Heart Pizza
- Chicken Fettuccine Alfredo
- Baked Asparagus With Parmesan Cheese
- Steak Marinade
- Cherry Cobbler
- Red Velvet Crinkle Cookies
- Pink Velvet Cupcakes
- Gluten-Free Black Bean Brownies
- Non-Alcoholic Italian Cream Soda
- Non-Alcoholic Strawberry Margarita
- Non-Alcoholic Cranberry Shirley Temple
- Non-Alcoholic Pineapple Mocktail
- Chocolate Strawberry Cake
- Chocolate Raspberry Cake
- Strawberry Sugar Cookies
- Red Velvet Cookies
- Lemon Raspberry Cookies
- Strawberries And Cream Cake
- Marble Heart Sugar Cookies
- Red Velvet Peanut Butter Blossom Cookies
- Flourless Peanut Butter Chocolate Chunk Cookies
- Red Velvet Cake Mix Cookies