I still remember the day I made this under the sea cake for a child’s birthday party.
The excitement in the room grew the moment the cake was brought out—its colors so bright, its layers so alive, it almost felt like the ocean had arrived at the table.
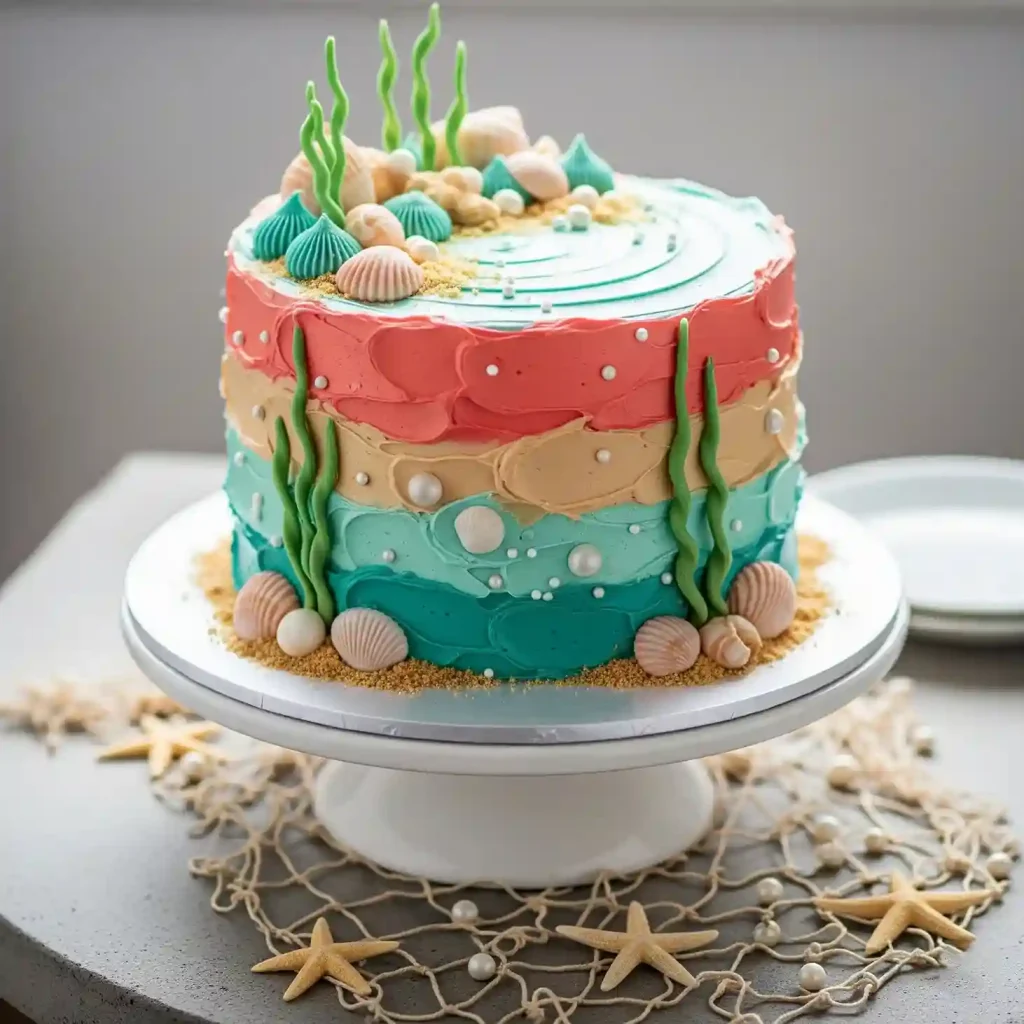
The waves of turquoise and coral buttercream, the edible pearls shining like hidden treasures, and the tiny fondant shells scattered on golden biscuit sand drew everyone’s eyes before a single slice was cut.
This cake isn’t just about sweetness; it’s about bringing a little wonder to the celebration.
It captures the beauty of the sea in a way that makes people pause and smile before they even taste it.
The details—the swirls of frosting that look like rippling water, the seaweed strands climbing up the sides, and the shells resting on the shore—make it more than dessert.
It becomes the centerpiece of the gathering, a cake that feels alive and tells its own story.
Creating this cake takes patience and care, but the reward is a masterpiece that feels as magical as it looks.
When the knife finally goes in and the slices are shared, the reaction is pure joy.
That’s when you realize this under the sea cake is more than layers of sponge and frosting—it’s a memory in the making.
Table of Contents
Under The Sea Cake Recipe
Ingredients
For The Cake
- 2 ½ cups all-purpose flour
- 2 ½ tsp baking powder
- ½ tsp baking soda
- ½ tsp salt
- 1 cup unsalted butter, softened
- 2 cups granulated sugar
- 4 large eggs, room temperature
- 1 tbsp vanilla extract
- 1 cup whole milk, room temperature
- ½ cup sour cream, room temperature
For The Frosting
- 2 cups unsalted butter, softened
- 6 cups powdered sugar, sifted
- 3 tbsp heavy cream (add more if needed for consistency)
- 1 tbsp vanilla extract
- Gel food coloring (coral, tan, turquoise, teal, and green)
For Decoration
- White fondant or modeling chocolate (to shape shells, pearls, and coral details)
- Green fondant for seaweed strands
- Edible pearl sprinkles
- Crushed vanilla biscuits or graham crackers for edible sand
Instructions
- Preheat oven to 350°F (175°C). Grease and line three 8-inch round cake pans with parchment paper.
- In a medium bowl, whisk together flour, baking powder, baking soda, and salt. Set aside.
- In a large mixing bowl, beat butter and sugar until light and fluffy. Add eggs one at a time, beating well after each addition. Mix in vanilla extract.
- Alternate adding the dry ingredients and milk mixed with sour cream into the butter mixture, beginning and ending with the dry ingredients. Mix until just combined, without overbeating.
- Divide the batter evenly between the prepared pans and smooth the tops. Bake for 25–30 minutes, or until a toothpick inserted into the center comes out clean. Let cakes cool in pans for 10 minutes, then transfer to a wire rack to cool completely.
- To prepare the frosting, beat butter until creamy. Gradually add powdered sugar, then mix in heavy cream and vanilla until smooth and fluffy. Adjust consistency with a little extra cream if needed.
- Divide the frosting into four portions. Tint one portion coral, one tan, one turquoise, and one teal, leaving some plain if needed for touch-ups. Keep a small amount green for piping seaweed.
- Level the cooled cake layers if necessary, then stack them with a thin layer of frosting between each. Apply a crumb coat around the cake and chill for 20 minutes.
- Spread the colored frostings in horizontal layers around the cake, starting with teal at the bottom, followed by turquoise, tan, and coral at the top. Use an offset spatula to create soft, wave-like swirls.
- Press crushed biscuits around the cake base to resemble sand. Add fondant seashells, edible pearls, and piped green seaweed along the sides. Scatter some decorations on top to complete the underwater theme.
- Chill the cake for 30 minutes before serving to set the decorations, then slice and enjoy this ocean-inspired delight.
How To Store Under The Sea Cake?
Storing this cake properly ensures that the texture stays moist, the frosting keeps its smoothness, and the decorations look as fresh as when they were placed.
Because this cake has buttercream, fondant, and biscuit crumb details, storage methods need to be handled with care.
- Short-term storage at room temperature: If you plan to serve the cake the same day, you can safely leave it at room temperature for up to 12 hours. Keep it on a sturdy cake stand with a dome lid, or lightly cover it with plastic wrap so the buttercream doesn’t dry out. Avoid direct sunlight or warm spots in your kitchen.
- Refrigerator storage: If you need the cake to last 2 to 3 days, place it in the refrigerator. Buttercream tends to harden in cold air, so allow the cake to sit at room temperature for at least 30 minutes before slicing to bring back its creamy texture. Always store it inside a cake box or loosely covered so the frosting decorations are not smudged.
- Freezer storage for longer keeping: If you want to make it well in advance, freezing is the best option. Chill the decorated cake until the frosting is firm, then wrap tightly with plastic wrap followed by aluminum foil. Store it for up to 1 month. Thaw overnight in the refrigerator, then let it sit on the counter for a few hours before serving to restore the flavors and texture.
Can I Make The Cake Layers In Advance?
Yes, preparing the sponge layers before decorating can make the process much easier, especially when you have other party arrangements to manage.
- Baking ahead by a couple of days: Bake the cake layers 1–2 days before assembling. Once completely cooled, wrap each layer in plastic wrap to prevent them from drying out, then store them in an airtight container at room temperature.
- Freezing cake layers for longer preparation: You can bake the layers weeks in advance and freeze them. Wrap each layer in two layers of plastic wrap, followed by foil, to protect them from freezer burn. Thaw the layers overnight in the refrigerator, and bring them to room temperature before stacking and frosting.
- Benefit of advance preparation: Cakes that are baked and cooled ahead often slice and stack more neatly, which helps keep the decoration smooth and stable.
How To Keep Decorations Fresh?
The ocean-inspired decorations are what make this under the sea cake stand out, so keeping them in good condition is essential.
- Fondant shells and seaweed: Fondant decorations can be shaped days in advance. Store them in an airtight container lined with parchment paper at room temperature. Avoid refrigeration, as fondant tends to absorb moisture and turn sticky.
- Edible pearls and sprinkles: These decorations do not spoil quickly and can be stored for months in sealed jars. Add them after the cake is frosted to keep their shine.
- Biscuit sand crumbs: To maintain their crunch, store the crushed biscuits in a dry airtight container until just before serving. If you apply them too early, they may absorb moisture from the frosting and lose their sandy texture.
How To Transport The Cake Safely?
Because this cake has delicate decorations and a tall structure, careful handling during transport is very important.
- Use a strong base: Place the cake on a thick cake board at least 2 inches wider than the cake itself. This keeps it stable and makes lifting easier.
- Secure with a cake box: A tall, sturdy cake box is essential to protect the decorations from getting damaged. Make sure the box lid doesn’t touch the frosting or fondant details.
- Maintain cool temperature: Buttercream melts quickly in heat, so always transport in an air-conditioned car. If the journey is long, consider placing a cold pack in the car (not inside the cake box) to keep the temperature steady.
- Place on a flat surface: Never carry the cake on someone’s lap or a car seat. Place it flat in the trunk or on the floor of the car and drive slowly, avoiding sharp turns and sudden brakes.
How To Serve Under The Sea Cake?
Serving this cake the right way ensures that each slice looks neat and delicious.
- Slice with a hot, sharp knife: Dip the knife in hot water, wipe it dry, then cut through the cake. This helps the knife glide smoothly through the buttercream without dragging decorations.
- Portion guide: An 8-inch cake usually yields 12–14 slices. For children’s parties, you can cut smaller pieces to serve more people, since the buttercream is rich.
- Bringing it to the right temperature: If the cake has been refrigerated, allow it to rest at room temperature for at least 30 minutes before serving. This softens the buttercream and enhances the overall flavor.
Can I Use Different Flavors For The Cake?
Yes, the design stays the same while the flavor of the sponge can be adjusted to suit your preference.
- Vanilla sponge: A classic choice that balances well with buttercream and lets the decoration shine.
- Chocolate sponge: A rich option that pairs beautifully with colorful frosting and gives a more indulgent feel.
- Citrus sponge: Adding zest of lemon or orange lightens the flavor and ties beautifully with the beach-inspired theme.
- Marble sponge: For variety, you can swirl chocolate and vanilla batters together for a cake that looks interesting even on the inside.
How Long Does Under The Sea Cake Last?
The life of the cake depends on how it’s stored. Here’s what you can expect if handled correctly.
- At room temperature: The cake stays fresh for about 1 day if kept covered in a cool, dry spot.
- In the refrigerator: Properly stored, it will last up to 3 days. Bring it back to room temperature before serving so the frosting softens again.
- In the freezer: The cake can be frozen for up to 1 month. Beyond that, the decorations may lose their beauty and the texture may change.
Troubleshooting Under The Sea Cake
Even with careful preparation, cakes with detailed decorations can sometimes give you a few challenges. Here are the most common issues and practical solutions to keep your under the sea cake looking and tasting just as magical as planned.
Why Did My Cake Layers Turn Out Dry?
Dry cake layers usually happen when the batter or baking process isn’t handled correctly.
- Overbaking: If the cake is left in the oven too long, the sponge loses its moisture. Always start checking with a toothpick 5 minutes before the suggested baking time.
- Incorrect measuring: Using too much flour or too little liquid can cause dryness. Use the spoon-and-level method for flour instead of scooping directly from the bag.
- Storage without wrapping: If cooled cakes are left uncovered, they dry out quickly. Wrap layers tightly in plastic once cooled to keep moisture locked in.
How To Stop Frosting Colors From Blending?
With multiple shades of frosting, colors can sometimes mix and lose their neat, defined look.
- Chill between layers: After applying one color, place the cake in the fridge for 10–15 minutes before adding the next shade. This keeps the layers firm and stops them from blending.
- Use clean tools: Wipe your spatula or piping bag tip between colors to avoid transferring frosting.
- Apply thick enough layers: If the frosting layer is too thin, the colors beneath can show through. Always spread enough to cover fully.
What To Do If Buttercream Melts Or Becomes Too Soft?
Buttercream can soften quickly, especially in warm kitchens or during summer.
- Keep ingredients cool: Use butter that is just softened, not melted. If the frosting feels too soft, refrigerate it for 15 minutes, then whip again.
- Work in a cool room: If the environment is hot, consider frosting the cake in shorter sessions, returning it to the fridge in between.
- Stabilize with sugar: If the buttercream is too loose, add a little more sifted powdered sugar until it holds shape.
Why Are My Fondant Shells And Seaweed Sagging?
Fondant decorations can lose their shape if exposed to too much moisture or if they are too thin.
- Dry them in advance: Make the decorations a day or two ahead and let them air-dry at room temperature. This gives them time to firm up.
- Avoid the fridge: Never refrigerate fondant, as humidity causes it to soften and sag.
- Use support: For taller seaweed pieces, insert a thin skewer or toothpick inside the fondant before placing them on the cake. This keeps them upright.
Why Does My Biscuit Sand Turn Soggy?
The biscuit crumb decoration can lose its crunch if applied too early.
- Moisture from frosting: Crumbs soften when in direct contact with buttercream for hours. Always sprinkle biscuit sand as close to serving time as possible.
- Store separately until use: Keep crushed biscuits in an airtight jar and only add them once the cake is fully decorated and ready to be displayed.
How To Fix Uneven Cake Layers?
Sometimes, cakes bake with domed tops or uneven heights.
- Level before stacking: Use a serrated knife or cake leveler to trim the tops flat before adding frosting. This ensures stability.
- Flip for a smooth top: Place the bottom of one layer facing up so the flattest side is on top. This gives a professional finish.
- Stack with support: If making a very tall cake, add dowels inside the cake for extra support, so it doesn’t lean.
You May Also Like To Check Out These Recipes
- Pumpkin Cream Cheese Muffins
- Pumpkin Pie Cookies
- Baked Cinnamon Apples
- Pumpkin Chocolate Chip Cookies
- Jack-O’-Lantern Halloween Pumpkin Cake
- Vegan Blueberry Muffins
- Chocolate Chip Muffins
- Banana Oatmeal Protein Muffins
- Applesauce Muffins
- Vegan Banana Muffins
- Moist Banana Chocolate Chip Muffins
- Breakfast Egg Muffins
- Vegan Oat Flour Muffins
- Pumpkin Cream Cheese Swirl Muffins
- Pumpkin Bread
- No Bake Caramel Apple Icebox Cake Recipe
- Pumpkin Bars
- Pumpkin Cheesecake Muffins
- Pumpkin Fudge
- Pumpkin Sugar Cookies
- Chewy Pumpkin Cookies
- Italian Christmas Cookies
- Halloween Brownies
- Pumpkin Protein Balls
- Apple Cider Donut Cake
- Fall Pumpkin Cake Pops
- Fall Fruit Salad
- Peanut Butter Fudge
- Pumpkin Donuts
- Pumpkin Sourdough Bread
- Halloween Dirt Cups
- Halloween Oreos
- Halloween Rice Krispie Treats
- Halloween Dirt Cake
- Pumpkin Cheesecake Dip
- Crustless Pumpkin Pie
- Pumpkin Chocolate Chip Bars
- Best Pumpkin Pie Recipe
- Pumpkin Dump Cake
- Pumpkin Cinnamon Rolls
- Pumpkin Bundt Cake With Maple Glaze
- Pumpkin Poke Cake
- Pumpkin Snickerdoodle Cookies
- Orange Spice Cake
- Caramel Apple Dump Cake
- Pumpkin Spice Cake
- Pumpkin Fluff Dip
- Neapolitan Cake
- Starbucks Pumpkin Cream Cheese Muffins
- Pumpkin Cobbler
- Pumpkin Crisp
- Pumpkin Chocolate Chip Muffins
- Sweet Potato Casserole With Marshmallows
- Best Pumpkin Pie Recipe
- Decorated Pumpkin Shaped Cookies
- Pumpkin Cake With Cinnamon Cream Cheese Frosting
- Sticky And Sweet Date Cake
- Starbucks Pumpkin Cream Cheese Muffins
- Tres Leches Cake With Box Mix
- Vegan Apple Cake
- Sunset Cake With Citrus & Florals
- Juicy Plum Cake