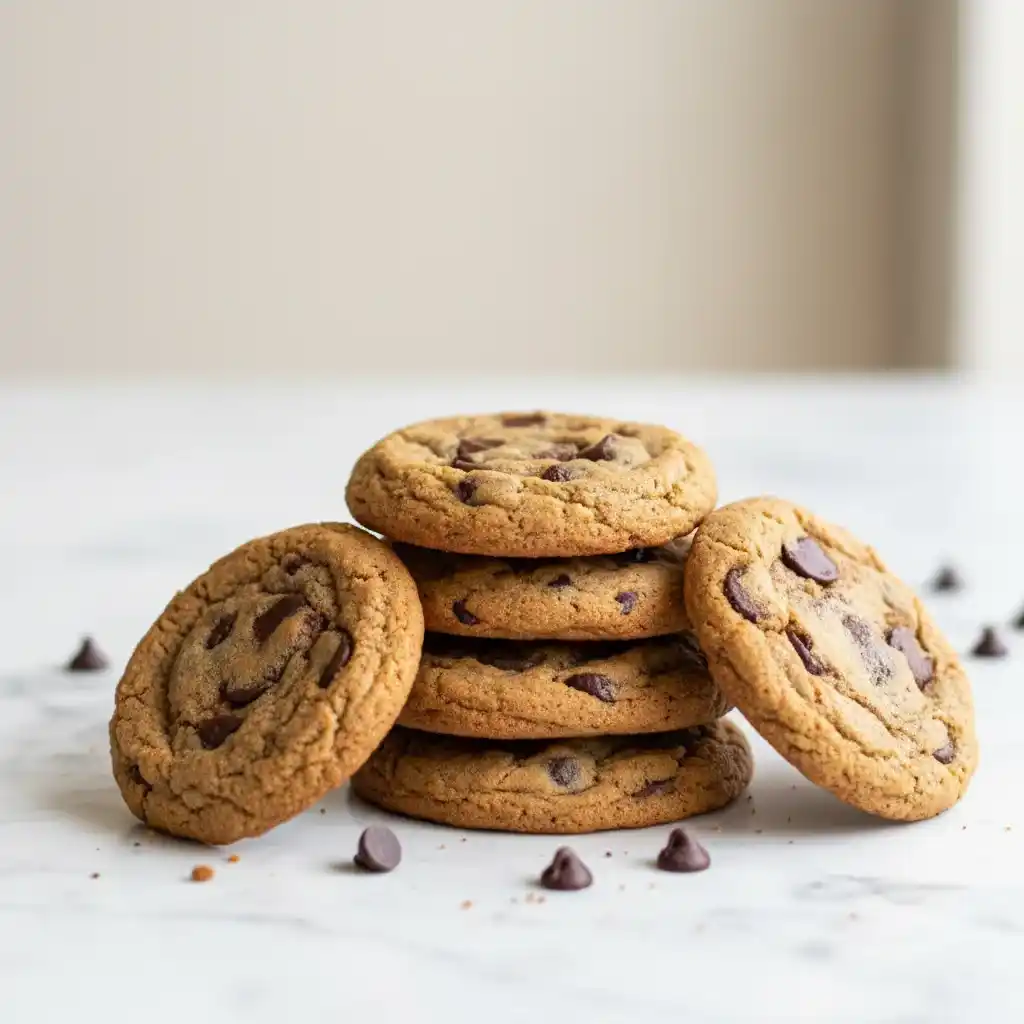
Brown butter chocolate chip cookies earned their place in my kitchen through patience, not luck. I learned early that melted butter alone could never give the depth I wanted.
The real shift happened when I slowed down, stood by the stove, and watched butter change color and smell.
That warm, nutty scent told me everything was about to be different. From that point on, regular cookies felt unfinished.
These cookies come from paying attention to small details that matter. The way the butter is cooked until golden. The pause that lets it cool just enough.
The balance between sugar and flour so the dough stays thick and bakes with soft centers and steady edges. Each step shapes the final bite. Miss one, and the cookie loses its soul.
I make these cookies when I want results I can trust. They bake up sturdy but tender, with cracks that form naturally and chocolate that melts into the dough instead of sitting on top.
They stay chewy hours later, and the flavor deepens as they rest. That rich taste does not rush. It builds slowly, starting with butter and ending with a cookie that feels complete.
This recipe is written for people who care about outcome, not speed. If you follow it closely, you will pull cookies from the oven that look and taste intentional.
Warm, balanced, and deeply flavored, these are the cookies I rely on when only one style will do.
Table of Contents
Brown Butter Chocolate Chip Cookies Recipe
Ingredients
- 170 g unsalted butter
- 150 g light brown sugar, packed
- 100 g granulated sugar
- 1 large egg, at room temperature
- 1 large egg yolk, at room temperature
- 1 ½ teaspoons vanilla extract
- 240 g all-purpose flour
- ½ teaspoon baking soda
- ¾ teaspoon fine salt
- 200 g chocolate chips or chocolate chunks
- Optional: extra chocolate chips for topping before baking
Instructions
- Place the butter in a light-colored saucepan over medium heat. Let it melt completely, then continue cooking. The butter will foam, then the foam will subside. Swirl the pan frequently and watch closely as golden brown milk solids form at the bottom and a nutty aroma develops. This takes about 5–7 minutes. Immediately remove from heat to prevent burning.
- Pour the browned butter, including all the brown bits, into a heat-safe bowl. Let it cool for about 10–15 minutes until warm but not hot. It should be liquid but no longer steaming.
- Add the brown sugar and granulated sugar to the warm butter. Whisk vigorously for about 1 minute until the mixture looks glossy and slightly thickened.
- Whisk in the whole egg, egg yolk, and vanilla extract until smooth and well combined. The mixture should look cohesive and slightly creamy.
- In a separate bowl, mix the flour, baking soda, and salt. Add the dry ingredients to the wet mixture and gently fold with a spatula just until no dry flour remains. Do not overmix.
- Fold in the chocolate chips or chunks, reserving a small handful if you want visible chocolate on top.
- Cover the dough and chill in the refrigerator for 30–45 minutes. This step is important for flavor development and to keep the cookies thick.
- Preheat the oven to 175°C (350°F). Line a baking tray with parchment paper.
- Scoop the chilled dough into portions of about 2 tablespoons each. Roll lightly into balls but keep them rustic. Place them on the tray, spacing them about 7–8 cm apart. Press a few extra chocolate chips on top of each dough ball if desired.
- Bake for 10–12 minutes, until the edges are set and lightly golden, while the centers still look soft and slightly underbaked.
- Remove from the oven and let the cookies rest on the baking tray for 5 minutes. They will continue to set as they cool. Then transfer to a wire rack to cool further.
Why Does Brown Butter Matter In Brown Butter Chocolate Chip Cookies?
Brown butter is the base flavor of these cookies, and understanding it helps you control the final taste. When you cook butter past melting, the milk solids slowly toast.
This creates a deep, nutty flavor that regular melted butter cannot give. That flavor spreads through the entire dough, not just the surface.
- Flavor Depth: Browning butter adds warmth and richness that balances the sweetness of sugar and chocolate.
- Aroma Development: The smell changes from plain butter to toasted and nut-like, which signals it is ready.
- Color Impact: Brown butter slightly darkens the dough, helping the cookies bake with a golden finish.
If the butter is removed too early, the cookies taste flat. If it burns, the cookies taste bitter. Staying focused during this step makes a visible and noticeable difference.
How Do You Know When Brown Butter Is Perfectly Cooked?
This step decides success, so learning the signs matters. Butter changes in stages, and each one gives you clues.
First it melts, then it foams, then the foam settles. The moment you see brown specks forming at the bottom, you are very close.
- Visual Clue: The butter turns amber and small brown bits appear at the base of the pan.
- Smell Clue: The scent shifts from buttery to toasted and nutty.
- Timing Control: Remove it immediately once browned to avoid burning.
Pouring it into a bowl right away stops cooking and protects the flavor you worked for.
Why Does This Recipe Use An Extra Egg Yolk?
Egg structure controls texture, and this detail is intentional.
A full egg gives structure, while the yolk adds moisture and richness. Using one whole egg plus one yolk keeps the cookies chewy without making them dry or puffy.
- Moisture Balance: The yolk adds fat, which keeps centers soft after baking.
- Chewy Texture: Extra fat slows moisture loss in the oven.
- Richer Dough: The dough feels smoother and bakes more evenly.
Skipping the extra yolk leads to cookies that feel firmer and less tender.
Should You Chill Brown Butter Chocolate Chip Cookie Dough?
Chilling is not optional if you want thick, bakery-style cookies. Warm dough spreads fast in the oven. Chilling firms the butter and lets flour fully absorb moisture.
- Controlled Spread: Cold dough holds its shape longer while baking.
- Better Texture: Chilling helps create crisp edges and soft centers.
- Flavor Development: Resting time allows the browned butter flavor to settle into the dough.
Even a short chill makes a visible difference in thickness and shape.
How Do You Keep The Cookies Thick Instead Of Flat?
Thickness comes from technique, not extra flour. Several small steps work together to keep these cookies tall and chewy.
- Dough Temperature: Cold dough spreads slower and bakes upward.
- Scooping Style: Loosely shaped dough bakes thicker than tightly packed balls.
- Baking Time: Pulling cookies while centers look soft prevents over-spreading.
Letting the cookies finish setting on the baking tray helps lock in their shape.
What Type Of Chocolate Works Best For Brown Butter Chocolate Chip Cookies?
Chocolate choice changes how the cookies melt and taste. You want chocolate that melts smoothly without disappearing into the dough.
- Chocolate Chips: Hold their shape and give visible chocolate pockets.
- Chocolate Chunks: Melt into larger pools and create contrast in each bite.
- Balanced Sweetness: Semi-sweet chocolate keeps the cookies from tasting overly sugary.
Mixing chips and chunks gives both structure and melt in one cookie.
How Do You Store Brown Butter Chocolate Chip Cookies Properly?
Correct storage keeps texture and flavor intact. Once the cookies cool completely, storage becomes important.
- Room Temperature Storage: Keep cookies in an airtight container for up to 3 days.
- Moisture Control: Add a small piece of plain bread to the container to help keep cookies soft.
- Avoid Refrigeration: Cold air dries baked cookies and changes texture.
Stored properly, the cookies stay chewy and rich without losing flavor.
Can You Freeze The Dough Or Baked Cookies?
Freezing works well when done the right way. Both dough and baked cookies freeze successfully with no loss in quality.
- Freezing Dough: Scoop dough into portions and freeze solid, then store in a sealed bag for up to 2 months.
- Baking From Frozen: Bake directly from frozen and add 1–2 minutes to baking time.
- Freezing Baked Cookies: Cool completely, then freeze in a sealed container for up to 2 months.
Freezing lets you bake fresh cookies whenever you want without remaking the dough.
Brown Butter Chocolate Chip Cookies
Ingredients
Method
- Place the butter in a light-colored saucepan over medium heat. Let it melt completely, then continue cooking. The butter will foam, then the foam will subside. Swirl the pan frequently and watch closely as golden brown milk solids form at the bottom and a nutty aroma develops. This takes about 5–7 minutes. Immediately remove from heat to prevent burning.
- Pour the browned butter, including all the brown bits, into a heat-safe bowl. Let it cool for about 10–15 minutes until warm but not hot. It should be liquid but no longer steaming.
- Add the brown sugar and granulated sugar to the warm butter. Whisk vigorously for about 1 minute until the mixture looks glossy and slightly thickened.
- Whisk in the whole egg, egg yolk, and vanilla extract until smooth and well combined. The mixture should look cohesive and slightly creamy.
- In a separate bowl, mix the flour, baking soda, and salt. Add the dry ingredients to the wet mixture and gently fold with a spatula just until no dry flour remains. Do not overmix.
- Fold in the chocolate chips or chunks, reserving a small handful if you want visible chocolate on top.
- Cover the dough and chill in the refrigerator for 30–45 minutes. This step is important for flavor development and to keep the cookies thick.
- Preheat the oven to 175°C (350°F). Line a baking tray with parchment paper.
- Scoop the chilled dough into portions of about 2 tablespoons each. Roll lightly into balls but keep them rustic. Place them on the tray, spacing them about 7–8 cm apart. Press a few extra chocolate chips on top of each dough ball if desired.
- Bake for 10–12 minutes, until the edges are set and lightly golden, while the centers still look soft and slightly underbaked.
- Remove from the oven and let the cookies rest on the baking tray for 5 minutes. They will continue to set as they cool. Then transfer to a wire rack to cool further.
You May Also Like To Check Out These Articles
- 55 Creative Christmas Cake Ideas To Spark Holiday Cheer
- 50 Easy Christmas Cupcakes You’ll Want To Bake All Season
- 40 Christmas Cheesecake Recipes For A Joyful Holiday Season
- 50 Time-Saving Christmas Cookie Recipes Everyone Will Devour
- 115 Yummy Christmas Treats For The Perfect Celebration
- 115 Christmas Desserts To Make Your Holidays Sweet
- 165 Mouthwatering Christmas Dinner Recipes To Try This Holiday Season
- 55 Delicious Christmas Appetizer Ideas
- 160 Easy And Festive Christmas Potluck Ideas
- 55 Best Christmas Snacks For Party
- 20 Best Non Alcoholic Christmas Drinks
- 72 Joyful Christmas Baking Ideas For The Festive Season
- 25 Easy Christmas Candy Recipes
- 40 Best Christmas Side Dishes
- 10 Simple Tips For A Cozy Christmas Coffee Bar
- Eggnog Cheesecake
- Christmas Cake Pops
- Christmas Tree Cake Pops
- Christmas Cookie Cake
- Christmas Tree Cake Cheesecake
- Cranberry Christmas Cake
- Grinch Christmas Cake
- Red Velvet Cheesecake Cake
- Gingerbread Cake
- Pistachio And White Chocolate Winter Wonderland Cake
- Oreo Cheesecake Cupcakes
- Black Bottom Cupcakes
- Oreo Cupcakes
- Gingerbread Cupcakes
- Red Velvet Cupcakes
- Lemon Cupcakes
- Cranberry White Chocolate Cookies
- Santa Cookies
- Melted Snowman Cookies
- Cranberry Orange Cookies
- Linzer Cookies With Almond Flour
- Grinch Sugar Cookies
- Ooey Gooey Butter Cookies
- Cookies And Cream Cookies
- Raspberry Thumbprint Cookies
- Christmas Tree Rice Crispy Treats
- Starbucks Cranberry Bliss Bars
- Christmas Oreo Balls
- Cranberry Pecan Cheese Ball
- Mexican Champurrado
- Christmas Tree Pizza
- Christmas Chocolate Peppermint Bark
- Peanut Butter Rice Krispie Treats
- Sausage Hash Brown Casserole
- Christmas Cream Cheese Mints
- Potato Candy
- Cranberry Sauce With Orange Juice And Honey