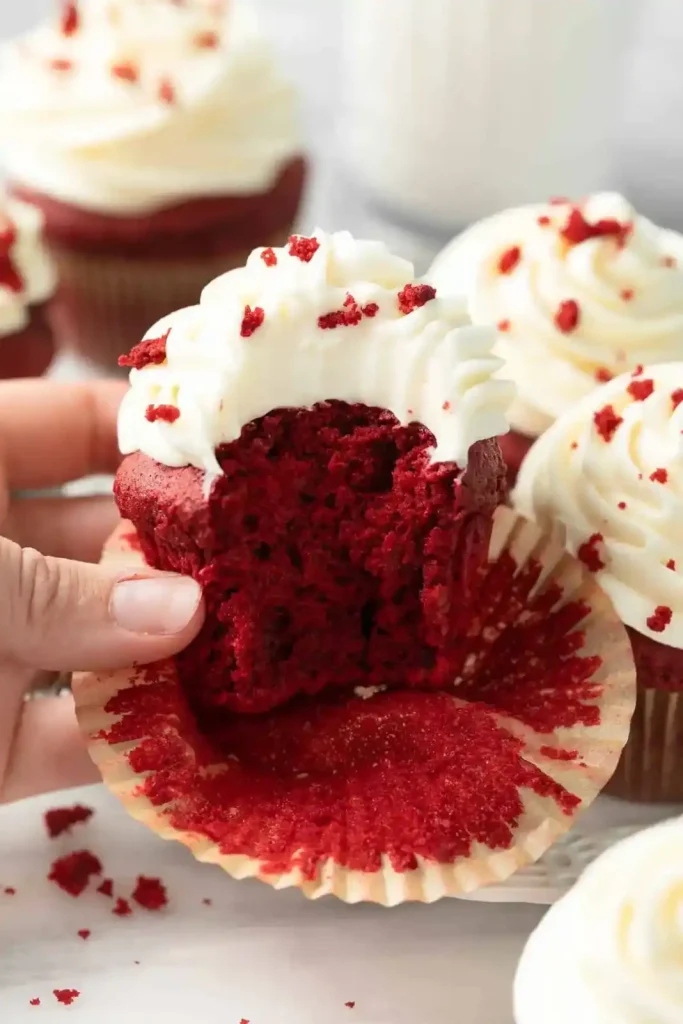
Red velvet cupcakes are a timeless treat, and when they’re gluten-free, they become even more special.
These little cakes are soft, moist, and full of vibrant red color—just the way they should be! But the real magic happens with the texture.
Thanks to the simple swap of sour cream and oil, these cupcakes are light and airy, not dense like some gluten-free baked goods can be.
The result is a cupcake that everyone will enjoy, no matter their dietary needs. The beauty of gluten-free baking is that it doesn’t have to feel like a compromise.
With a few easy-to-find ingredients and a method that guarantees success every time, you’ll have a batch of cupcakes that are perfectly fluffy, full of flavor, and ready to impress.
Whether you’re baking for a birthday, a holiday, or just because, these red velvet cupcakes are sure to brighten up any occasion.
Let’s get to baking the perfect batch of gluten-free red velvet cupcakes, made with ingredients that taste just as amazing as they look!
Gluten-Free Red Velvet Cupcakes Recipe
Ingredients
For The Cupcakes
- 1 ¼ cups gluten-free 1:1 baking flour (190g)
- 3 tablespoons cocoa powder (20g)
- 1 ½ teaspoons baking powder
- ½ teaspoon salt
For The Wet Ingredients
- 1 cup sugar (200g)
- 2 large eggs
- ¼ cup vegetable oil (50g)
- 1 tablespoon red food coloring (or use plant-based alternatives like beet juice).
- 1 ½ teaspoons vanilla extract
- ½ teaspoon lemon juice
- ¼ cup sour cream (60g)
- ½ cup milk (125g) – use any milk of your choice, like cow’s milk or a non-dairy substitute (such as almond or oat milk).
For The Cream Cheese Frosting
- ½ cup (1 stick) unsalted butter (113g), softened
- 8 oz cream cheese (226g), softened
- 1 teaspoon vanilla extract
- A pinch of salt
- 3 cups powdered sugar (390g)
Instructions
Make The Cupcakes
- Preheat your oven to 350°F (175°C). Line a 12-cup muffin pan with cupcake liners, and lightly grease them with cooking spray.
- In a medium-sized bowl, whisk together the gluten-free flour, cocoa powder, baking powder, and salt.
- In a stand mixer or large bowl, beat the eggs and sugar together on medium-high speed for about 3 minutes until the mixture is light and fluffy. While mixing on low speed, slowly pour in the oil to keep the air in the batter. Add the red food coloring, vanilla extract, and lemon juice.
- Gradually add the dry ingredients in 3 parts, alternating with the milk. Start by adding a third of the dry mix, then add the sour cream and mix until smooth. Add another third of the dry ingredients, followed by half of the milk. Finally, add the last third of the dry mix and the remaining milk. Mix until everything is well combined.
- Spoon the batter into the cupcake liners, filling them about ¾ full. Bake for 22-25 minutes, or until a toothpick inserted into the center comes out clean.
- Let the cupcakes cool for about 5 minutes in the pan, then transfer them to a wire rack to cool completely before frosting.
Make The Cream Cheese Frosting
- Beat the softened butter and cream cheese together using a hand or stand mixer until smooth and creamy.
- Gradually add in the powdered sugar and vanilla extract, mixing on low speed. Once the sugar is incorporated, increase the speed to high and beat for about 3 minutes until light and fluffy.
- Scrape down the sides and bottom of the bowl, then mix for another 30 seconds to ensure everything is well-blended.
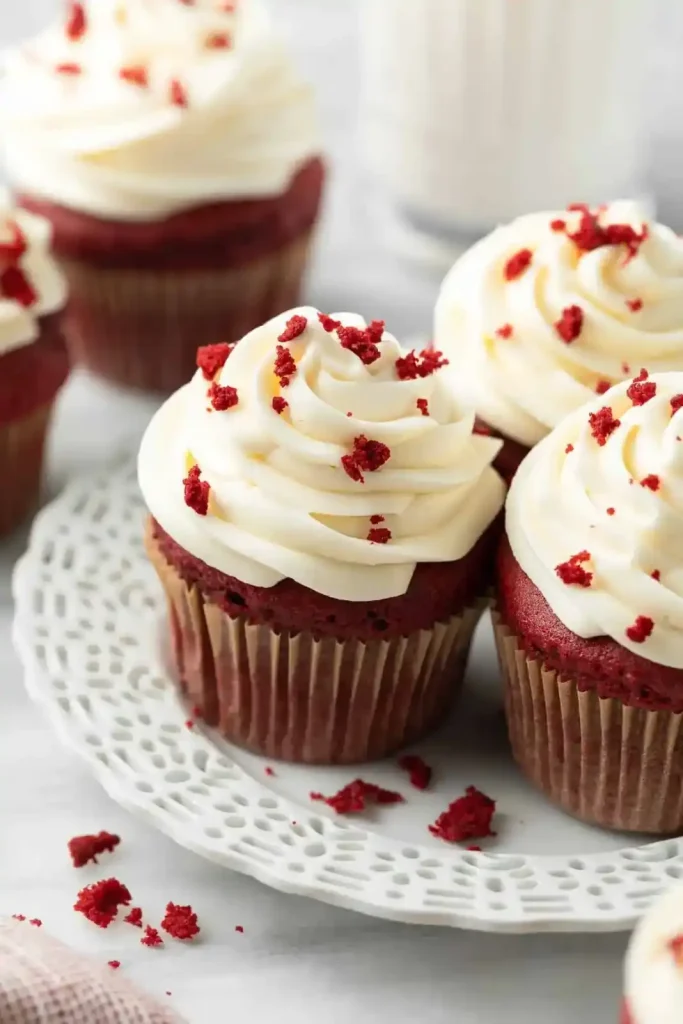
- Transfer the frosting to a piping bag with a star tip, and pipe generous swirls on top of each cooled cupcake.
Tips For Perfect Gluten-Free Red Velvet Cupcakes
Making the perfect gluten-free red velvet cupcakes can feel like a challenge, but with a few simple tips, you’ll be baking like a pro in no time!
- Use a good gluten-free flour blend: Not all gluten-free flours are the same, so make sure you use a high-quality 1:1 baking flour blend. This helps mimic the texture of regular flour and makes your cupcakes light and fluffy.
- Whisk the dry ingredients properly: Make sure to whisk together the dry ingredients (flour, cocoa powder, salt, and baking powder) well before adding them to the wet ingredients. This ensures even distribution and helps avoid clumps.
- Room temperature ingredients: Using eggs, sour cream, and milk at room temperature helps the ingredients blend together more easily, leading to a smoother batter.
- Don’t skip the oil: Oil gives cupcakes a moist texture. In gluten-free baking, it’s essential to use oil instead of butter to prevent the cupcakes from turning out dry.
- Avoid overmixing the batter: Once the dry ingredients are added to the wet ingredients, mix gently. Overmixing can lead to dense cupcakes, so only mix until everything is just combined.
- Check the cupcakes early: Oven temperatures can vary. Check your cupcakes after 20 minutes to avoid overbaking. They should be firm to the touch and a toothpick should come out clean when inserted into the center.
Variations For Gluten-Free Red Velvet Cupcakes
Ready to get creative with your cupcakes? Here are a few ways to add a fun twist to your gluten-free red velvet recipe!
- Add a cream cheese swirl: Swirl a bit of cream cheese filling into the batter before baking for a rich, tangy surprise in every bite.
- Top with fresh berries: Add a burst of freshness with a few fresh raspberries or strawberries on top of the frosting. They add color and a sweet contrast to the cupcakes’ rich flavor.
- Swap the food coloring: If you’re not a fan of artificial food coloring, you can try using beet juice as a natural alternative for that classic red hue. Just be sure to adjust the amount to achieve the desired color.
- Make them dairy-free: For a dairy-free version, substitute the sour cream with dairy-free yogurt and the milk with any non-dairy milk like almond or oat milk. Vegan cream cheese works well for the frosting, too.
- Experiment with frosting flavors: While classic cream cheese frosting is always a hit, why not mix it up? Try adding a bit of lemon zest, cinnamon, or cocoa powder to the frosting for extra flavor.
- Try a chocolate ganache topping: If you want an indulgent treat, drizzle some rich chocolate ganache over your red velvet cupcakes for a decadent finish.
What To Serve With Gluten-Free Red Velvet Cupcakes?
- Fresh berries (strawberries, raspberries)
- Whipped cream
- A scoop of vanilla or chocolate ice cream
- A glass of cold milk or almond milk
- Hot chocolate or coffee
How To Store Gluten-Free Red Velvet Cupcakes?
- At room temperature: Store in an airtight container for up to 3 days.
- In the fridge: For longer storage, place cupcakes in an airtight container and refrigerate for up to 1 week.
- For freezing: Wrap cupcakes individually in plastic wrap and store in a freezer bag for up to 3 months. Thaw at room temperature before serving.
- Underbaking: If the cupcakes are not baked long enough, they may rise initially but then collapse as they cool. Always check them by inserting a toothpick—if it comes out clean, they’re done.
- Overmixing the batter: Mixing the batter too much can incorporate too much air, which causes the cupcakes to rise and then fall as they bake. Mix gently until just combined to avoid this.
- Incorrect oven temperature: If your oven is too hot or too cool, the cupcakes may rise too quickly or too slowly. An oven thermometer can help ensure your oven is at the correct temperature (usually 350°F for red velvet cupcakes).
- Too much liquid: Adding too much liquid (like milk or sour cream) can make the batter too runny, which can lead to sinking. Measure your ingredients carefully and avoid adding extra liquid.
- Leavening issues: Too much baking powder or baking soda can cause the cupcakes to rise too quickly and then collapse. Ensure you measure leavening agents accurately.
- Opening the oven door too early: Opening the oven door before the cupcakes have fully set can cause them to sink. Wait until they are almost done baking before checking on them.
Why Did My Red Velvet Cupcakes Sink?
If your red velvet cupcakes sank in the middle, there could be a few reasons behind it. Here’s a list of the most common causes and how to fix them:
- Underbaking: If the cupcakes are not baked long enough, they may rise initially but then collapse as they cool. Always check them by inserting a toothpick—if it comes out clean, they’re done.
- Overmixing the batter: Mixing the batter too much can incorporate too much air, which causes the cupcakes to rise and then fall as they bake. Mix gently until just combined to avoid this.
- Incorrect oven temperature: If your oven is too hot or too cool, the cupcakes may rise too quickly or too slowly. An oven thermometer can help ensure your oven is at the correct temperature (usually 350°F for red velvet cupcakes).
- Too much liquid: Adding too much liquid (like milk or sour cream) can make the batter too runny, which can lead to sinking. Measure your ingredients carefully and avoid adding extra liquid.
- Leavening issues: Too much baking powder or baking soda can cause the cupcakes to rise too quickly and then collapse. Ensure you measure leavening agents accurately.
- Opening the oven door too early: Opening the oven door before the cupcakes have fully set can cause them to sink. Wait until they are almost done baking before checking on them.