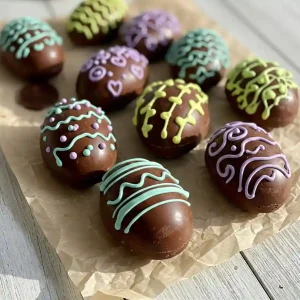
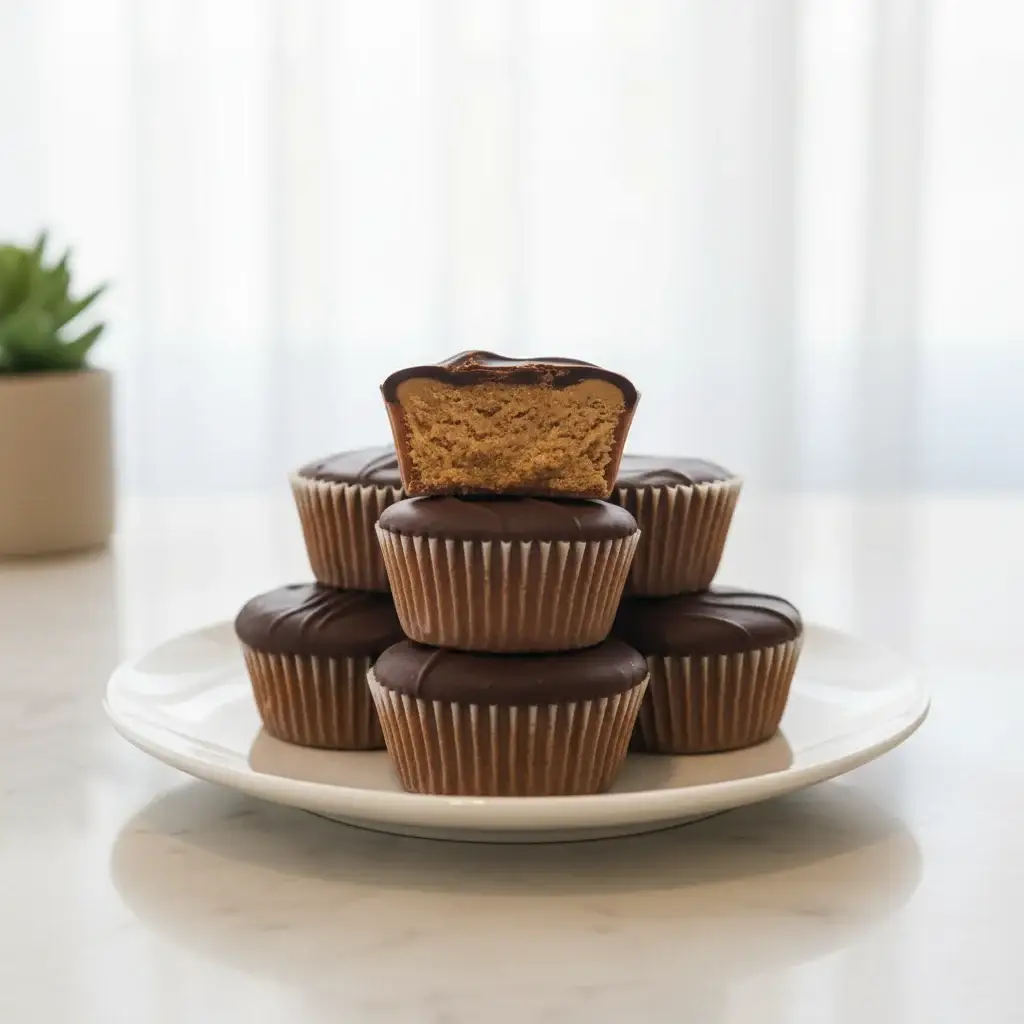
I grew up with a weakness for chocolate and peanut butter together, but store-bought treats never fully satisfied me.
They always felt too sweet, too waxy, or missing that creamy center I wanted.
The first time I tried making peanut butter cups in my own kitchen, I realized how much better they taste when you control the balance.
Thick chocolate that actually snaps when you bite in, a smooth peanut butter filling that melts slowly instead of crumbling apart—these details make all the difference.
Making them at home feels almost indulgent, like you’ve taken a candy shop favorite and given it a richer, more real upgrade.
They stack beautifully on a plate, and when you peel back the paper liner, you get that same childhood excitement but with a far better payoff.
Each bite is bold, chocolatey, and nutty in a way no wrapped candy can compete with.
Table of Contents
Homemade Peanut Butter Cups Recipe
Ingredients
- 2 cups milk chocolate chips (or good-quality milk chocolate, chopped)
- 2 cups semi-sweet chocolate chips (or good-quality semi-sweet chocolate, chopped)
- 1 ½ cups creamy peanut butter (unsalted)
- ½ cup unsalted butter, softened to room temperature
- 2 cups powdered sugar, sifted
- ½ teaspoon fine salt
- Paper cupcake liners (standard size, about 12–14)
Instructions
- Line a standard muffin tin with paper cupcake liners. This will help the chocolate cups hold their shape and release easily.
- Melt half of the chocolate (about 2 cups total, mixing milk and semi-sweet) using a double boiler or microwave in 30-second intervals, stirring each time until smooth and glossy.
- Spoon about 1 to 2 teaspoons of melted chocolate into each paper liner. Use the back of a spoon to gently spread the chocolate up the sides so it forms a cup shape. Tap the muffin tin lightly on the counter to even out the chocolate. Place the tray in the refrigerator for about 15 minutes to firm up.
- While the chocolate shells are chilling, prepare the peanut butter filling. In a mixing bowl, combine creamy peanut butter and softened butter. Mix until smooth and creamy.
- Gradually add the sifted powdered sugar and salt, mixing well until a thick but soft dough-like mixture forms. It should be scoopable but not runny.
- Once the chocolate shells have hardened, scoop about 1 tablespoon of peanut butter filling and roll it gently into a flat disc that will fit inside the chocolate cup. Place one disc of filling in each chocolate-lined cup, pressing lightly to flatten the top.
- Melt the remaining chocolate using the same method as before. Spoon enough melted chocolate over the peanut butter filling to completely cover it, smoothing out the tops with the back of the spoon.
- Tap the muffin tin again on the counter to remove any air bubbles and create an even surface.
- Refrigerate the tray for at least 45 minutes, or until the peanut butter cups are completely set and firm.
- Once set, peel away the paper liners carefully and serve. Store the peanut butter cups in an airtight container at room temperature for up to 4 days, or in the refrigerator for up to 2 weeks.
What Type Of Chocolate Works Best For Peanut Butter Cups?
The chocolate you choose makes a huge difference in both taste and texture. For a glossy shell and rich flavor, always pick high-quality chocolate rather than candy melts or low-grade bars.
- Milk chocolate: Gives a sweet, creamy taste that balances the saltiness of peanut butter.
- Semi-sweet chocolate: Adds a deeper cocoa flavor, making the cups less sugary.
- Mix of both: Combining milk and semi-sweet creates a balanced shell that tastes closer to store-bought while still being richer and smoother.
If you prefer a darker and more intense bite, you can use bittersweet chocolate, but remember it can make the cups taste slightly less sweet.
How Do I Keep The Peanut Butter Filling Smooth And Creamy?
The filling should be soft enough to bite into easily, but firm enough to hold its shape. Achieving this texture comes down to balancing peanut butter, butter, and powdered sugar.
- Creamy peanut butter: Always use creamy, not crunchy, so the filling stays smooth.
- Butter: Softened butter helps make the filling spreadable and less dry.
- Powdered sugar: This thickens the filling while keeping it light and not too sticky.
Mix everything together until you get a dough-like consistency. If it feels too soft, add a little more powdered sugar. If it’s too stiff, mix in a spoon of peanut butter.
Can I Make Peanut Butter Cups Without A Muffin Tin?
Yes, you don’t necessarily need a muffin tin, although it makes shaping much easier. You can still create peanut butter cups using alternatives.
- Paper cupcake liners on a flat tray: Place the liners on a baking sheet and build the cups inside them. They may not be as tall but still hold their shape.
- Silicone molds: These are flexible and make it very easy to pop the cups out once they are set.
- Shaping by hand: Spread melted chocolate on parchment paper, add filling discs, and cover with more chocolate. These will look more rustic but taste just as good.
How Long Do Homemade Peanut Butter Cups Last?
Storage is important to keep the chocolate shell from blooming (getting white streaks) and the peanut butter filling from drying out.
- Room temperature: Store in an airtight container for up to 4 days. Keep them away from heat or direct sunlight.
- Refrigerator: Lasts up to 2 weeks in a sealed container. The chocolate may firm up a bit more, but it still tastes great.
- Freezer: You can freeze peanut butter cups for up to 2 months. Wrap each cup in parchment or wax paper before storing them in a freezer-safe bag or container.
When thawing, always bring them back to room temperature slowly to prevent the chocolate from cracking.
Can I Use Natural Peanut Butter For This Recipe?
Natural peanut butter can be used, but it does change the texture. Since it usually has more oil and less stabilizer, it can make the filling oily or grainy.
- Stir well: Mix natural peanut butter thoroughly before using to keep the oil from separating.
- Adjust sugar: You may need a little extra powdered sugar to firm up the filling.
- Chill longer: If the filling feels too loose, refrigerate it before shaping the discs.
For the smoothest, candy-shop style cups, stabilized creamy peanut butter works best.
Why Did My Chocolate Crack Or Separate From The Peanut Butter Filling?
This usually happens if the chocolate shell is too thin, or if the filling wasn’t pressed in properly before sealing with the top chocolate layer.
- Thicker base layer: Spread at least 1 to 2 teaspoons of melted chocolate at the bottom.
- Press filling lightly: Flatten the peanut butter discs so they don’t create gaps inside.
- Seal completely: Pour enough chocolate on top to cover every bit of the filling.
- Temperature shock: Avoid moving cups from freezer to room temperature too quickly, as sudden changes can crack the chocolate.
Can I Add Variations To Peanut Butter Cups?
Yes, once you master the classic recipe, you can try many fun twists without losing the original appeal.
- Sea salt flakes: Sprinkle a pinch on top before the chocolate sets for a sweet-salty kick.
- Crunchy layer: Add crushed cookies, pretzels, or rice cereal inside the filling for extra texture.
- Nut butter swaps: Use almond butter, cashew butter, or hazelnut spread instead of peanut butter.
- White or dark chocolate shells: Swap out the chocolate type to match your taste.
These changes keep the recipe exciting, and you can adjust them based on who you’re serving.
Why Did My Chocolate Seize While Melting?
Chocolate can seize and turn grainy if even a small amount of water or steam touches it. This happens often when using a double boiler without wiping the bowl dry or when covering melted chocolate with a lid.
- Dry utensils: Always use completely dry bowls and spoons.
- Low heat: Melt chocolate slowly over low heat, stirring constantly.
- Rescue tip: If it seizes, add 1 teaspoon of neutral oil or melted cocoa butter and stir gently to bring it back.
Why Did My Peanut Butter Cups Stick To The Paper Liners?
If the cups cling to the liners, it usually means the chocolate wasn’t tempered properly or the liners were too thin.
- Thicker liners: Use sturdy cupcake liners to prevent sticking.
- Chill fully: Make sure the cups are completely set before peeling the liners off.
- Freezer trick: Place the tray in the freezer for 10 minutes, then peel the liners away more easily.
Why Did My Chocolate Bloom Or Get White Streaks?
White streaks or spots on chocolate are caused by fat or sugar bloom. This happens when chocolate is exposed to sudden temperature changes or excess humidity.
- Consistent temperature: Store peanut butter cups in a cool, dry place, not in direct sunlight or near the stove.
- Proper cooling: Let the chocolate set in the refrigerator, then keep it at room temperature in an airtight container.
- Good quality chocolate: Using well-tempered chocolate helps prevent bloom.
Why Did My Peanut Butter Filling Leak Out?
Leaking happens when the filling isn’t fully sealed by the chocolate coating.
- Enough bottom layer: Start with at least 1 to 2 teaspoons of chocolate at the base.
- Cover completely: Spread chocolate around the edges and pour enough on top to hide all of the filling.
- Tap to remove air: After adding the final chocolate layer, tap the tray gently to release air bubbles that could cause weak spots.
Why Did My Chocolate Crack After Setting?
Cracking usually comes from temperature shock or a chocolate layer that’s too thin.
- Thicker layers: Always spread a generous coat of chocolate on both bottom and top.
- Slow cooling: Let the cups set in the refrigerator rather than the freezer to avoid sudden temperature changes.
- Handle gently: Avoid pressing too hard on the cups when peeling off liners.
Why Did My Peanut Butter Cups Taste Too Sweet Or Too Salty?
The filling flavor depends on the balance of peanut butter, butter, and powdered sugar. If not measured carefully, the taste can lean too far in one direction.
- Too sweet: Reduce the powdered sugar slightly or use semi-sweet chocolate for balance.
- Too salty: Use unsalted peanut butter and butter, then add salt slowly, tasting as you go.
- Balanced flavor: Combining milk and semi-sweet chocolate usually creates the most even taste.
You May Also Like To Check Out These Recipes
- Pumpkin Cream Cheese Swirl Muffins
- Mexican Street Corn White Chicken Chili
- Viral Tiktok Cucumber Salad
- Caramel Apple Dump Cake
- Pumpkin Pie Cookies
- 60 Fall Crockpot Recipes
- 70 Best Fall Dinner Recipes
- 60 Fall Comfort Food Ideas
- 50 High Protein Breakfast Ideas
- Neapolitan Cake
- Fall And Winter Pantry Essentials
- 25 Best Habanero Recipes
- 30 Best Fall Dessert Ideas
- 25 Best Fall Cookies
- 41 Best Fall Bread Recipes
- 25 Fall Cake Ideas
- 17 Fall Kitchen Essentials To Get Now
- Fall And Halloween Coffee Bar: Setup And Decoration Ideas
- Lasagna Soup Recipe
- Vegan Potato Soup
- Baked Cheesy Pumpkin Gnocchi
- Cheeseburger Soup
- Roasted Pumpkin Seeds
- Garlic Soup
- Broccoli Cheddar Soup
- 25 Butternut Squash Soup Recipes
- 50 Easy Soup Recipes
- Oven Roasted Sweet Potatoes Wedges
- Roasted Sweet Potato Black Bean Bowl
- Pumpkin Soup
- Pumpkin Pie Cupcakes With Cream Cheese Frosting
- Hatch Chile Chicken Enchiladas
- Hatch Chile Corn Chowder
- Hatch Chile Cream Cheese Dip
- Hatch Chile Salsa
- Hatch Green Chile Queso Dip With beef Chorizo
- Cheesy Hatch Green Chili Chicken And Rice Casserole
- 50 Best Hatch Chili Recipes
- Jack O Lantern Pizza
- Mexican Street Corn White Chicken Chili
- Beef Stuffed Acorn Squash
- Fall Pasta Salad Recipe
- Air Fryer Pumpkin Seeds
- Pumpkin Empanadas
- Pumpkin Cheese Ball
- Apple Crisp Recipe With Oats And Melted Butter