Halloween is a time for fun, creativity, and a little bit of mischief. One of the best ways to celebrate this spirited season is by whipping up a Halloween dirt cake that brings joy and laughter to any gathering.
This charming treat is more than just a dessert; it’s a delightful activity that invites everyone to join in the fun.
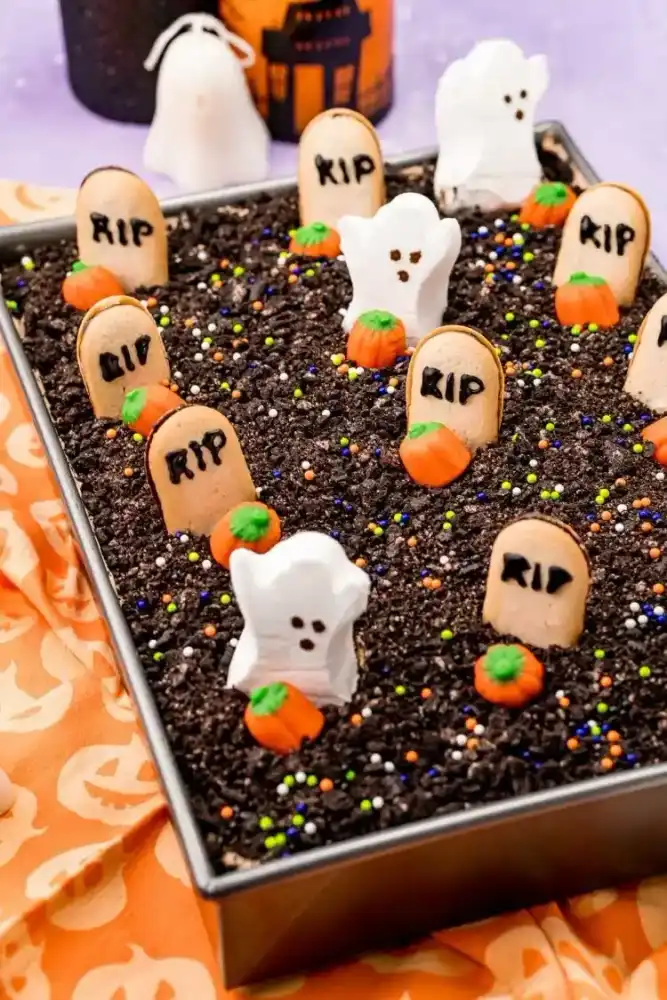
Think about gathering with friends and family to create a cake that looks like a spooky graveyard, filled with chocolatey goodness and topped with tasty decorations.
The excitement of digging into this sweet creation is contagious, making it a perfect centerpiece for your Halloween festivities.
Whether you’re hosting a gathering or simply looking to bring some cheer to a quiet evening, this cake will surely add a splash of fun.
Get ready to mix, decorate, and enjoy a Halloween dirt cake that will make your celebration truly special!
Halloween Dirt Cake Recipe
Ingredients
For The Cake
- 1 box (16 oz) chocolate cake mix
- 1 box (3 oz) instant chocolate pudding mix (dry, not prepared)
- ½ cup sour cream (can substitute with plain yogurt)
- ¾ cup vegetable oil
- ½ cup whole milk (or almond milk for a dairy-free option)
- 3 large eggs
- 1 teaspoon vanilla extract
- ½ teaspoon salt
For The Filling
- 1 box (3 oz) instant chocolate pudding mix (dry, not prepared)
- 2 cups whole milk (or almond milk)
For The Frosting
- 2 cups heavy cream (or whipped coconut cream for a dairy-free option)
- ½ cup powdered sugar
- ⅓ cup instant chocolate pudding mix (dry, not prepared)
For The Topping
- 16 Oreo cookies (or any chocolate sandwich cookies), crushed
- 9 Milano cookies (or any cookies) for decoration
- 3 Ghost Peeps
- 12 candy pumpkins
- Optional: colorful sprinkles
- Black gel icing for decoration
Instructions
Making The Cake
- Start by preheating your oven to 350°F (175°C). Grease a 9×13-inch cake pan and set it aside.
- In a large bowl, combine the chocolate cake mix, pudding mix, sour cream, vegetable oil, whole milk, eggs, vanilla extract, and salt. Mix everything together until well combined. The batter will be thick, so use a rubber spatula to spread it evenly in the prepared pan.
- Bake in the preheated oven for 28 to 32 minutes. To check if it’s done, insert a toothpick in the center; it should come out clean.
- Once baked, let the cake cool for about 30 minutes. Then, use the handle of a wooden spoon to poke holes all over the top.
Preparing The Filling
- In a bowl, whisk together the dry pudding mix and milk for about 2 minutes until it starts to thicken.
- Pour the pudding mixture over the cooled cake, spreading it evenly.
Making The Frosting
- In another bowl (or using a stand mixer), whip the heavy cream until it’s thick and fluffy. Add in the powdered sugar and the dry pudding mix, and mix until combined.
- Spread the whipped frosting over the pudding layer on the cake.
Decorating The Cake
- Crush the Oreos in a food processor until you have fine crumbs, then sprinkle them over the top of the cake.
- To create tombstones, write “R.I.P.” on the Milano cookies and gently press them into the frosting so they stand upright.
- Place the Ghost Peeps into the frosting. If they don’t stay up, you can use toothpicks to help secure them.
- Arrange the candy pumpkins around the ghosts and tombstones for a festive look.
- Add sprinkles on top if you like!
Substitutions And Variations For Halloween Dirt Cake
You can easily adapt the Halloween dirt cake recipe to fit your preferences or dietary needs. Here are some creative substitutions and variations:
- Cake Mix: Swap chocolate cake mix for vanilla cake mix for a lighter flavor, or use a gluten-free cake mix if you’re catering to dietary restrictions.
- Pudding Mix: Consider using vanilla or butterscotch pudding for a unique flavor twist that still keeps the dessert exciting.
- Yogurt Alternatives: If you don’t have sour cream or yogurt, unsweetened applesauce or buttermilk can be excellent substitutes.
- Milk Alternatives: For a dairy-free option, almond milk, soy milk, or oat milk can replace whole milk without sacrificing taste.
- Toppings: Mix it up with gummy worms, chocolate spiders, or candy eyeballs instead of the classic decorations for a fun, spooky flair.
How Can I Make Halloween Dirt Cake Ahead Of Time?
Planning to serve Halloween dirt cake but want to get a head start? Here’s how you can prepare it in advance:
- Baking the Cake: Bake the cake a day before your event. Allow it to cool completely, then wrap it tightly in plastic wrap and store it at room temperature.
- Preparing the Filling and Frosting: Make the pudding filling and frosting a few hours before serving. Store them in the refrigerator until you’re ready to assemble the cake.
- Assembling the Cake: It’s best to assemble the cake no more than a few hours before serving to keep the toppings fresh and the cake looking its best.
How Should I Serve Halloween Dirt Cake?
Serving your Halloween dirt cake can be as much fun as making it! Here are some creative ideas for presentation:
- Slice and Serve: Cut the cake into squares and place them on festive plates for individual servings that are easy for guests to enjoy.
- Decorative Displays: Use a large serving platter to display the cake, surrounding it with extra candy pumpkins, edible grass, or other Halloween-themed decorations to enhance its appearance.
- Creative Serving Tools: Use a small plastic shovel to serve the cake, adding to the fun and whimsical theme while making it even more appealing for kids.
Storage Tips For Halloween Dirt Cake
Proper storage is essential to keep your Halloween dirt cake fresh and tasty. Here’s how to store it effectively:
- Room Temperature Storage: If you plan to serve the cake within two days, store it covered at room temperature to maintain its moisture.
- Refrigerator Storage: For longer-lasting freshness, place the cake in an airtight container in the fridge, where it can stay good for up to five days.
- Freezing the Cake: If you want to make it well in advance, freeze the cake before adding any toppings. Wrap it tightly in plastic wrap and aluminum foil. It can be frozen for up to three months.
Why Does My Halloween Dirt Cake Come Out Runny?
If your Halloween dirt cake ends up runny, there are a few common reasons and solutions:
- Excess Liquid: Adding too much milk or yogurt can result in a wet batter. Make sure to follow the recommended measurements closely for best results.
- Underbaking: Ensure that the cake is fully baked. If a toothpick inserted into the center comes out wet, bake it for a few more minutes.
- Overmixing the Batter: Mixing too much can lead to a dense texture. Combine the ingredients just until blended to keep the cake light and fluffy.

Tips For Making The Perfect Halloween Dirt Cake
Ready to impress with your Halloween dirt cake? Here are some pro tips to elevate your baking:
- Quality Ingredients: Choose high-quality cake mix and toppings for the best flavor and texture.
- Cooling the Cake: Allow the cake to cool completely before adding the filling and frosting to prevent melting and ensure neat layers.
- Layering for Fun: Consider making two layers of cake with filling between for added height and visual appeal.
- Engage the Kids: Let children help with the decorations. Their excitement will make the cake-making process memorable and enjoyable!