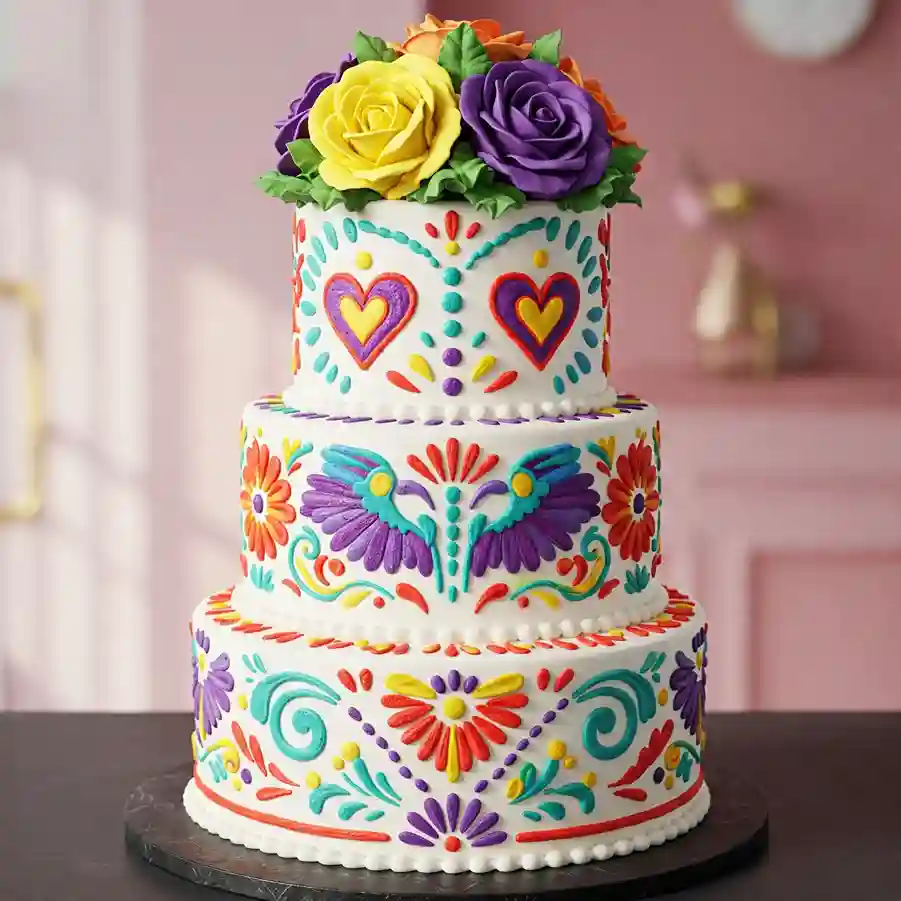
Prepare to celebrate Cinco de Mayo with a cake that’s as bold and beautiful as the holiday itself.
This three-tiered masterpiece isn’t just a dessert—it’s a tribute to Mexican culture, handcrafted with colorful icing and topped with blooming fondant roses that steal the spotlight on any table.
Every part of this cake, from the soft vanilla sponge to the hand-piped decorations, is designed to reflect the vibrant energy of the day.
Each layer is built with care, filled with creamy frosting, and wrapped in vivid patterns inspired by traditional Mexican embroidery.
It’s a labor of love that rewards you at every step, both in flavor and in the joy of watching it come to life.
The colors don’t bleed, the structure holds perfectly, and the final result is as clean and bright as the designs painted across it.
This is the kind of cake people stop to admire before they even pick up a fork. And once they taste it, they’ll ask how you made it look and taste this good.
From birthdays to festivals, this cake is your showpiece—and it’s more than worth the effort.
Table of Contents
Cinco De Mayo Cake Recipe
Ingredients
For The Vanilla Cake (Three 8-inch, 6-inch, and 4-inch tiers – each with 2 layers)
- 6 cups all-purpose flour
- 2 tablespoons baking powder
- 1 teaspoon baking soda
- 1 teaspoon salt
- 2 cups unsalted butter, room temperature
- 3½ cups granulated sugar
- 8 large eggs, room temperature
- 1 tablespoon pure vanilla extract
- 3 cups whole milk, room temperature
- 1 tablespoon white vinegar or lemon juice
For The Buttercream Frosting (For Filling, Crumb Coat, Base Coat, and Piping)
- 3½ cups unsalted butter, room temperature
- 14 cups powdered sugar, sifted
- 1 tablespoon pure vanilla extract
- ⅔ cup heavy cream (adjust for consistency)
- Gel food coloring (red, purple, yellow, orange, green, turquoise, and blue)
For Decoration
- Pre-made or homemade gum paste or fondant flowers (yellow, purple, orange roses)
- Flower wire and green floral tape (optional for securing flowers)
- Small round and petal piping tips (#1, #2, #3, #4, #5)
- Offset spatula, cake scraper, and turntable
- Piping bags
Instructions
- Preheat oven to 350°F (175°C). Grease and flour your cake pans (two 8-inch, two 6-inch, and two 4-inch pans) and line the bottoms with parchment paper.
- In a bowl, whisk together the flour, baking powder, baking soda, and salt. Set aside.
- In a large bowl, cream the butter and sugar using an electric mixer until pale and fluffy (about 4–5 minutes).
- Add eggs one at a time, beating well after each addition. Stir in vanilla extract.
- Mix vinegar or lemon juice into the milk and let sit for 5 minutes (this makes a quick buttermilk).
- Add the dry ingredients to the butter mixture in three parts, alternating with the milk mixture, starting and ending with the dry ingredients. Mix until just combined. Do not overmix.
- Divide the batter evenly between prepared pans. Tap each pan gently to release air bubbles.
- Bake all tiers (in batches if needed) until a toothpick inserted into the center comes out clean — about 25–30 minutes for the 4-inch, 30–35 for 6-inch, and 35–40 minutes for the 8-inch. Let them cool for 10 minutes in the pans, then turn out onto wire racks to cool completely.
- While cakes cool, make the buttercream. Beat butter until creamy and pale. Gradually add powdered sugar, 1 cup at a time, mixing on low. Add vanilla, then slowly add cream until fluffy and spreadable.
- Separate small amounts of frosting into bowls and tint each with desired gel colors. Keep the main batch white for base icing.
- Level each cake layer with a serrated knife or cake leveler. Fill and stack each size tier with white buttercream between layers. Apply a thin crumb coat to each and chill for 30 minutes.
- Apply a smooth second coat of white buttercream. Use a bench scraper and turntable for clean sides and edges. Chill again for at least 1 hour before piping designs.
- Assemble the tiers. Insert cake dowels or straws into the center of the bottom and middle tiers before stacking to support the weight. Place middle tier on the bottom, then top tier.
- Fill piping bags with colored frosting using different small tips for clean detail. Practice first if needed.
- Pipe vibrant Mexican embroidery-inspired patterns: hearts, flowers, swirls, leaves, and birds. Refer to symmetrical motifs for balance. Repeat shapes around each tier for a cohesive design.
- Once piping is complete, chill the cake slightly to set the buttercream.
- Arrange colorful gum paste roses on the top tier. Use floral tape or wires to secure if needed.
- Keep the cake in a cool, dry place until ready to serve. Refrigerate if storing overnight and bring to room temperature before slicing.
What Makes This Cake Perfect For Cinco De Mayo?
This cake is more than just dessert—it’s a symbol of color, celebration, and tradition. Here’s why it fits the spirit of Cinco de Mayo so beautifully:
- Bold Decorations Reflect Mexican Culture: The colorful buttercream designs are inspired by traditional Mexican embroidery and papel picado, which are often used during celebrations. These bright patterns immediately bring festive energy to the table.
- Roses Represent Joy And Celebration: The decorative flowers on top mirror the joyful nature of Mexican festivals, especially during parades and parties.
- It’s A Showstopper For Any Fiesta Table: Whether you’re hosting a family dinner or a full-blown fiesta, this tiered cake becomes the centerpiece that guests remember.
Can I Use Different Cake Flavors Instead Of Vanilla?
Yes, you can change the cake flavor to match your preference while still keeping the design intact. Here are a few easy ideas:
- Chocolate Cake: Rich and moist, it pairs well with buttercream and brings a deeper flavor contrast to the sweet frosting.
- Coconut Or Lime Cake: These flavors add a tropical twist, which goes perfectly with the Cinco de Mayo theme.
- Strawberry Or Orange Cake: Fruit-based flavors not only taste great but also go along with the colorful, vibrant decoration.
Just make sure the cake layers are sturdy enough to hold the weight of the tiers and decorations.
How Do I Get My Buttercream Colors This Bright?
Getting rich, bold colors like the ones on this cake takes a little technique. Here’s what to do:
- Use Gel Food Coloring: Gel colors are more concentrated than liquid ones and won’t water down your buttercream.
- Start With White Buttercream: A pure white base gives a clean, vibrant result when mixed with color.
- Let The Colors Develop: After mixing, cover and let the colored buttercream sit for 30 minutes. The color deepens over time.
- Don’t Overmix: Too much mixing can make buttercream too soft and hard to pipe. Mix until smooth, then stop.
How Can I Pipe These Intricate Designs Even If I’m A Beginner?
If you’re not a pro decorator, don’t worry! Follow these beginner-friendly tips to create neat, colorful designs:
- Use The Right Piping Tips: Small round tips like #1 to #4 are best for thin lines, dots, and small shapes. Petal tips help create floral accents.
- Practice First: Try your design on parchment paper before piping directly on the cake.
- Chill The Cake First: A cold cake holds piped decorations better. Chill it for at least an hour before decorating.
- Work Slowly And Steadily: These patterns are more about precision than speed. You don’t have to rush—take your time.
Can I Make This Cake In Advance?
Yes! This cake is perfect for making ahead if you follow proper steps:
- Bake Cake Layers Ahead: You can bake the layers 2–3 days in advance. Wrap them tightly in plastic wrap and store in the fridge.
- Make Buttercream Early: Prepare buttercream up to 5 days ahead and refrigerate. Just bring it back to room temperature and rewhip before using.
- Decorate 1 Day Before Serving: This gives the buttercream time to set and ensures you’re not rushing on the day of the celebration.
How Do I Store The Cake And Leftovers?
Keeping your cake fresh is important so it tastes as good as it looks. Here’s how to store it the right way:
- Refrigerate Before Serving: If you’ve decorated in advance, place the entire cake in the fridge. Cover with a box or a large cake container to protect it.
- Bring To Room Temperature: Take the cake out 1–2 hours before serving so the buttercream softens and tastes better.
- Store Leftovers Covered: After cutting, wrap leftover slices in plastic wrap or keep them in an airtight container in the fridge for up to 5 days.
- Freeze For Long-Term Storage: You can freeze leftover cake slices for up to 2 months. Wrap each slice tightly in plastic and foil, then thaw in the fridge before eating.
What Kind Of Flowers Work Best For Topping?
Topping this cake with colorful flowers adds a real wow factor. Here are some tips for choosing the best ones:
- Use Gum Paste Or Fondant Flowers: These hold their shape, are fully edible, and won’t wilt or melt.
- Go For Bright, Bold Colors: Yellow, purple, and orange roses match the cake’s vibrant look and festive theme.
- Add Green Leaves For Contrast: Green fondant leaves make the flowers pop and balance the overall design.
- Secure Carefully: If using flower wires or picks, make sure they don’t touch the cake directly unless food-safe.
What If I Don’t Have Three Sizes Of Cake Pans?
If you don’t have all the exact pan sizes, you can still build a tiered cake by adjusting your baking tools:
- Use What You Have: You can still create tiers with any set of small, medium, and large round pans—even if they’re slightly different sizes.
- Bake In Batches: If you only have one pan of each size, bake the layers one after the other. Just don’t let the batter sit too long.
- Cut Layers From Larger Cakes: Bake one large sheet cake and cut out circles using a round cutter or template if needed.
- Use Dowels For Support: No matter the size, always insert supports to avoid the tiers collapsing.
How Can I Transport This Cake Safely?
Moving a tall, decorated cake can feel scary, but these tips will help you do it safely:
- Chill The Cake First: A cold cake is firm and less likely to shift during travel.
- Use A Sturdy Cake Board: Make sure the base is thick and strong enough to hold the weight.
- Box It Up: Use a tall cake box that matches the cake’s size. Tape the bottom so it doesn’t slide.
- Drive Slowly And Flat: Place the cake on a flat surface in the car (like the trunk floor) and avoid sudden stops or turns.
Is This Cake Only For Cinco De Mayo?
Not at all! While it’s inspired by the joy and colors of Cinco de Mayo, this cake works for many occasions:
- Birthday Parties: Its colors and design make it perfect for fun celebrations.
- Weddings And Showers: You can customize the flowers and piping colors to fit the theme.
- Cultural Celebrations: Any event that celebrates Mexican culture or Latin American heritage can feature this cake.
- Art-Inspired Events: Its embroidery look also fits into boho, folk-art, or craft-themed gatherings.