I still smile when I think about how these little Christmas Tree Cake Pops started in my kitchen.
It was a quiet afternoon, lights already hanging around the windows, and I wanted a treat that looked joyful the moment you placed it on the table.
I wasn’t after a big cake or trays of cookies; I wanted tiny trees that felt playful, soft inside, smooth outside, and fun to decorate.
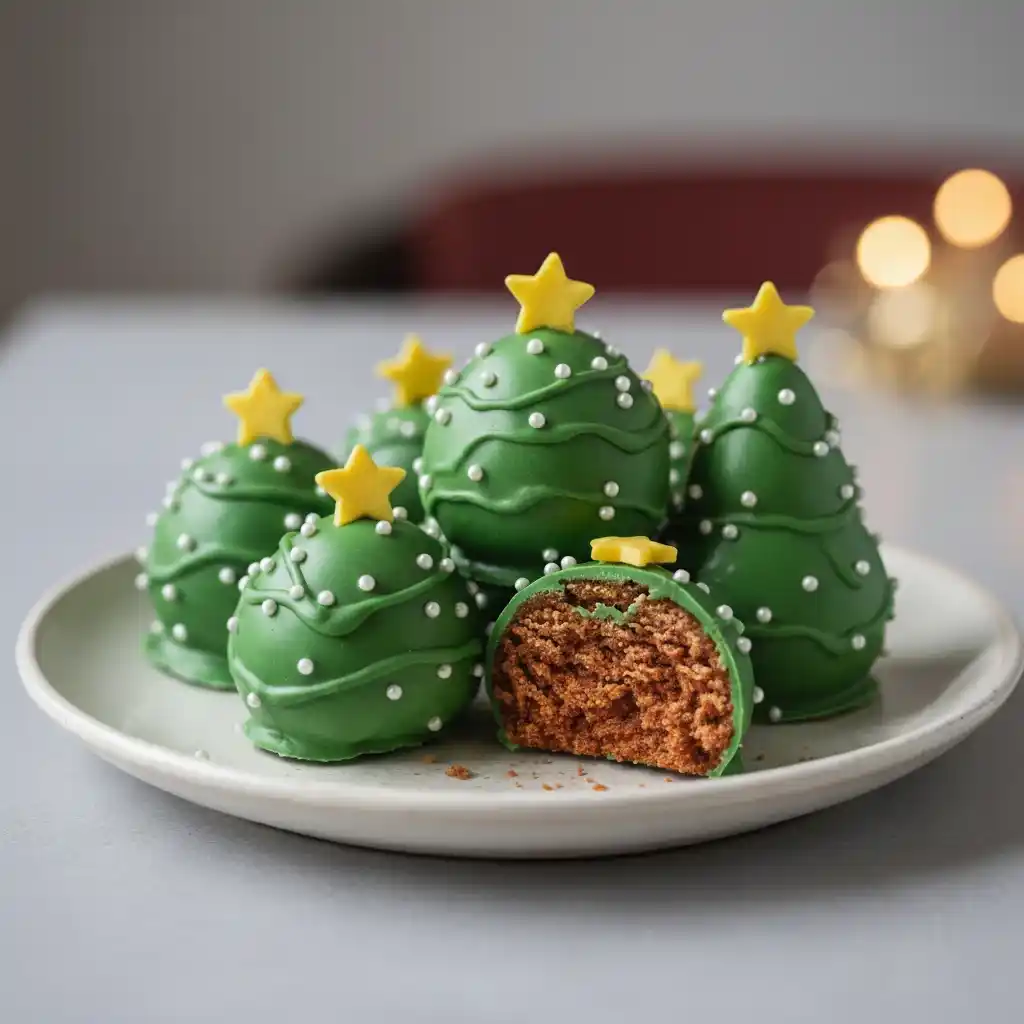
When I shaped the very first one, it felt like making a decoration you could actually eat—round base, pointed top, a green coating that set beautifully, and tiny white pearls that turned into ornaments the moment they touched the chocolate.
The small yellow star on top changed the whole mood. It didn’t feel like work… it felt like building a little scene that belonged on a holiday table.
These cake pops always get attention because they look neat and polished, but they’re still warm and homemade.
Every bite has that gentle chocolate taste with a soft crumb inside, and the outside stays firm enough to hold its shape without cracking.
Kids usually reach for the one with the biggest star, and adults always pause for a second before eating because they look too cute to break apart.
What I love most is how calm the whole process feels—mixing, baking a thin cake, crumbling it, shaping each tree, dipping them to get that smooth green coat, and seeing them line up like a tiny forest waiting for lights.
They turn any table into a small celebration, and once you try them, they become a treat you look forward to making every December.
Table of Contents
Christmas Tree Cake Pops Recipe
Ingredients
For The Cake Mixture
- 1 cup all-purpose flour
- 1/2 cup sugar
- 1/4 cup brown sugar
- 1/4 cup oil
- 1/2 cup milk
- 1 large egg
- 1 tsp vanilla extract
- 2 tbsp unsweetened cocoa powder
- 1 tsp baking powder
- 1/4 tsp baking soda
- 1/8 tsp salt
For The Cake Pop Dough
- 1/4 to 1/3 cup thick vanilla or chocolate frosting (homemade or store-bought)
For The Coating & Decoration
- 2 cups green candy melts
- 1 tbsp neutral oil (only if needed to thin the chocolate)
- White sugar pearls or sprinkles
- Small edible yellow stars
- Parchment paper
- A fork or dipping tool
Instructions
- Preheat your oven to 170°C and lightly grease a small baking pan. A 7×7 inch or similar pan works perfectly because you need a thin, even cake layer.
- In a mixing bowl, whisk flour, cocoa powder, baking powder, baking soda and salt until everything is well combined.
- In another bowl, whisk sugar, brown sugar, oil, egg, milk and vanilla until the mixture becomes smooth and slightly creamy.
- Add the dry mixture into the wet mixture and whisk gently until the batter becomes lump-free. Do not over-mix because you want a soft crumb.
- Pour the batter into the prepared pan and bake for 18–22 minutes, or until a toothpick inserted in the center comes out clean.
- Let the cake cool completely. This is very important. Warm cake will make the dough sticky and wet.
- Once cooled, crumble the cake using your hands. Make sure there are no lumps and the crumbs are very fine. The texture should look like soft sand.
- Add 1/4 cup frosting to the crumbs and mix with your hands. If the mixture still feels dry, add 1–2 teaspoons more frosting at a time. Stop as soon as it becomes a soft, moldable dough. It should not feel sticky or greasy.
- Roll the dough into medium-sized balls. Each ball should be smooth because any cracks will show after dipping. Place them on a plate lined with parchment paper.
- Shape each ball into a small Christmas tree. Gently pinch the top to form a pointed tip and smooth the sides with your fingers so the shape becomes round but slightly conical, exactly like the ones in the image.
- Freeze the shaped cake balls for 15–20 minutes. They must be firm but not rock hard.
- Melt the green candy melts in a microwave-safe bowl. Heat for 20–25 seconds at a time, stirring between each session until fully melted. If the mixture feels thick, add 1 teaspoon oil at a time to make it silky.
- Remove the chilled cake trees from the freezer. Working one at a time, place a cake pop tree on a fork and dip it fully into the melted chocolate. Tap the fork gently on the bowl’s edge to remove extra coating and create a smooth, even surface.
- Slide the coated tree gently onto parchment paper. While the coating is still wet, stick one yellow star on the top.
- Add tiny white pearls randomly around the tree to mimic ornaments. If you want the swirl lines like in the picture, drizzle a thin line of green chocolate over the set coating.
- Let the cake pops sit at room temperature until completely dry and firm. This usually takes 15–20 minutes.
- Once dried, trim any chocolate pools from the bottom using a small knife for a neat base.
What Is The Best Way To Shape Christmas Tree Cake Pops?
Shaping the cake pops correctly gives you the smooth, neat tree look that makes them stand out. The technique is simple once you understand what the right texture should feel like.
- Shape while the dough is cool: Cool dough stays firm and lets you pinch the top into a small point without cracks.
- Create a rounded base: A rounded base helps the cake pop sit flat on the plate and prevents wobbling after coating.
- Smooth the sides gently: Doing this with slightly warm hands melts the surface just enough for a clean finish.
- Keep sizes similar: Every tree should be close in size so they set evenly and look uniform after dipping.
The goal is to work slowly and avoid pressing too hard. A soft crumble mixed with a small amount of frosting gives you a dough that shapes beautifully and holds its form.
How Thick Should The Cake Pop Dough Be?
The dough should be soft enough to mold yet firm enough to stay in shape without spreading. An easy way to check is to press a small piece between your fingers.
- Soft but not sticky: A dough that sticks to your fingers needs more cake crumbs.
- Holds shape without cracking: If the dough cracks or breaks, it needs a teaspoon of extra frosting.
- Feels like modeling clay: This texture helps you shape the pointed top and smooth sides much more easily.
- Stays steady when lifted: If the dough loses form when you pick it up, mix it more for an even texture.
A balanced dough is the difference between smooth, professional-looking trees and cake pops that fall apart during dipping.
Why Do My Cake Pops Crack After Dipping?
Cracks usually appear when the coating and the cake mixture have different temperatures. Understanding this helps you avoid it completely.
- Coating too hot: Hot melted chocolate hardens too fast on cold cake pops and forms cracks.
- Cake pops too cold: If they are fully frozen, the inside expands as they warm up, causing breaks.
- Thick coating: A very thick layer pulls apart as it sets.
- Dough too dry: Dry cake dough shrinks inside the coating.
Let your dipped cake pops rest at room temperature for a few minutes before placing them in cooler temperatures. This keeps the chocolate smooth and unbroken.
How Do You Get A Smooth Green Coating?
A smooth coating comes from the right temperature, the right thickness, and slow dipping.
- Properly melted candy melts: Heat them in short bursts so they stay silky and not grainy.
- Add a little oil: A small amount of neutral oil helps thin the melts for a flawless finish.
- Dip in one motion: Lower each tree into the chocolate gently without twisting or dragging.
- Tap lightly: Soft taps remove extra coating without creating air bubbles.
A smooth surface helps your white pearls and yellow star sit neatly and gives the cake pops the polished tree look.
Which Decorations Work Best For Christmas Tree Cake Pops?
Using decorations that stay firm and attach easily makes the process stress-free and creates a clean final look.
- White sugar pearls: These stay in place and look like ornaments on the green surface.
- Edible yellow stars: They instantly turn the shape into a Christmas tree and add height.
- Extra green drizzle: A thin swirl adds texture and a ribbon-like effect.
- Fine sugar sprinkles: These add sparkle without overpowering the design.
Attach all decorations while the coating is still wet so everything sticks securely.
How Long Should You Chill Cake Pops Before Dipping?
Chilling is important because it keeps the cake pops from breaking during dipping.
- Chill for 15 to 20 minutes: This keeps them firm enough without freezing the inside.
- Avoid over-chilling: Extremely cold cake pops shock the chocolate and cause cracks.
- Refrigerate the dipped pops: A short chill helps the coating set smoothly.
- Room-temperature rest: Let them sit for a few minutes before decorating to avoid condensation.
Balanced chilling keeps the structure strong while giving you an easy dipping experience.
Can You Make Christmas Tree Cake Pops Ahead Of Time?
Cake pops hold their shape well, so making them in advance can save a lot of time during the busy holiday season.
- Prepare cake balls early: You can shape the cake dough trees 1 to 2 days before coating.
- Coat a day early: The coating stays firm and shiny for at least 24 hours.
- Freeze undecorated shapes: This gives the best long-term storage without affecting texture.
- Add decorations on the day of serving: This keeps pearls and stars crisp.
Planning ahead helps you focus on decorating rather than rushing through every stage.
Why Is My Coating Falling Off?
This happens when the surface of the cake pop doesn’t bond well with the melted chocolate. A few small adjustments fix this quickly.
- Excess moisture: Wet or sticky cake dough prevents the coating from holding.
- Warm dough: Dough that isn’t chilled enough softens under the heat of the coating.
- Coating too thin: Very thin chocolate slips off instead of setting.
- Rough surface: Cracked or uneven dough creates gaps under the coating.
Make sure the dough is chilled, dry, and shaped smoothly before dipping.
What Size Should Christmas Tree Cake Pops Be?
Keeping the size consistent helps the trees look neat and makes dipping much easier.
- Medium size works best: Too large makes them heavy, too small makes shaping hard.
- Uniform balls: Start by rolling equal-sized balls before shaping into trees.
- Balanced weight: A medium size holds the star securely without tilting.
- Even baking crumbs: Smaller crumbs mix better and give a smoother dough.
You get cleaner results when every cake pop starts at the same size.
Can You Use Food Coloring Instead Of Green Candy Melts?
Candy melts are the easiest because they set quickly and stay glossy. Food coloring works, but only with specific types.
- Use oil-based colors: Water-based colors can ruin the texture of melted chocolate.
- Start with white chocolate: This lets the green color mix evenly.
- Avoid overmixing: Too much stirring cools the chocolate and makes it thick.
- Test a small amount first: This helps you pick the right shade without wasting chocolate.
If you prefer a deeper green, you can add a tiny amount more, but stop before the texture changes.
How Do You Store Christmas Tree Cake Pops?
Good storage keeps the cake soft, the coating firm, and the decorations intact.
- Store at room temperature: Keep them in an airtight container for up to 2 to 3 days.
- Refrigerate if needed: If your home gets warm, chilling helps keep the coating from melting.
- Avoid moisture: Condensation softens the coating and loosens decorations.
- Freeze undecorated pops: This keeps the dough fresh for up to 2 months.
For coated pops, refrigerating is fine as long as you bring them back to room temperature before serving.
Can You Freeze Christmas Tree Cake Pops?
Freezing is useful if you want to prepare early for events or gatherings.
- Freeze before coating: This gives you the best texture later.
- Use airtight wrapping: Wrap each tree in plastic to protect the shape.
- Thaw slowly: Bring them to room temperature before dipping to avoid cracks.
- Store coated pops for short periods: Coated pops can be frozen for a week, but the decorations may lose shine.
Freezing the uncoated shapes is the easiest way to keep the dough fresh without affecting the final look or flavor.
How Do You Prevent Pearls And Stars From Falling Off?
Decorations stay secure when the coating is still wet and slightly warm.
- Press gently, not deeply: A light touch holds them in place without sinking.
- Work fast: Candy melts set quickly, so add decorations immediately after dipping.
- Avoid moving the pops early: Let the coating firm up before shifting them.
- Use clean tools: Any oil or crumbs will prevent decorations from sticking.
Handling the cake pops gently keeps the ornaments in perfect position.
Christmas Tree Cake Pops
Ingredients
Method
- Preheat your oven to 170°C and lightly grease a small baking pan. A 7×7 inch or similar pan works perfectly because you need a thin, even cake layer.
- In a mixing bowl, whisk flour, cocoa powder, baking powder, baking soda and salt until everything is well combined.
- In another bowl, whisk sugar, brown sugar, oil, egg, milk and vanilla until the mixture becomes smooth and slightly creamy.
- Add the dry mixture into the wet mixture and whisk gently until the batter becomes lump-free. Do not over-mix because you want a soft crumb.
- Pour the batter into the prepared pan and bake for 18–22 minutes, or until a toothpick inserted in the center comes out clean.
- Let the cake cool completely. This is very important. Warm cake will make the dough sticky and wet.
- Once cooled, crumble the cake using your hands. Make sure there are no lumps and the crumbs are very fine. The texture should look like soft sand.
- Add 1/4 cup frosting to the crumbs and mix with your hands. If the mixture still feels dry, add 1–2 teaspoons more frosting at a time. Stop as soon as it becomes a soft, moldable dough. It should not feel sticky or greasy.
- Roll the dough into medium-sized balls. Each ball should be smooth because any cracks will show after dipping. Place them on a plate lined with parchment paper.
- Shape each ball into a small Christmas tree. Gently pinch the top to form a pointed tip and smooth the sides with your fingers so the shape becomes round but slightly conical, exactly like the ones in the image.
- Freeze the shaped cake balls for 15–20 minutes. They must be firm but not rock hard.
- Melt the green candy melts in a microwave-safe bowl. Heat for 20–25 seconds at a time, stirring between each session until fully melted. If the mixture feels thick, add 1 teaspoon oil at a time to make it silky.
- Remove the chilled cake trees from the freezer. Working one at a time, place a cake pop tree on a fork and dip it fully into the melted chocolate. Tap the fork gently on the bowl’s edge to remove extra coating and create a smooth, even surface.
- Slide the coated tree gently onto parchment paper. While the coating is still wet, stick one yellow star on the top.
- Add tiny white pearls randomly around the tree to mimic ornaments. If you want the swirl lines like in the picture, drizzle a thin line of green chocolate over the set coating.
- Let the cake pops sit at room temperature until completely dry and firm. This usually takes 15–20 minutes.
- Once dried, trim any chocolate pools from the bottom using a small knife for a neat base.
You May Also Like To Check Out These Recipes
- Christmas Cookie Cake
- Christmas Tree Cake Cheesecake
- Cranberry Christmas Cake
- Grinch Christmas Cake
- Red Velvet Cheesecake Cake
- Gingerbread Cake
- Pistachio And White Chocolate Winter Wonderland Cake
- Oreo Cheesecake Cupcakes
- Black Bottom Cupcakes
- Oreo Cupcakes
- Gingerbread Cupcakes
- Red Velvet Cupcakes
- Lemon Cupcakes
- Cranberry White Chocolate Cookies
- Santa Cookies
- Melted Snowman Cookies
- Cranberry Orange Cookies
- Linzer Cookies With Almond Flour
- Grinch Sugar Cookies
- Ooey Gooey Butter Cookies
- Cookies And Cream Cookies
- Raspberry Thumbprint Cookies
- Christmas Tree Rice Crispy Treats
- Starbucks Cranberry Bliss Bars
- Christmas Oreo Balls
- Cranberry Pecan Cheese Ball
- Mexican Champurrado
- Christmas Tree Pizza
- Christmas Chocolate Peppermint Bark
- Peanut Butter Rice Krispie Treats
- Sausage Hash Brown Casserole
- Christmas Cream Cheese Mints
- Beef Wellington
- Perfect Prime Rib
- Cheese Fondue Without Alcohol
- Christmas Tree Pull Apart Bread
- Keto Sausage Balls
- Chicken And Noodles
- Venison Italian Meatballs
- Hashbrown Casserole
- Southern-Style Vegan Collard Greens
- Chocolate Yule Log Cake
- Christmas Cake Pops