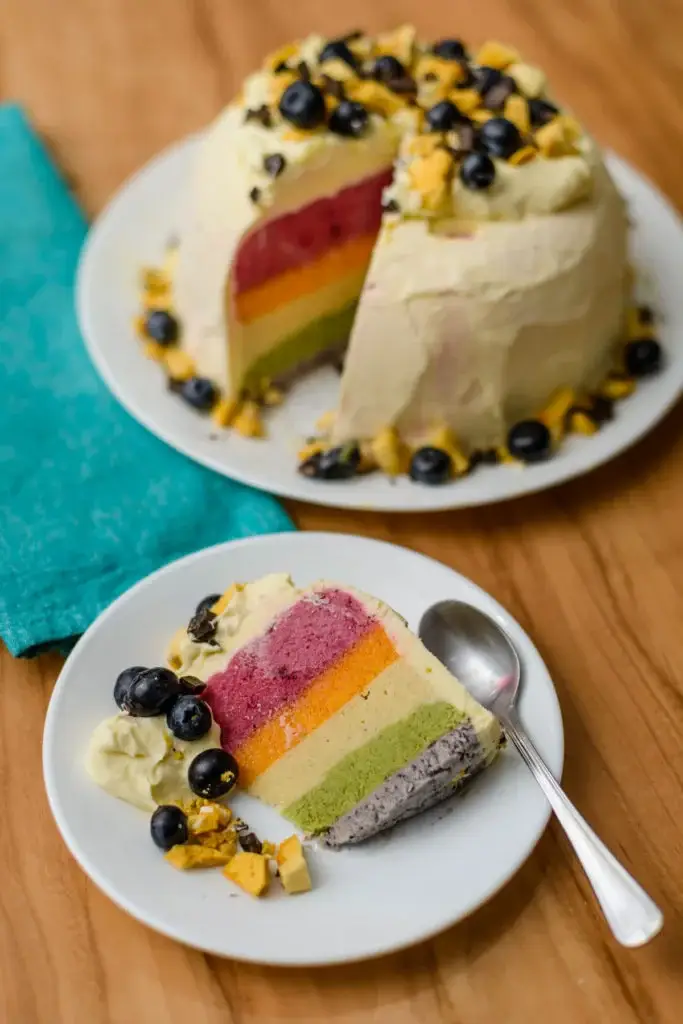
This rainbow ice cream cake is made completely from scratch, using real fruits and vegetables for the colors.
No artificial flavors, no weird additives—just pure, natural ingredients that come together to create something both fun and delicious.
It’s the kind of dessert that makes kids’ eyes light up and adults go back for seconds.
This recipe does take some time and has to be done in steps over a few days. But trust me, the effort is 100% worth it.
The layers freeze beautifully, the flavors blend perfectly, and the end result is a stunning cake that looks like it came straight from a bakery.
If your family isn’t used to the natural sweetness of fruit and dairy alone, you can add a touch of honey or maple syrup to the layers.
A few weeks ago, I asked what kind of cake was wanted for a special occasion, listing out different options—chocolate, vanilla, fruit, ice cream.
Instead of choosing just one, the request came back for a rainbow ice cream cake. Not just any rainbow cake, though. It had to have real fruit flavors, be creamy and smooth, and most importantly, look as good as it tasted.
I had no recipe to follow, so I made it up as I went, testing different fruits and vegetables to get the right colors and flavors. In the end, it worked even better than I expected.
The layers came out bright, the texture was soft and creamy, and every bite was packed with real fruit flavor. Now, I’m sharing the exact method so you can make it too.
Rainbow Ice Cream Cake Recipe
Step 1: Make The Vanilla Ice Cream
Ingredients (For 1 Liter Of Ice Cream)
You will need to double this amount to make the full cake.
- 600ml full-fat cream
- 300ml whole milk
- 3 eggs
- ½ cup natural sweetener (such as raw honey or cane sugar)
- ½ teaspoon pure vanilla extract or vanilla powder
- 1 tablespoon maple syrup
Instructions
- In a mixing bowl, whisk together the eggs, milk, cream, sweetener, and vanilla until smooth.
- Pour the mixture into a saucepan and place it over medium heat, stirring continuously.
- Do not allow it to boil—if it starts bubbling, remove it from the heat for a moment.
- Keep stirring until the mixture thickens, about 15 minutes. Test by dipping a spoon in: if the mixture lightly coats the spoon, it’s ready.
- Remove from heat and stir in the maple syrup to help keep the ice cream soft.
- Let the mixture cool for 10 minutes, then pour it into a container and place it in the freezer.
- After 2 hours, take it out and stir well. Repeat this process every couple of hours until the texture is similar to soft-serve ice cream.
- Once ready, divide the ice cream into six separate containers. Keep them in the freezer except for one.
Step 2: Create The Rainbow Layers
Each layer is naturally flavored and colored with real fruits and vegetables. If you prefer a sweeter taste, you can add a little maple syrup or honey.
Ingredients For Red Layer
- 10 frozen strawberries
- 1 small beetroot (peeled and chopped)
- 1 tablespoon water
Instructions
- Blend all ingredients until completely smooth.
- Stir the mixture into one container of vanilla ice cream until evenly combined.
Alternative: If you don’t like beetroot, use a mix of strawberries, raspberries, and blackberries instead for a deep red color.
Ingredients For Orange Layer
- 2 peeled oranges
- 1 carrot (chopped)
Instructions
- Blend until smooth.
- Mix into another portion of vanilla ice cream.
Alternative: You can use a small amount of cooked sweet potato instead of the carrot for a richer color.
Ingredients For Yellow Layer
- 1 portion of vanilla ice cream (it is already naturally yellow)
Alternative: For a brighter yellow, mix in an extra egg yolk.
Ingredients For Green Layer
- 2 peeled kiwi fruits
- 1 handful of baby spinach
- 1 tablespoon water
Instructions
- Blend everything until smooth.
- Stir into another portion of vanilla ice cream.
Alternative: If you prefer a creamier green layer, use avocado instead of kiwi.
Ingredients For Blue/Purple Layer
- ½ cup fresh blueberries
- 1 tablespoon water
Instructions
- Blend until smooth.
- Mix into the last portion of vanilla ice cream.
Alternative: You can use mulberries or dark grapes for a richer purple shade.
Step 3: Assemble The Cake
- Line a round glass bowl with plastic wrap for easy removal later.
- Pour in the red layer first, smoothing the top with a spatula.
- Freeze for about 2 hours until firm.
- Take out the next portion of vanilla ice cream and let it soften slightly.
- Mix in the orange layer ingredients and pour it over the red layer. Smooth the top and freeze again.
- Repeat this process for the yellow, green, and blue/purple layers, making sure each one is frozen before adding the next.
- Once all layers are done, freeze the cake for at least 24 hours to make it firm.
Step 4: Decorating The Cake
Ingredients
- 600ml full-fat cream (for whipping)
- Fresh fruits (blueberries, strawberries, bananas, etc.)
- Dark chocolate chunks (at least 70% cocoa)
- Crushed honeycomb (optional)
Instructions
- Remove the cake from the freezer and let it sit for 5-10 minutes until it slightly softens.
- Flip the bowl upside down onto a plate and gently remove the plastic wrap.
- Whip the cream until stiff peaks form. Spread it evenly over the entire cake.
- Freeze for a few hours (or overnight) to let the cream set.
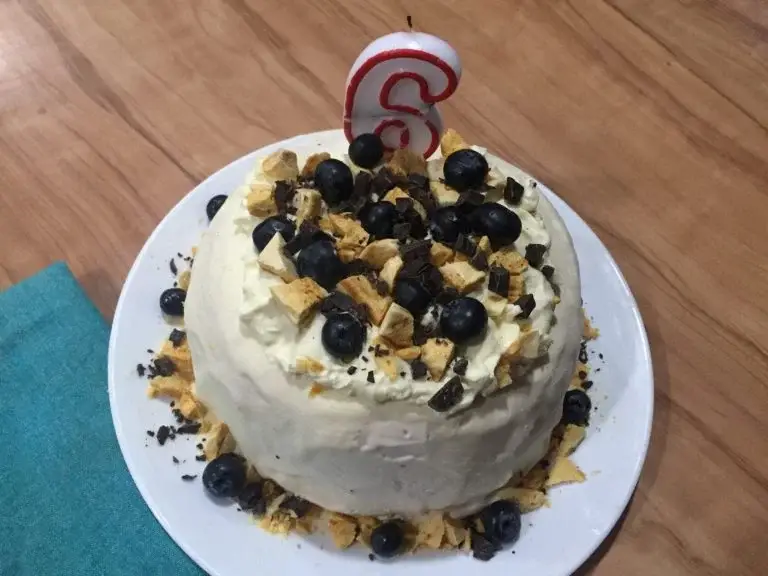
- Right before serving, decorate with fresh fruits, chocolate chunks, and honeycomb.
Step 5: Serving The Cake
- Take the cake out 15 minutes before serving to soften slightly.
- Add any final decorations and slice carefully.
- Enjoy your colorful, all-natural rainbow ice cream cake!
Tips & Tricks For Making A Perfect Rainbow Ice Cream Cake
Making an ice cream cake from scratch takes time, but following these tips will help you get smooth layers, the right texture, and a cake that holds its shape beautifully.
- Use the right pan: A deep, round pan or springform pan lined with plastic wrap makes it easier to remove the cake without breaking it.
- Freeze each layer properly: Let each ice cream layer freeze for at least 1–2 hours before adding the next one. This keeps the colors from mixing.
- Soften ice cream the right way: Leave ice cream at room temperature for 5–10 minutes before spreading. Avoid microwaving it, as it melts unevenly.
- Press down each layer: Use a spatula or the back of a spoon to gently press down the ice cream for smooth, even layers.
- Keep decorations simple: If using whipped cream, apply it just before serving to keep it from melting. Use fruits, nuts, or chocolate for extra flavor.
- Let it freeze overnight: After assembling, freeze the cake for at least 12 hours to make sure it’s fully set before slicing.
How To Store Rainbow Ice Cream Cake Properly?
To keep your ice cream cake fresh and avoid freezer burn, follow these steps:
- Wrap it tightly: Use plastic wrap or aluminum foil to cover the entire cake, preventing ice crystals from forming.
- Store in an airtight container: If possible, place the wrapped cake in a container to keep out any freezer smells.
- Keep it in the back of the freezer: Avoid storing it near the freezer door, where temperature changes can cause melting and refreezing.
- Avoid storing near strong-smelling foods: Ice cream can absorb odors, so keep it away from items like onions or seafood.
- Consume within a week for best taste: While it can last longer, eating it within 7 days ensures the best flavor and texture.
If you have leftovers, cut the cake into slices, wrap them individually, and store them in a container to make serving easier later.
How Long Should Ice Cream Cake Sit Out Before Eating?
Serving ice cream cake at the right consistency is important. If it’s too frozen, it’s hard to cut, and if it’s too soft, it melts too fast. Here’s how long to leave it out based on temperature:
- Hot weather (above 25°C/77°F): Let it sit for 5 minutes before slicing.
- Mild weather (20–25°C/68–77°F): Leave it out for 10 minutes before cutting.
- Cool weather (below 20°C/68°F): Wait 15 minutes before serving.
To check if it’s ready, press the side gently. If it gives slightly but still holds its shape, it’s perfect for slicing.
How To Keep Ice Cream Cake From Melting At A Party?
Keeping an ice cream cake cold during a party can be tricky, but these steps will help it stay firm longer:
- Take it out at the last moment: Keep it in the freezer until just before serving to reduce the time it’s exposed to warm air.
- Pre-chill the serving plate: Place the cake stand or plate in the freezer for 30 minutes to 1 hour before using it.
- Surround it with ice packs: Set the cake on a tray with ice packs underneath to keep it cold.
- Use dry ice for outdoor parties: If you’re serving it outside, place dry ice in a cooler and store the cake inside until needed.
- Slice and serve quickly: Cut the cake into portions and serve immediately instead of leaving the whole cake out.
- Return leftovers to the freezer fast: If there’s any cake left, put it back in the freezer within 10 minutes to prevent melting and refreezing.

.