I’ve baked a lot of cakes over the years, but this one left a mark. Not just on my tastebuds, but on the kind of silence that falls across the table when people take the first bite — the good kind of silence.
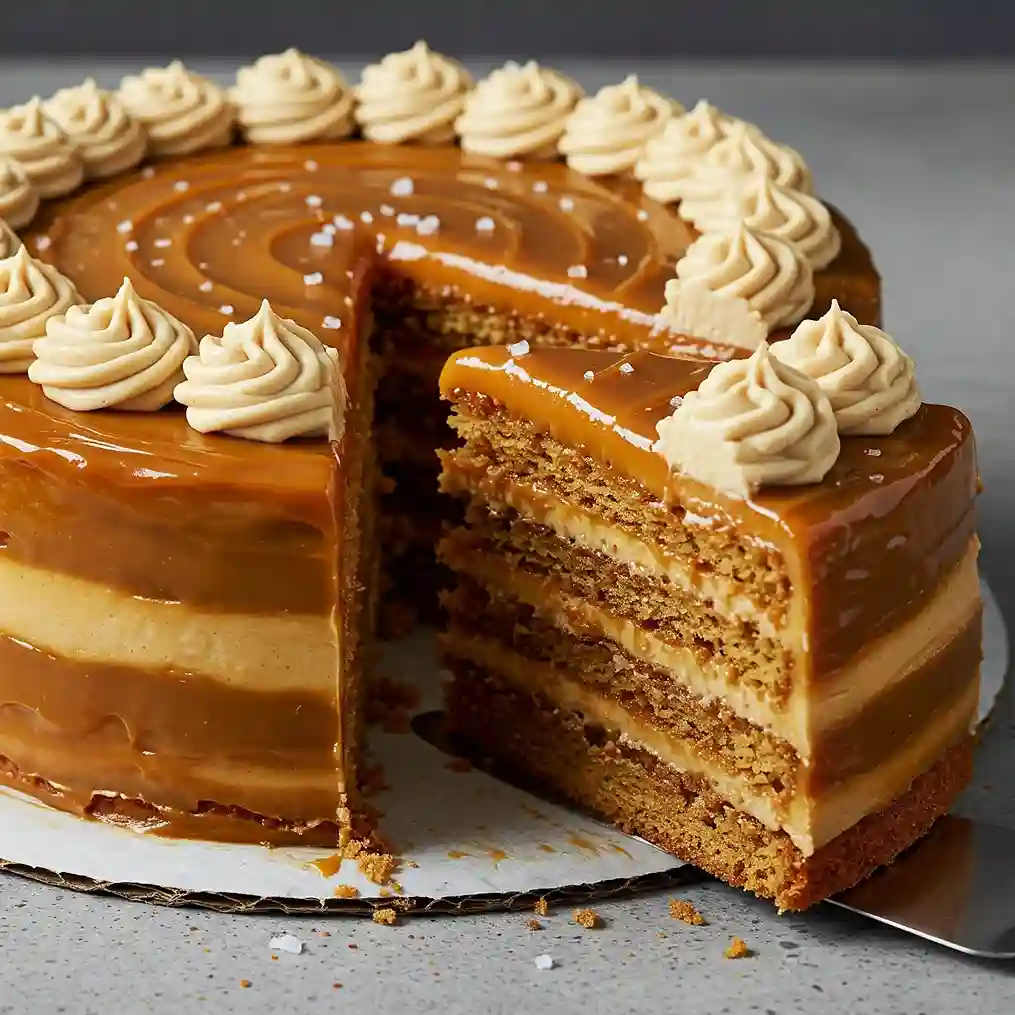
That thick, buttery caramel. The dense yet soft layers. That glossy, sticky finish you can see catching the light.
This Dulce de Leche Cake isn’t your average dessert—it’s the sort of thing that stops time for a moment.
There’s a depth to it — not just in the tall, golden-brown layers stacked one after another like a story told slowly — but in the way it holds up sweetness with a gentle edge of salt and warmth.
Each bite is creamy, a little sticky, not too sweet, never boring. It’s the kind of cake you cut thin, thinking one slice will do, and end up scraping your fork across the plate wondering if anyone’s watching.
The buttercream is thick, smooth, and lush with that caramel-like dulce richness — not whipped into air, but whipped into submission.
It holds its shape, holds its flavor, and doesn’t get lost in the cake.
And the glaze? That’s the glossy curtain that drapes over the whole thing, locking in moisture and adding just the right amount of shine and chew to finish every forkful the way it started — with intention.
This isn’t a cake that apologizes for being rich. It doesn’t need to be loud, either. It just shows up, does its job, and then lingers in your memory for days.
If you want to bake something that makes people pause — not from shock or drama, but from honest-to-goodness joy — bake this cake. Just once. Then try not to make it again next week.
Dulce De Leche Cake Recipe
Ingredients
For The Cake Layers
- 2½ cups (310g) all-purpose flour
- 1½ tsp baking powder
- 1 tsp baking soda
- ½ tsp fine salt
- 1 tsp ground cinnamon (optional, but enhances flavor)
- 1 cup (225g) unsalted butter, room temperature
- 1 cup (200g) light brown sugar, packed
- ½ cup (100g) granulated sugar
- 4 large eggs, room temperature
- 1 tbsp pure vanilla extract
- 1 cup (240ml) buttermilk, room temperature
- ½ cup (120g) prepared dulce de leche (store-bought or homemade)
For The Dulce De Leche Buttercream
- 1½ cups (340g) unsalted butter, room temperature
- ½ cup (120g) prepared dulce de leche
- 3½ cups (420g) powdered sugar, sifted
- 1½ tsp vanilla extract
- Pinch of fine salt
- 2–3 tbsp heavy cream or milk (as needed for texture)
For The Dulce De Leche Glaze
- ¾ cup (180g) prepared dulce de leche
- 2 tbsp heavy cream
- ½ tsp sea salt (plus more for garnish)
Optional Garnish
- Flaky sea salt for topping
- Extra buttercream for piping (reserve ~½ cup)
Instructions
- Preheat your oven to 350°F (175°C). Grease and line three 8-inch round cake pans with parchment paper circles. Lightly flour the sides.
- In a large bowl, whisk together the flour, baking powder, baking soda, salt, and cinnamon. Set aside.
- In a stand mixer with the paddle attachment, cream the butter, brown sugar, and granulated sugar on medium-high speed until light and fluffy (3–4 minutes).
- Add eggs one at a time, beating well after each addition. Mix in vanilla extract.
- Reduce speed to low and add the dry ingredients in 3 additions, alternating with the buttermilk in 2 additions, beginning and ending with the dry. Do not overmix.
- Stir in the dulce de leche until just combined — the batter will be thick and rich.
- Divide the batter evenly among the prepared pans. Smooth the tops with a spatula.
- Bake for 23–27 minutes, or until a toothpick inserted in the center comes out clean.
- Let cakes cool in pans for 10 minutes, then turn out onto wire racks to cool completely. Chill them if needed before assembling for easier handling.
Make The Buttercream
- In a large mixing bowl, beat butter until pale and fluffy (about 3 minutes).
- Add the dulce de leche, vanilla, and salt. Mix until smooth.
- Gradually beat in powdered sugar on low speed to avoid clouds, then increase to medium-high until smooth and spreadable.
- Add heavy cream one tablespoon at a time until desired consistency is reached — it should be silky but hold its shape.
- Reserve about ½ cup of buttercream for decorating the top swirls.
Make The Glaze
- In a small saucepan or microwave-safe bowl, gently warm dulce de leche with heavy cream and sea salt, stirring until glossy and pourable. It should coat a spoon but still run slowly.
Assemble The Cake
- Level the cooled cakes with a serrated knife if needed.
- Place the first layer on a cake board or serving plate. Spread a generous layer of buttercream evenly to the edges.
- Repeat with remaining layers: cake, buttercream, cake, buttercream… ending with a cake layer on top.
- Use a thin layer of buttercream to crumb-coat the cake and chill for 20–30 minutes to set.
- Once set, frost the sides and top with a smooth, even layer of buttercream. A cake scraper helps here for clean edges.
- Pour the warm glaze on top of the cake and gently spread it outward to let it drip over the sides. Use an offset spatula for control.
- Chill the cake for 10 minutes, then pipe decorative rosettes with the reserved buttercream using a star tip.
- Finish with a light sprinkle of flaky sea salt across the top for a dramatic, irresistible finish.
What Is Dulce De Leche And How Is It Different From Caramel?
Dulce de leche and caramel look similar, but they’re not made the same way and don’t taste exactly alike.
- Dulce de leche is made by slowly heating sweetened milk until it becomes thick, golden, and creamy. It has a smooth, mellow sweetness with a deep milky flavor.
- Caramel is made by heating sugar until it melts and turns golden, then sometimes adding cream or butter. It has a sharper, more intense flavor and can be slightly bitter.
- Texture-wise, dulce de leche is softer and thicker, which makes it perfect for cake layers, frostings, and glazes without being too runny or sticky.
You can use them in similar ways, but if a recipe specifically calls for dulce de leche, it’s best not to swap it with regular caramel.
Can I Make Dulce De Leche At Home?
Yes, you can — and it’s easier than most people think, though it takes some time and patience.
- Boil a can of sweetened condensed milk: Remove the label, submerge the sealed can in a pot of water, and simmer gently for 2½ to 3 hours. Keep the can fully covered with water at all times.
- Use a baking method: Pour the sweetened condensed milk into a glass dish, cover it with foil, place it in a water bath, and bake at 400°F for about 90 minutes, stirring occasionally.
Let it cool completely before using or opening the can, especially if using the boiling method.
How Do I Store Dulce De Leche Cake Properly?
Proper storage is key to keeping this cake fresh, flavorful, and safe to eat.
- In the fridge: Wrap the cake with plastic wrap or store it in an airtight container. It will stay fresh for up to 4 days. The buttercream and glaze will firm up slightly but soften again at room temperature.
- In the freezer: You can freeze the whole cake or individual slices. Wrap them tightly in plastic and a layer of foil. Store for up to 2 months. Thaw in the fridge overnight before serving.
- Room temperature: If you plan to eat the cake the same day or within 12 hours, you can keep it covered at room temperature in a cool place.
Always let the cake come back to room temperature before serving, so the buttercream and dulce de leche have the perfect soft texture.
Can I Make This Cake In Advance?
Yes, you can prepare this cake in stages to make baking more manageable and stress-free.
- Bake the cake layers ahead: You can bake them up to 2 days in advance. Once cooled, wrap each layer tightly in plastic wrap and refrigerate.
- Make the buttercream the day before: Store it in an airtight container in the fridge. Let it come to room temperature and beat it again before using.
- Assemble the cake a day early: This allows the flavors to settle and the layers to hold together better. Just store it in the fridge and let it sit out for at least 30–40 minutes before serving.
Doing this makes the final day of assembly quicker and smoother, especially if you’re serving it for a special occasion.
Can I Use Store-Bought Dulce De Leche For This Cake?
Absolutely. In fact, good quality store-bought dulce de leche works beautifully in this recipe.
- Choose one with simple ingredients: Look for a product that lists milk and sugar as the main ingredients, without a long list of additives.
- Make sure it’s thick and creamy: You want a spreadable texture, not too runny. Some brands are thicker than others, so check consistency before using.
- Taste it first: Since it’s a major flavor in the cake, the better it tastes, the better your cake will turn out.
If your store-bought dulce de leche is too stiff, you can warm it slightly or stir in a spoonful of warm cream.
Can I Make This Cake Without A Stand Mixer?
Yes, it’s possible, though it will take a bit more elbow grease.
- Use a hand mixer for creaming butter and sugar: It may take slightly longer, but you’ll still get a fluffy base.
- Mix cake batter and buttercream in batches: Hand mixers may struggle with thick mixtures, so mix in parts and take your time.
- Whisk by hand when needed: For glazes and finishing touches, a regular whisk works just fine.
While a stand mixer makes things faster, you can still make this cake beautifully without one if you’re patient and consistent.
Can I Turn This Into A Smaller Or Larger Cake?
Yes, you can scale this recipe up or down depending on the occasion.
- For a smaller cake: Cut all the ingredients in half and use two 6-inch pans instead of three 8-inch pans.
- For a larger cake or more servings: Double the recipe and bake in four 9-inch pans. Adjust baking time slightly (check around the 28-minute mark).
- For cupcakes: The batter works well for about 24 cupcakes. Fill liners ¾ full and bake for 18–20 minutes.
Just remember: baking time changes depending on size and thickness, so keep an eye on your oven.
How Do I Get That Glossy Glaze?
That stunning glaze on top isn’t hard to achieve, but it needs the right consistency and technique.
- Warm the dulce de leche gently: Mix with cream until smooth and pourable, but not too runny.
- Pour onto a chilled cake: This helps the glaze set quickly and stops it from dripping too far down the sides.
- Spread with a light hand: Use an offset spatula to guide the glaze toward the edges slowly. Don’t push it too hard.
- Let it drip naturally: Those soft drips over the edge are what make the cake look like it came from a bakery.
Always chill the cake for 10–15 minutes after glazing to set the look before adding decorations.
You May Also Like To Check Out These Recipes
- 4th Of July Cookie Cake
- Oreo Cake Pops
- Easter Cake Pops
- Easter Cookie Cake
- Sour Cream Coffee Cake
- Chocolate Lava Cake
- Fruit Tart With Cream Filling
- Brownie And Chocolate Chip Cookies (Brookies)
- Authentic Golden Churros
- Almond Croissant
- Banana Bars With Cream Cheese Frosting
- French Crème Caramel
- Baby In Bloom Cake
- Baby Shower Cookies
- Baby In Bloom Cupcakes (Tutorial)
- German Chocolate Cake
- Chocolate Drip Cake With Fresh Fruit
- White Texas Sheet Cake
- 4th Of July Cake Pops
- Ocean Cake
- Mango Cake With Whipped Cream
- Raspberry Cake
- Bakery-Style Lemon Bars
- Rhubarb Custard Bars
- Rhubarb Pie
- Peach Dump Cake
- Lemon Blueberry Cake
- Lemon Raspberry Cake
- Strawberry Icebox Cake
- Strawberry Sheet Cake
- Strawberry Rhubarb Pie With Frozen Fruit
- Mango Sago Dessert With Coconut Milk
- Beach Cake
- Ice Cream Sandwich Cake
- Banana Split Cake
- Baseball Cake Pops