Every December, my table changes before the food even arrives. The colors matter more. The layout matters more. People notice details they usually ignore.
This Christmas Fruit Tray grew out of that quiet pressure I put on myself each year to serve food that feels thoughtful, not rushed, and worth pausing over.
I wanted a tray that felt calm and joyful at the same time. Clean circles, rich reds, deep greens, and just enough warmth to signal the season before a single bite is taken.
This tray became my answer. I’ve made it for family gatherings where everyone talks at once, and for smaller evenings where the room stays hushed and candles do most of the talking.
It always earns the same response: people slow down. They look twice. They reach carefully.
What I love most is how intentional it feels. Every fruit has a place. Every color has a reason. The design isn’t loud, yet it holds attention.
It feels festive without shouting for it. That balance is hard to get right, and that’s why the details matter here.
The order, the spacing, the way the center is built layer by layer—it all works together to create a tray that feels complete before anyone even tastes it.
This is not a random mix tossed onto a platter. It’s arranged with purpose, built slowly, and finished with care.
When it lands on the table, it carries that effort with it. That’s what makes this Christmas Fruit Tray feel special every single time.
Table of Contents
Christmas Fruit Platter Recipe
Ingredients
- Green seedless grapes (about 3½ to 4 cups), washed, dried completely, stems removed
- Blueberries (1½ to 2 cups), washed and fully dried
- Fresh raspberries (2 cups), firm and evenly sized
- Mandarin oranges or clementines (4 to 5 medium), peeled, separated into whole segments
- Kiwi (4 to 5), peeled and sliced into thin, even rounds
- Red apple (1 large), cored and sliced into thin half-moons
- Pomegranate arils (⅓ cup), fresh and glossy
- Fresh rosemary sprigs (5 to 6 long sprigs), washed and patted dry
- Cinnamon sticks (2 to 3), similar length for balance
- Star-shaped apple slice (cut from one apple slice using a small cutter)
Instructions
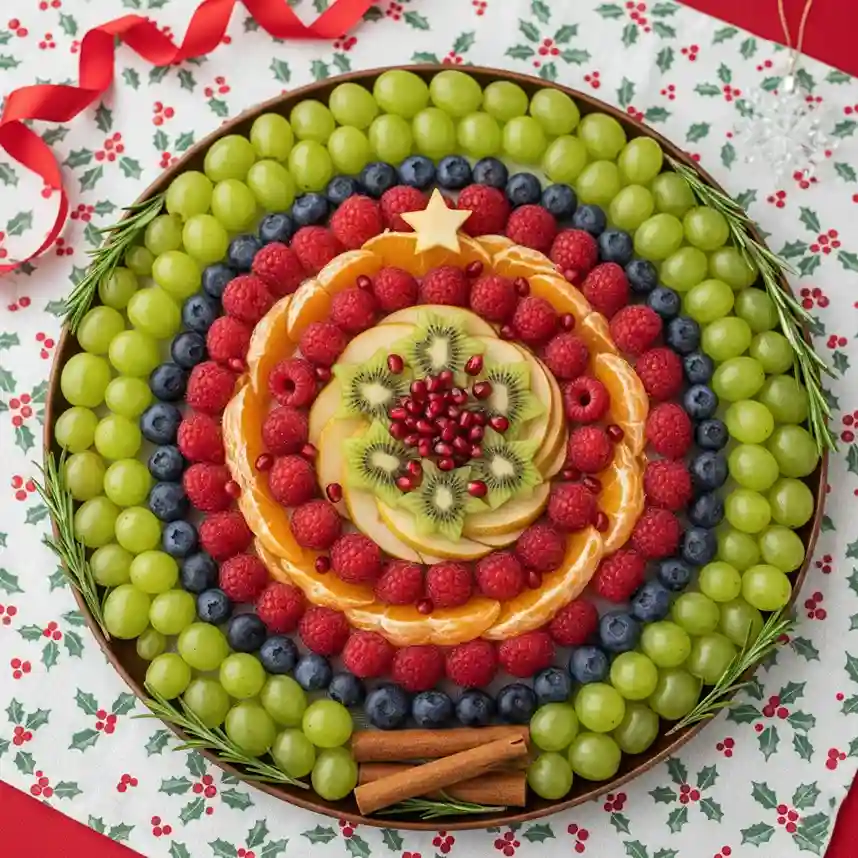
- Choose a large, round serving tray with a shallow rim. Make sure it is completely dry before starting so fruit does not slip or sweat.
- Place rosemary sprigs around the inside edge of the tray, following the curve to form a subtle green border. Tuck the ends under slightly so the stems are hidden and only the needles show.
- Start the outermost ring by placing green grapes tightly side by side. Each grape should touch the next to create a clean, continuous circle with no gaps.
- Inside the grape ring, create the next circle using blueberries. Keep them uniform in size and position them carefully so the ring looks even from all angles.
- Add a full ring of raspberries inside the blueberries. Place them upright with the hollow side facing down for a neater appearance.
- Arrange mandarin orange segments next, slightly overlapping them in a curved pattern so the ring feels smooth and full.
- Create another inner ring using raspberries, matching the spacing and size of the previous raspberry ring to maintain symmetry.
- In the center, layer thin apple slices in a circular, slightly overlapping pattern to form a soft base.
- On top of the apple slices, arrange kiwi rounds in a flower-like design, overlapping gently and keeping the green evenly distributed.
- Sprinkle pomegranate arils neatly in the center of the kiwi, keeping them concentrated so they form a rich red focal point.
- Place the apple star just above the central fruit design so it visually resembles a tree topper.
- At the bottom edge of the tray, lay the cinnamon sticks horizontally and neatly aligned to anchor the design and balance the composition.
- Step back and adjust spacing if needed. Every ring should look intentional, full, and evenly shaped.
How Do You Arrange A Christmas Fruit Tray So It Looks Balanced And Festive?
A Christmas fruit tray looks intentional when every fruit has a clear place and purpose. Balance comes from repeating colors, keeping shapes consistent, and building from the outside toward the center.
Start with structure before decoration. Large fruits belong on the outer rings, while smaller and more detailed fruits work best in the center. Keeping fruit sizes similar within each ring prevents gaps and uneven lines.
Color balance matters just as much. Green, red, and deep blue tones should appear more than once so the tray feels calm instead of scattered. Key details that help with balance:
- Consistent Spacing: place fruit tightly so rings look clean and continuous
- Color Repetition: repeat red and green in more than one area
- Clear Center Focus: design the middle last so it naturally draws the eye
When you work slowly and adjust as you go, the tray feels finished without looking forced.
What Fruits Work Best For A Christmas Fruit Tray Design?
Not all fruits behave the same once they are cut and placed. Some hold their shape well, while others release moisture or lose color quickly. Choosing the right fruits keeps the tray neat for hours.
Firm fruits with bright natural color are ideal. Grapes, berries, citrus segments, apples, and kiwi keep their structure and shine when handled correctly.
Fruits with very high water content or soft flesh tend to break clean lines and dull the overall look. For best results:
- Firm Texture Fruits: grapes, apples, kiwi, blueberries
- Bold Color Fruits: raspberries, pomegranate arils, oranges
- Stable Slices: thin apple and kiwi slices stay flat and clean
Using fruits that hold up well ensures the tray stays attractive from start to finish.
How Far In Advance Can You Prepare A Christmas Fruit Tray?
Timing plays a major role in how fresh the tray looks when it is served. While the full tray should be assembled close to serving time, smart prep work saves effort later.
You can wash, dry, and cut most fruits several hours ahead. Store each fruit separately in airtight containers in the refrigerator. This prevents moisture transfer and keeps colors sharp.
Citrus segments and apple slices should be fully dry before storage to avoid slipping or browning. Assembly timing tips:
- Same-Day Assembly: best for clean lines and bright color
- Advance Prep: fruits can be prepped up to 12 hours earlier
- Final Touches: center garnishes should be added last
Waiting to assemble helps preserve both appearance and texture.
How Do You Keep Cut Fruit Fresh Without Losing Color?
Freshness depends on moisture control and proper handling. Fruit that sits damp or warm loses its appeal quickly.
Always dry fruit completely after washing. Use clean towels and let air circulate if needed. Apples can be sliced thin and used as is when arranged shortly before serving.
Kiwi and berries should be handled gently to avoid bruising. To maintain freshness:
- Dry Surfaces: moisture causes slipping and dullness
- Cool Storage: refrigeration slows softening
- Gentle Handling: pressure damages texture and shape
These steps keep fruit looking bright and natural throughout the event.
What Is The Best Way To Store A Christmas Fruit Tray?
Storage depends on whether the tray is fully assembled or still in parts. Each situation needs a slightly different approach.
If the tray is already assembled, cover it lightly with plastic wrap without pressing down on the fruit. Refrigerate and use within 6 hours for best quality.
For unassembled fruit, airtight containers work best, with similar fruits stored together. Storage guidelines:
- Assembled Tray: refrigerate up to 6 hours
- Prepped Fruit: refrigerate up to 24 hours
- Leftovers: separate fruit and store individually
Long storage dulls color and softens texture, so shorter storage always gives better results.
Why Does The Order Of Fruit Placement Matter?
The order affects both appearance and stability. Placing heavier or larger fruit first creates a solid base that holds everything else in place.
Outer rings should be sturdy and uniform. Inner layers depend on that stability to stay centered and clean. Working inward also helps you adjust spacing as the design takes shape. Benefits of proper order:
- Stable Foundation: outer rings prevent shifting
- Clean Lines: inner circles stay smooth
- Better Control: spacing is easier to fix early
This method leads to a tray that stays intact even when moved.
How Do You Keep The Tray Looking Fresh During Serving?
Once the tray is out, small adjustments keep it looking polished. Fruit may shift as people serve themselves, especially berries and grapes.
Keep a small towel nearby to dab away moisture if needed. Gently nudge fruit back into place between servings. Avoid placing the tray near heat sources, as warmth softens fruit quickly. Serving tips:
- Cool Placement: keeps fruit firm
- Light Adjustments: maintain clean rings
- Short Display Time: refresh or rotate if serving for long periods
With simple care, the tray stays visually appealing until the last piece is taken.
Can You Customize A Christmas Fruit Tray Without Losing The Classic Look?
You can personalize the tray while keeping its festive feel intact. The key is to respect the original structure and color balance.
Swapping similar fruits works well. Red grapes can replace green, or blackberries can replace blueberries if size and color stay consistent.
Decorative herbs and warm accents should stay minimal so the fruit remains the focus. Smart customization ideas:
- Color Matching Swaps: replace fruits with similar tones
- Same Size Rule: keep fruit sizes consistent
- Minimal Accents: avoid overcrowding
Customization works best when the overall shape and rhythm remain unchanged.
Christmas Fruit Tray
Ingredients
Method
- Choose a large, round serving tray with a shallow rim. Make sure it is completely dry before starting so fruit does not slip or sweat.
- Place rosemary sprigs around the inside edge of the tray, following the curve to form a subtle green border. Tuck the ends under slightly so the stems are hidden and only the needles show.
- Start the outermost ring by placing green grapes tightly side by side. Each grape should touch the next to create a clean, continuous circle with no gaps.
- Inside the grape ring, create the next circle using blueberries. Keep them uniform in size and position them carefully so the ring looks even from all angles.
- Add a full ring of raspberries inside the blueberries. Place them upright with the hollow side facing down for a neater appearance.
- Arrange mandarin orange segments next, slightly overlapping them in a curved pattern so the ring feels smooth and full.
- Create another inner ring using raspberries, matching the spacing and size of the previous raspberry ring to maintain symmetry.
- In the center, layer thin apple slices in a circular, slightly overlapping pattern to form a soft base.
- On top of the apple slices, arrange kiwi rounds in a flower-like design, overlapping gently and keeping the green evenly distributed.
- Sprinkle pomegranate arils neatly in the center of the kiwi, keeping them concentrated so they form a rich red focal point.
- Place the apple star just above the central fruit design so it visually resembles a tree topper.
- At the bottom edge of the tray, lay the cinnamon sticks horizontally and neatly aligned to anchor the design and balance the composition.
- Step back and adjust spacing if needed. Every ring should look intentional, full, and evenly shaped.
You May Also Like To Check Out These Articles
- 55 Creative Christmas Cake Ideas To Spark Holiday Cheer
- 40 Christmas Cheesecake Recipes For A Joyful Holiday Season
- 50 Easy Christmas Cupcakes You’ll Want To Bake All Season
- 50 Time-Saving Christmas Cookie Recipes Everyone Will Devour
- 130 Yummy Christmas Treats For The Perfect Celebration
- 118 Christmas Desserts To Make Your Holidays Sweet
- 180+ Mouthwatering Christmas Dinner Recipes To Try This Holiday Season
- 55 Delicious Christmas Appetizer Ideas
- 160 Easy And Festive Christmas Potluck Ideas
- 55 Best Christmas Snacks For Party
- 20 Best Non Alcoholic Christmas Drinks
- 26 Easy Christmas Candy Recipes
- 40 Best Christmas Side Dishes
- 10 Simple Tips For A Cozy Christmas Coffee Bar
- 72 Joyful Christmas Baking Ideas For The Festive Season