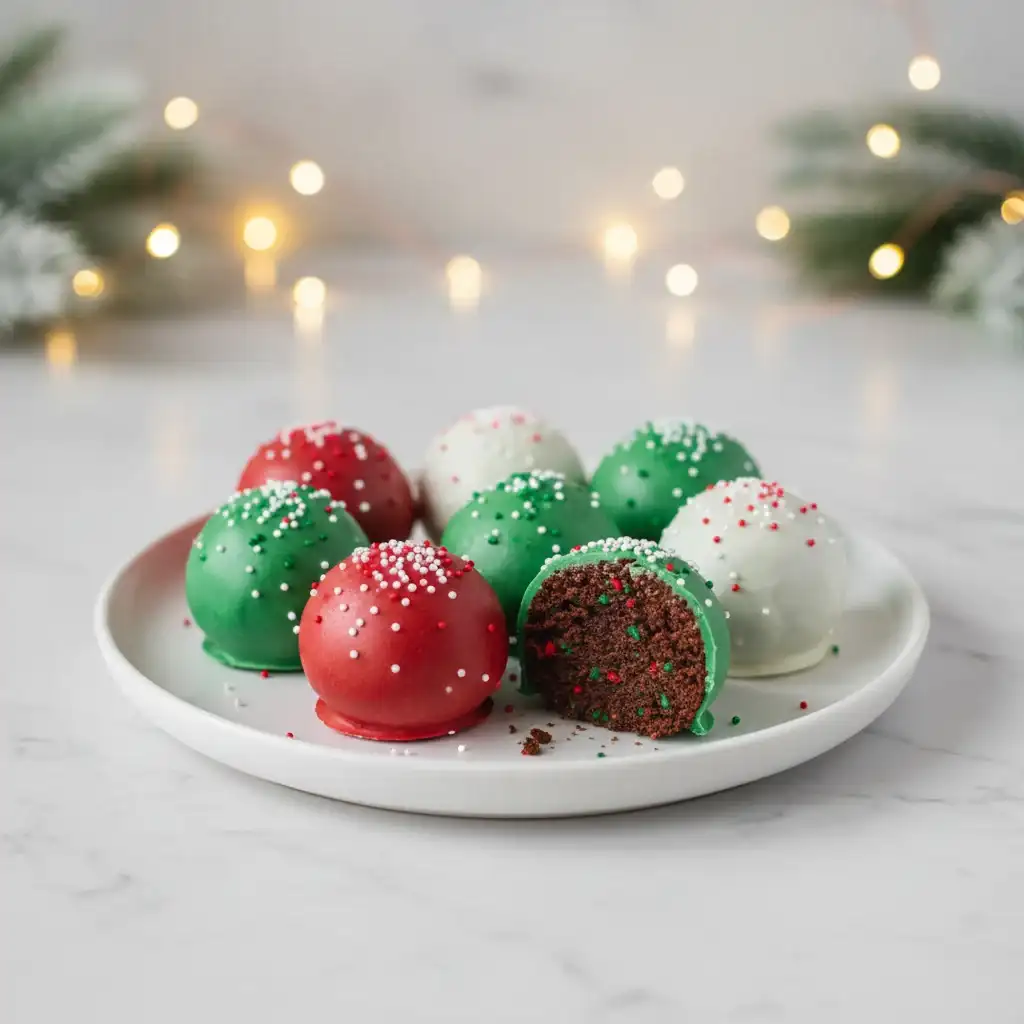
The aroma of warm chocolate always pulls me in, but there’s something about cake pops that transforms simple chocolate into tiny bursts of joy.
Rolling the soft, rich cake into smooth spheres is a quiet ritual—hands dusted with crumbs, the frosting binding every piece together like magic.
Dipping each pop into glossy red, green, and white coatings feels almost meditative, and sprinkling the tiny nonpareils adds a playful, festive spark that can’t be rushed.
These little treats are more than dessert; they carry the energy of the season in every bite.
Each bite is dense and chocolaty yet light enough to pop in your mouth, with a crisp coating that gives just the right snap before melting into soft cake.
Making them takes focus and care, but the result is a collection of edible ornaments that make every holiday table glow.
Table of Contents
Christmas Cake Pops Recipe
Ingredients
For The Cake
- 1 cup granulated sugar
- 1 cup all-purpose flour
- 1/3 cup unsweetened cocoa powder
- 1 teaspoon baking powder
- 1/2 teaspoon baking soda
- 1/4 teaspoon fine salt
- 1 large egg, room temperature
- 1/2 cup milk, room temperature
- 1/4 cup neutral-flavored oil
- 1 teaspoon vanilla extract
- 1/2 cup hot water
For The Cake Pop Mixture
- 1 1/4 to 1 1/2 cups chocolate frosting (smooth, spreadable consistency)
For Coating & Decoration
- 1 1/2 cups red melting wafers
- 1 1/2 cups green melting wafers
- 1 1/2 cups white melting wafers
- 2 teaspoons vegetable shortening (optional, only if wafers seem too thick)
- Red, green, and white nonpareil sprinkles
Instructions
- Preheat the oven to 350°F (175°C). Lightly grease an 8×8-inch square baking pan and line the bottom with parchment so the cake releases cleanly.
- In a mixing bowl, whisk together the sugar, flour, cocoa powder, baking powder, baking soda, and salt until fully blended and no cocoa lumps remain.
- Add the egg, milk, oil, and vanilla. Mix until the batter looks smooth and glossy, about 30 seconds. Do not overmix.
- Pour in the hot water. The batter will become thin, and that is correct. Stir slowly until fully combined.
- Pour the batter into the prepared pan and smooth the surface. Bake for 24–28 minutes, or until the cake springs back when lightly pressed in the center. Avoid overbaking because a dry cake will crumble instead of binding smoothly.
- Let the cake cool completely in the pan. Once cooled, lift it out using the parchment and crumble it into a large bowl. The crumbs should be very fine with no visible chunks.
- Add 1 1/4 cups frosting to the crumbled cake. Use clean hands or a spatula to mix until the texture resembles soft cookie dough. If it still looks crumbly, add the remaining frosting one tablespoon at a time until it holds together smoothly.
- Scoop out portions using a tablespoon-size cookie scoop. Roll each portion into a perfectly smooth ball—you should get about 24 cake pops. Place them onto a parchment-lined tray.
- Refrigerate the rolled cake balls for 1 hour, or freeze them for 15 minutes. They must be firm so they don’t slide while dipping.
- Melt each color of melting wafers in separate bowls using 20–25 second microwave bursts, stirring between each. If the chocolate feels thick, mix in a small amount of shortening until the consistency is fluid and smooth.
- Take one cake ball at a time and place it on a fork or dipping tool. Spoon the melted coating over it, letting excess drip off. Avoid swirling because it creates uneven patches—pouring gives a flawless finish.
- Place the coated pop onto a parchment-lined tray, keeping red pops together, green pops together, and white pops together for a clean presentation.
- Immediately sprinkle each pop with tiny nonpareils before the coating sets. Work in small batches so the coating doesn’t harden before decorating.
- Repeat until all cake pops are dipped and sprinkled. Let them set at room temperature until firm. If your kitchen is warm, chill the tray for 10 minutes to help them harden.
- Once set, arrange them on a plate in alternating colors to recreate the festive display.
How Should You Store Cake Pops To Keep Them Fresh?
Proper storage ensures your cake pops stay soft, flavorful, and perfectly coated. Here’s how to do it right:
At Room Temperature (Short-Term Storage):
- Keep Them Covered: Store cake pops in an airtight container to prevent them from drying out. Avoid placing them near heat or sunlight.
- Duration: They stay fresh for about 2–3 days. Beyond that, the coating may lose its shine and the cake may start to dry.
In The Refrigerator (Medium Storage):
- Layer Carefully: Place cake pops in a single layer or separate layers with parchment paper to avoid touching and sticking.
- Airtight Containers: Use containers that seal well to maintain moisture and flavor.
- Duration: They remain good for up to 7–10 days if stored properly.
In The Freezer (Long-Term Storage):
- Wrap Individually: Cover each cake pop in plastic wrap or wax paper, then place in a freezer-safe container or bag.
- Prevent Freezer Burn: Proper wrapping ensures the coating stays intact and the cake remains soft.
- Duration: Cake pops can be frozen for 2–3 months.
- Thawing: Move frozen pops to the refrigerator a few hours or overnight before serving, then let them reach room temperature to avoid condensation on the coating.
What Are Common Problems When Storing Cake Pops And How To Avoid Them?
Storing cake pops incorrectly can lead to cracked coatings, dry cake, or sticky decorations. Avoid these pitfalls:
- Air Exposure: Leaving pops uncovered can dry out the cake and frosting. Always use airtight containers.
- Stacking Without Protection: Direct stacking can crush coatings or make pops stick together. Use parchment sheets between layers.
- Warm or Humid Conditions: Heat can melt the coating, and humidity can make the cake soggy or cause sprinkles to stick.
- Freezing Without Wrapping: Pops frozen without proper wrapping may develop freezer burn or become dry.
- Rapid Thawing: Bringing frozen pops directly to a warm place causes condensation, which affects coating texture. Thaw gradually in the fridge.
When Should You Eat Cake Pops For The Best Taste And Texture?
Cake pops are most enjoyable when eaten at their peak freshness:
- Room Temperature: Best within 2–3 days to enjoy soft, moist cake and crisp coating.
- Refrigerated: Consume within 7–10 days for the ideal texture.
- Frozen And Thawed: Eat within a few days after thawing; prolonged storage may slightly alter coating or interior softness.
How To Store Cake Pops If You Made Them Ahead For Holidays Or Parties?
Preparing cake pops in advance is possible, but careful storage is essential:
- Individual Wrapping: Wrap each pop in plastic wrap or wax paper, then store in an airtight container or freezer bag.
- Freeze In A Single Layer: This prevents them from sticking or flattening under weight.
- Thaw Gradually: Move frozen pops to the fridge a day or several hours before serving.
- Restore Coating Shine: If needed, you can lightly re-dip pops in melted coating to refresh their appearance.
Which Storage Method Should You Choose Based On When You Plan To Serve?
- Within 1–2 days: Store at room temperature in a cool, dry place.
- Up to a week: Refrigerate in an airtight container.
- Weeks or months ahead: Freeze properly wrapped pops and thaw carefully before serving.
Can I Make Cake Pops Without Chocolate Coating?
Yes, you can make cake pops without traditional chocolate coatings, but there are a few things to keep in mind:
- Alternative Coatings: You can use candy melts, yogurt-based coatings, or even royal icing. Each will give a different texture and firmness.
- Stability: Chocolate and candy melts harden firmly, helping the cake hold shape. Softer coatings may require refrigeration to stay intact.
- Flavor Variations: Non-chocolate coatings allow for creative flavor combinations, like fruit-flavored melts or white chocolate with zest.
When choosing an alternative coating, test a small batch first to ensure it sticks well and doesn’t make the cake pop soggy.
Why Do Cake Pops Crack After Coating?
Cracks in cake pops are a common issue and usually happen due to temperature or texture:
- Cake Too Dry: If the cake mixture is crumbly or overbaked, the coating can crack as it sets. Adding just enough frosting to hold crumbs together helps prevent this.
- Rapid Temperature Changes: Dipping cold cake pops into hot melted coating or moving frozen pops to a warm room too quickly can create cracks. Let pops reach room temperature gradually.
- Overhandling: Pressing or rolling the cake balls too much can weaken their structure, making cracks more likely after coating.
Can I Use Different Frosting Flavors For Cake Pops?
Absolutely! The frosting not only binds the cake crumbs but also adds flavor.
- Classic Chocolate or Buttercream: Most popular and gives a smooth texture.
- Cream Cheese or Whipped Cream: Adds tangy or light flavor but may need extra chilling to firm up.
- Flavor Combinations: You can mix in extracts like mint, orange, or coffee for a festive twist.
Make sure the frosting is thick enough to hold the cake together but soft enough to mix easily with crumbs.
How Long Can Cake Pops Stay On Display Without Losing Quality?
If you want to display cake pops as part of holiday décor:
- Short-Term Display: Room temperature is fine for 1–2 days in a cool environment. Avoid placing near heaters, sunlight, or humid areas.
- Maintaining Shine: Sprinkles and coating may dull over time. Display in an enclosed container if possible.
- Avoid Moisture: Condensation can make sprinkles stick together and coatings soft.
Can I Make Cake Pops Ahead And Freeze Them Before Coating?
Yes, freezing before coating is possible, and sometimes even better for handling:
- Freeze Cake Balls: Roll the cake balls and freeze them on a tray until firm. This prevents crumbling during dipping.
- Coating Later: Melted coating can then be applied to the frozen pops, which sets faster and gives a smoother finish.
- Thaw Carefully: After coating, allow pops to thaw at room temperature or refrigerate lightly before serving.
Why Do My Cake Pops Turn Out Too Sweet Or Too Rich?
Balancing sweetness is key to enjoyable cake pops:
- Check Frosting Amount: Too much frosting can make the cake overly sweet. Use just enough to bind crumbs smoothly.
- Coating Type: Candy melts are sweeter than dark chocolate, so adjust accordingly.
- Cake Flavor Balance: Use slightly less sugar in the cake if you plan on using rich frosting and coating.
How Can I Make Cake Pops Look Professional And Uniform?
Appearance matters, especially for festive settings:
- Consistent Size: Use a cookie scoop or small measuring spoon to make equal-sized balls.
- Smooth Balls: Roll gently with clean hands to remove cracks or uneven surfaces.
- Even Coating: Pour coating over the cake pop instead of swirling to avoid streaks.
- Sprinkle Timing: Add decorations immediately after coating to ensure they stick evenly before it hardens.
You May Also Like To Check Out These Recipes
- Christmas Tree Cake Pops
- Christmas Cookie Cake
- Christmas Tree Cake Cheesecake
- Cranberry Christmas Cake
- Grinch Christmas Cake
- Red Velvet Cheesecake Cake
- Gingerbread Cake
- Pistachio And White Chocolate Winter Wonderland Cake
- Oreo Cheesecake Cupcakes
- Black Bottom Cupcakes
- Oreo Cupcakes
- Gingerbread Cupcakes
- Red Velvet Cupcakes
- Lemon Cupcakes
- Cranberry White Chocolate Cookies
- Santa Cookies
- Melted Snowman Cookies
- Cranberry Orange Cookies
- Linzer Cookies With Almond Flour
- Grinch Sugar Cookies
- Ooey Gooey Butter Cookies
- Cookies And Cream Cookies
- Raspberry Thumbprint Cookies
- Christmas Tree Rice Crispy Treats
- Starbucks Cranberry Bliss Bars
- Christmas Oreo Balls
- Cranberry Pecan Cheese Ball
- Mexican Champurrado
- Christmas Tree Pizza
- Christmas Chocolate Peppermint Bark
- Peanut Butter Rice Krispie Treats
- Sausage Hash Brown Casserole
- Christmas Cream Cheese Mints
- Beef Wellington
- Perfect Prime Rib
- Cheese Fondue Without Alcohol
- Christmas Tree Pull Apart Bread
- Keto Sausage Balls
- Chicken And Noodles
- Venison Italian Meatballs
- Hashbrown Casserole
- Southern-Style Vegan Collard Greens
- Chocolate Yule Log Cake