Back-to-school season always carries its own mix of excitement and nervous energy.
Kids are picking out fresh notebooks, sharpening pencils, and tucking away their new supplies, while parents are busy keeping up with the bustle.
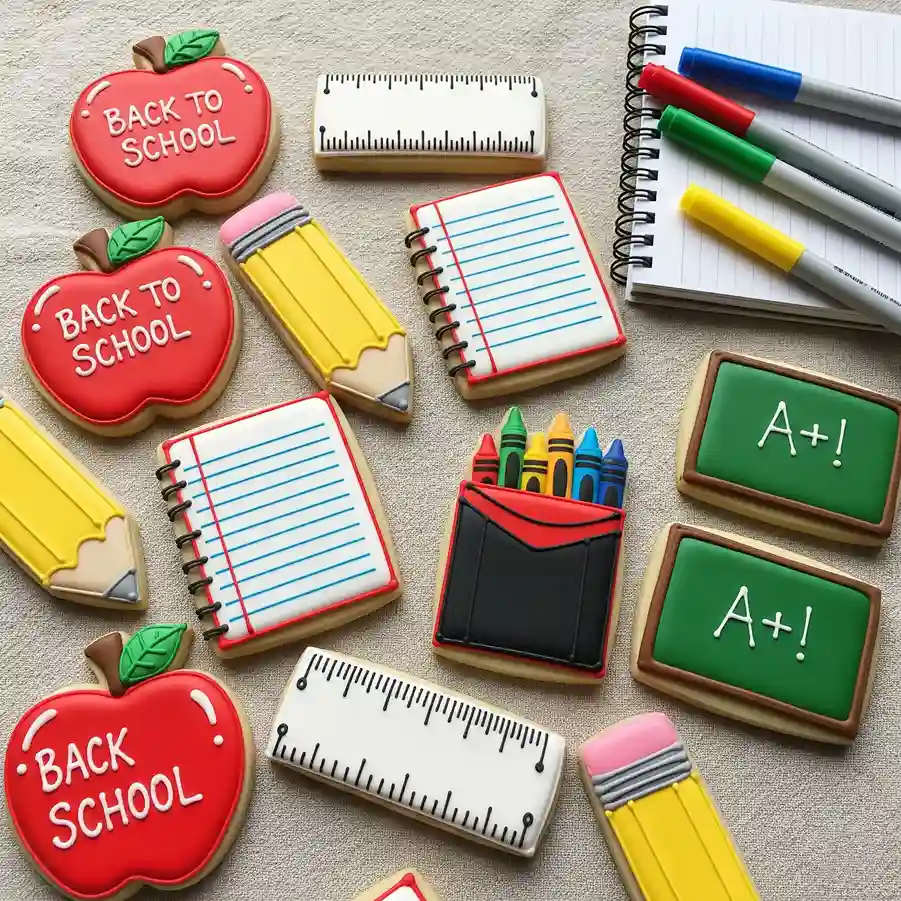
Amidst all the planning and preparation, it’s the small, thoughtful touches that make the days feel special. That’s where these back-to-school sugar cookies shine.
Each one looks just like the tools we associate with school—apples with bold red icing, sharp yellow pencils, neat little notebooks, bright boxes of crayons, crisp rulers, and even chalkboards boasting an A+.
They aren’t just cookies; they’re cheerful little reminders that learning can be fun and rewarding. The beauty of making these cookies is in the decorating.
You’re not just baking; you’re creating colorful, edible art that can make a child smile when tucked into a lunchbox or passed around at a classroom party.
They add joy to the first week of school and spark conversations that make kids proud to show them off.
If you want your table, lunchbox, or gift box to feel thoughtful and full of spirit, these cookies deliver that with every detail—from the precision of the lines on a notebook to the playful shine of a candy-coated apple.
They turn ordinary sugar cookies into little moments of encouragement that make going back to school feel brighter.
Table of Contents
Back To School Sugar Cookies Recipe
Ingredients
For Sugar Cookies
- 1 cup unsalted butter, softened
- 1 cup fine granulated sugar
- 1 large egg, room temperature
- 1 ½ teaspoons vanilla extract
- ½ teaspoon almond extract (optional, for flavor depth)
- 3 cups all-purpose flour
- 1 ½ teaspoons baking powder
- ½ teaspoon salt
For Royal Icing
- 4 cups powdered sugar, sifted
- 3 tablespoons meringue powder
- 6 tablespoons warm water (more if needed for consistency)
- Gel food colors (red, green, yellow, black, blue, brown, and white)
Instructions
- In a large bowl, cream the softened butter and sugar together using a stand mixer or hand mixer until pale and fluffy, about 2 minutes.
- Beat in the egg, vanilla extract, and almond extract until fully combined.
- In a separate bowl, whisk the flour, baking powder, and salt. Gradually add the dry mixture to the wet ingredients, mixing on low until a dough forms.
- Divide the dough into two portions. Flatten into discs, wrap in plastic wrap, and chill for at least 1 hour.
- Preheat oven to 350°F (175°C). Line baking sheets with parchment paper.
- Roll out one portion of dough on a lightly floured surface to about ¼ inch thickness.
- Use school-themed cookie cutters (apple, pencil, ruler, notebook, crayon box, chalkboard) to cut out shapes. Transfer carefully to the baking sheet.
- Bake for 8–10 minutes or until edges are just set and pale golden. Do not overbake to keep cookies soft.
- Let cookies cool completely on a wire rack before decorating.
Decorating With Royal Icing
- To make the icing, combine powdered sugar, meringue powder, and warm water in a large mixing bowl. Beat on high speed for 3–5 minutes until stiff peaks form.
- Divide the icing into separate bowls. Tint each portion with gel food coloring to match school items: red for apples, yellow for pencils, green for chalkboards, white for notebook paper and rulers, blue for notebook lines, black for outlines, and multicolors for crayons.
- Adjust icing consistency: use a thicker icing for outlines and details, and thin slightly with drops of water for flooding larger areas.
- Transfer each colored icing into piping bags fitted with fine tips. Keep unused icing covered with a damp cloth to prevent drying.
- Outline and flood each cookie according to design:
- Apples: Red base with green leaf and brown stem, add “Back To School” writing.
- Pencils: Yellow body, pink eraser top, silver band, and pointed graphite end.
- Rulers: White base with fine black tick marks.
- Notebooks: White base with blue horizontal lines and red vertical margin line, add black spiral detail.
- Crayon Box: Red and black box with multicolored crayons peeking out.
- Chalkboards: Green base with white “A+!” lettering.
- Allow decorated cookies to dry completely at room temperature, uncovered, for at least 6–8 hours or overnight until icing is firm to the touch.
How Long Do Back To School Sugar Cookies Stay Fresh?
Freshly baked sugar cookies decorated with royal icing can last quite a while if stored the right way. On the counter, in an airtight container, they will stay soft and flavorful for up to 7 days.
The icing keeps them from drying out quickly. Always let the icing dry completely before storing so the cookies do not stick together.
If you want to prepare ahead, you can freeze the cookies. Place them in a single layer in a container, with parchment paper between layers to prevent smudging. They can be frozen for up to 2 months and will taste just as good when thawed.
Can I Make The Cookie Dough Ahead Of Time?
Yes, the dough for sugar cookies can be made in advance which saves time when you are busy. The chilled dough actually rolls out better and helps keep the cookie shapes sharp while baking.
- Refrigerating: You can keep the dough wrapped in plastic wrap for up to 3 days in the refrigerator before rolling and cutting.
- Freezing: The dough can also be frozen for up to 2 months. Thaw overnight in the fridge before rolling it out.
Making the dough ahead also gives you flexibility so you can bake and decorate on separate days.
How Do I Store Decorated Back To School Cookies?
Proper storage is important so your decorated cookies stay neat and fresh. After decorating, let the royal icing dry completely for at least 6 to 8 hours.
- Room Temperature: Place cookies in a flat airtight container lined with parchment paper. Stack cookies carefully with parchment between layers. Keep them at room temperature for up to a week.
- Freezer Storage: For longer storage, wrap each decorated cookie individually in plastic wrap. Place them in a sealed container or freezer bag. When ready to use, thaw them still wrapped to avoid condensation ruining the icing.
This method helps keep the designs crisp and the icing smooth.
Can I Use Buttercream Instead Of Royal Icing?
You can decorate with buttercream, but it will give a very different look compared to royal icing. Buttercream is softer and does not dry as hard, which makes it less suitable for stacking or storing long term.
- Royal Icing: Best for sharp lines, smooth finishes, and cookies that need to be stacked or transported.
- Buttercream Icing: Best for soft, fluffy designs and when cookies will be eaten the same day or stored only briefly.
If you are making these cookies for a school event or as gifts, royal icing is the stronger choice.
What Tools Do I Need For Decorating Back To School Cookies?
Decorating school-themed cookies is easier when you have the right tools. You don’t need anything complicated, but certain basics will make your work neat and fun.
- Piping Bags and Tips: Use small round tips for outlines, writing, and details.
- Scribe Tool or Toothpick: Helps spread icing evenly and pop air bubbles.
- Gel Food Colors: Needed to achieve bright and bold shades like red, yellow, green, and black.
- Cookie Cutters: Shaped like apples, pencils, rulers, notebooks, crayons, and chalkboards for the full back-to-school theme.
How Do I Keep Cookie Shapes From Spreading In The Oven?
One of the most common issues is cookies losing their shape while baking. To avoid this, you need to chill the dough well before cutting.
- Chill The Dough: After making the dough, refrigerate it for at least 1 hour.
- Freeze Cut-Outs: Once you cut out the shapes, place the tray in the freezer for 10–15 minutes before baking.
- Avoid Extra Flour: Too much flour while rolling can change the texture and cause spreading.
These steps help the cookies bake evenly and hold their school-inspired shapes.
Can I Prepare Back To School Sugar Cookies In Advance For School Events?
Yes, these cookies are great for making ahead, especially for busy school weeks or events.
- Bake Ahead: You can bake the cookies up to 1 week before the event and store them in an airtight container.
- Decorate Ahead: Decorate them 2 to 3 days before serving to allow enough drying time.
- Freeze Ahead: If you want to prepare weeks before, freeze the undecorated cookies and decorate them closer to the event.
Preparing ahead saves time and ensures your cookies are ready without last-minute stress.
Common Decorating Mistakes And How To Fix Them?
Even with the best recipe and tools, small mistakes can happen when decorating cookies. The good news is that most of them can be fixed or prevented with the right tips.
Why Does My Royal Icing Look Too Runny Or Too Thick?
- Too Runny: If your icing spreads too much and doesn’t hold its shape, add more powdered sugar a little at a time until it thickens.
- Too Thick: If your icing is hard to pipe or cracks while spreading, add a few drops of warm water and mix until it reaches the right consistency.
A good test is to run a spoon through the icing: it should settle back into place within 10 to 15 seconds for flooding.
Why Are My Icing Colors Bleeding Into Each Other?
- Overly Wet Icing: If the icing is too thin, colors will bleed. Keep each color at the correct consistency before piping.
- Not Enough Drying Time: Allow one color to dry before adding another layer or detail on top.
- Humidity: High humidity can also cause bleeding. In such cases, use a fan or dehumidifier near your drying cookies.
Giving cookies enough drying time is key to keeping colors sharp and clean.
Why Is My Icing Cracking Or Looking Dull?
- Overmixed Icing: Mixing royal icing too long can add too much air and cause cracks. Mix until smooth but not overly whipped.
- Too Little Water: If the icing is too dry, cracks may form as it sets. Add a few drops of water to improve flexibility.
- Storage Conditions: Icing can look dull if cookies are stored in a damp environment. Store in a cool, dry place once they are completely dry.
Why Do My Cookies Break While Decorating?
- Overbaking: Hard cookies are more likely to break when pressure is applied. Bake until edges are set but not browned.
- Too Thin: Rolling the dough too thin can make fragile cookies. Keep them about ¼ inch thick for durability.
- Handling Too Soon: Always let cookies cool fully before decorating, as warm cookies are delicate.
Why Do Air Bubbles Appear On My Cookies?
- Trapped Air: Air bubbles form when icing is mixed too quickly. Mix slowly and tap the bowl to release bubbles.
- Not Using A Tool: Use a scribe tool or toothpick to pop bubbles immediately after flooding icing onto cookies.
These simple fixes help you achieve smooth, professional-looking cookies every time.
You May Also Like To Check Out These Articles
- Preschool Snack Ideas: 25 Fun & Fuss-Free Picks
- 25 Easy & Fun First Day Of School Breakfast Ideas
- 20 School Lunch Ideas For Teens That Beat Cafeteria Food
- 60 Delicious Adult Lunchables For Office And School
- 70 Homemade Toddler Snacks That Are Simple And Nutritious
- 10 Best Low Calorie Healthy Snacks For Teen Athletes
- 11 Best Nut Free Snacks For Kids School Safe On Amazon
- 15 Delicious & Healthy Snacks For Toddlers Heading Back To School
- 50 Best High Protein Snacks For Kids For Sustained Energy
- 15 Parent-Tested School Lunch Ideas For Kids
- Best Field Trip Lunch Ideas To Keep Kids Energized & Happy
- 20 Best Nut-Free Granola Bars For Kids
- 7 Best Water Bottles For Kids School
- 7 Best Lunch Boxes For Kids
- Classy & Giftable Back To School Teacher Cookies