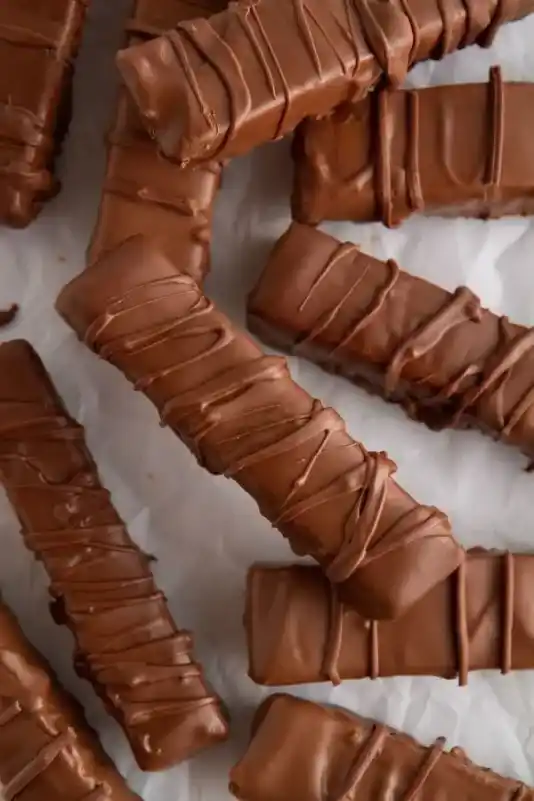
There’s a real joy in making your own Twix bars—the kind of joy that starts with the first layer and builds up with each sweet, gooey step.
You’ve got that crunchy shortbread base, a caramel layer that’s rich and just the right amount of chewy, and finally, a smooth chocolate topping that ties everything together.
This recipe brings you all the things you love about Twix, only fresher, homemade, and entirely customizable to your taste.
These bars are easy to make, and once you’ve tried them, they might just become your favorite treat to share—or keep all to yourself!
Homemade Twix Bars Recipe
Ingredients
For The Shortbread Base
- 2 cups all-purpose flour
- 1/2 cup white sugar
- 1/2 teaspoon salt
- 1 cup (2 sticks) unsalted butter, melted
For The Caramel Layer
- 1 can (14 oz) sweetened condensed milk
- 3/4 cup brown sugar
- 1/4 cup white sugar
- 1/2 cup heavy cream
- 1/2 cup light corn syrup (or replace with 1/2 cup honey if preferred)
- 1/2 teaspoon salt
- 1/2 cup (1 stick) unsalted butter
For The Chocolate Topping
- 1 1/2 cups (9 oz) milk chocolate chips
- 2 tablespoons vegetable shortening (can use coconut oil as a substitute)
Instructions
- Preheat your oven to 350°F (175°C). Line a 13×9-inch baking pan with aluminum foil, letting the edges hang over the sides for easy removal later.
- In a mixing bowl, combine flour, 1/2 cup white sugar, and salt. Add in the melted butter and mix until a soft dough forms. Press this dough evenly into the lined baking pan, covering the bottom completely. Bake for 25-30 minutes or until lightly golden. Set aside to cool.
- In a large saucepan, add the sweetened condensed milk, brown sugar, 1/4 cup white sugar, heavy cream, corn syrup (or honey), salt, and butter. Place over medium-low heat and stir constantly with a spatula. Cook for 15-20 minutes, stirring frequently, until the caramel thickens and reaches a creamy consistency, like melted peanut butter. Remove from heat, pour over the shortbread base, and spread it out evenly. Let it cool and set for about 1-1.5 hours.
- Once the caramel layer is firm, use the foil to lift the shortbread from the pan. Slice into 24 pieces (about 2-inch rectangles). Place them on a tray and chill in the freezer for 10-15 minutes to firm up for dipping.
- In a microwave-safe bowl, combine the chocolate chips and vegetable shortening (or coconut oil). Microwave in 20-second bursts, stirring between each, until the chocolate is smooth and fully melted.
- Using two forks, carefully dip each bar in the melted chocolate to coat it fully, then place it on a sheet of wax paper or a cooling rack. Drizzle extra chocolate on top for decoration, if desired. Let the chocolate set by refrigerating the bars for about 30 minutes.
- Store the bars in an airtight container at room temperature for up to one week.
Expert Tips For Perfect Homemade Twix Bars
Homemade Twix bars are simple to make, but a few small adjustments can make them even better. Here are some helpful tips:
- Get the Caramel Right: Stir the caramel constantly and keep the heat low. This helps avoid burning and creates a smooth, thick caramel that sets well.
- Chill Between Layers: Let each layer set completely before adding the next. Chilling the shortbread before adding caramel, and the caramel before dipping in chocolate, keeps the layers separate and neat.
- Use High-Quality Chocolate: The taste of the chocolate really comes through, so choose one you enjoy. High-quality chocolate melts better and makes a smoother coating.
Variations To Customize Your Twix Bars
It’s easy to make Twix bars your own with a few changes:
- Salted Caramel Twix Bars: Add a sprinkle of sea salt on top of the caramel before it sets. It gives a nice balance to the sweetness.
- Dark Chocolate Version: For a richer flavor, swap the milk chocolate for dark chocolate.
- Nutty Twist: You can add crushed nuts on top of the caramel layer for a bit of crunch.
What To Serve With Homemade Twix Bars?
Homemade Twix bars can be a delicious addition to a dessert table or a snack with a hot drink. Here are some pairing ideas:
- Hot Coffee or Hot Chocolate: These drinks balance the sweetness of the bars, making for a cozy treat.
- Ice Cream: Serving Twix bars with a scoop of vanilla or caramel ice cream turns them into a full dessert.
How To Store Homemade Twix Bars?
To keep your Twix bars fresh, storing them the right way is key. Once your bars are fully set:
- At Room Temperature: Twix bars can be kept in an airtight container at room temperature for up to 3 days.
- In the Fridge: Store them in a sealed container in the fridge if you’d like them to last a bit longer—about a week.
Separating the bars with wax paper helps keep the chocolate coating from sticking. Stored properly, they stay fresh and just as tasty.
Can You Freeze Homemade Twix Bars?
Yes, homemade Twix bars can be frozen if you want to enjoy them later. Just follow these steps:
- Wrap Each Bar Separately: Use plastic wrap or wax paper to wrap each bar individually. This prevents freezer burn.
- Store in a Freezer-Safe Container: Place the wrapped bars in an airtight freezer bag or container.
- Freeze for Up to 2 Months: They’ll stay fresh for up to 2 months in the freezer. When ready to eat, let them thaw at room temperature for 20–30 minutes.

How Many Layers Does A Twix Bar Have?
A classic Twix bar has three main layers, each one bringing a different texture and flavor:
- Shortbread Layer: This is the base layer, made of a firm, buttery shortbread that provides the perfect crunch.
- Caramel Layer: On top of the shortbread is a soft, chewy layer of caramel that adds sweetness and a gooey texture.
- Chocolate Coating: The top layer is a smooth coating of milk chocolate that wraps around the caramel and shortbread, holding everything together.
Tips For Cutting Homemade Twix Bars
Cutting Twix bars cleanly can be a bit tricky, especially with the caramel layer, but here are some easy tips to get nice, even slices:
- Chill the Bars First: Let the bars cool completely in the fridge for about an hour before cutting. This helps the caramel and chocolate set, making them easier to slice without sticking.
- Use a Warm Knife: Run a sharp knife under hot water, then wipe it dry before cutting. The warm knife slices through the caramel and chocolate more smoothly.
- Cut in One Motion: Use a single, firm motion to cut through the bars instead of sawing back and forth. This helps avoid cracks and gives a cleaner edge.