The first week of school always carries a mix of nerves, excitement, and fresh starts.
Teachers walk back into their classrooms ready to inspire, and students return with sharpened pencils and bright hopes.
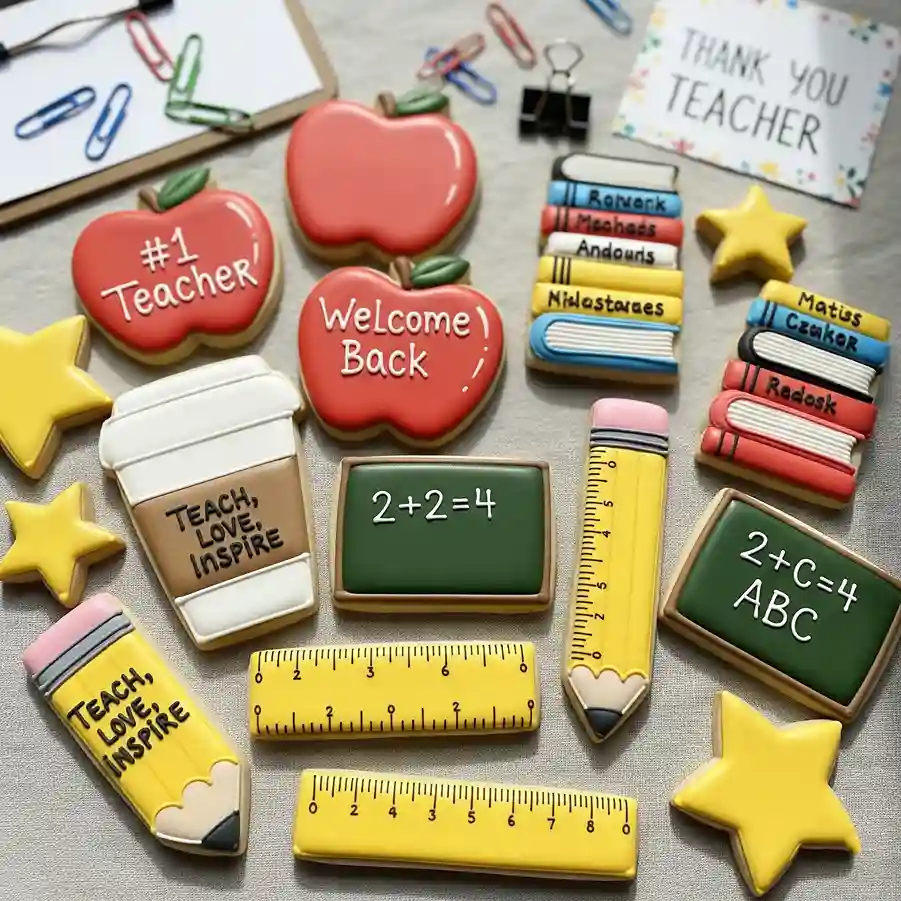
A thoughtful way to honor that moment is with cookies designed just for them—cookies that speak the language of school itself.
Apples with “#1 Teacher” piped across, chalkboards filled with math and ABCs, rulers stretched with tiny measurements, and pencils standing tall.
Each detail turns a simple cookie into a little tribute, both playful and heartfelt.
These back to school teacher cookies aren’t just decorated snacks, they’re small messages of gratitude wrapped in sugar and icing.
The bright colors mirror classroom supplies, while the shapes capture the spirit of learning. They don’t just taste buttery and sweet; they carry meaning in every bite.
Making them takes patience, but the reward is worth it—because when you hand over a tray filled with stars, apples, and books, it feels like giving thanks in the most personal way possible.
Table of Contents
Back To School Teacher Cookies Recipe
Ingredients
For The Cookies
- 1 cup unsalted butter, softened
- 1 cup granulated sugar
- 1 large egg, room temperature
- 1 ½ teaspoons vanilla extract
- ½ teaspoon almond extract (optional, enhances flavor)
- 2 ½ cups all-purpose flour
- ¾ teaspoon baking powder
- ½ teaspoon salt
For Royal Icing
- 4 cups powdered sugar, sifted
- 3 tablespoons meringue powder
- 6–8 tablespoons warm water (adjust as needed)
- Gel food colors (red, yellow, green, black, white, blue, pink, brown)
For Decoration Tools
- Piping bags
- Piping tips (small round tips #1, #2, #3)
- Toothpicks or scribe tool
- Cookie cutters: apple, pencil, star, ruler, book stack, chalkboard, coffee cup
Instructions
- In a large mixing bowl, cream together butter and sugar until light and fluffy, about 2 minutes.
- Add the egg, vanilla extract, and almond extract, and beat until combined.
- In a separate bowl, whisk flour, baking powder, and salt. Gradually add dry ingredients into the butter mixture and mix until dough forms.
- Divide the dough into two portions, flatten into discs, and wrap in plastic wrap. Chill for at least 1 hour.
- Preheat oven to 350°F (175°C) and line baking sheets with parchment paper.
- Roll dough on a lightly floured surface to ¼-inch thickness. Use cookie cutters for apple, pencil, ruler, star, chalkboard, book stack, and coffee cup shapes.
- Transfer cookies onto prepared baking sheets and bake for 8–10 minutes, until edges are lightly golden. Let them cool completely before decorating.
- For royal icing, whisk powdered sugar, meringue powder, and 6 tablespoons of warm water in a stand mixer on low speed for 7–10 minutes, until smooth and slightly thick. Adjust with more water if too stiff.
- Divide icing into bowls and tint with gel food colors: red for apples, yellow for stars, pencils, and rulers, green and black for chalkboards, brown for coffee cup sleeve, white for cup base, and various bright colors for books.
- Fill piping bags with each color. Use thicker icing for outlines and thinner, flood consistency icing for filling.
- Outline each cookie shape first, then flood with thinner icing. Use a toothpick or scribe tool to spread icing evenly and pop air bubbles.
- Let base layer dry for at least 1 hour before adding details like numbers on rulers, chalkboard writing, book titles, apple words, and pencil accents. Use a fine piping tip for text.
- Allow decorated cookies to dry uncovered for 8–12 hours at room temperature until icing is completely set and firm.
- Store cookies in an airtight container at room temperature for up to one week, or freeze undecorated cookies for longer storage.
What Shapes Can I Make For Back To School Teacher Cookies?
Back to school cookies give you the freedom to play with creativity and bring classroom elements to life.
- Apple Cookies: A timeless symbol of gratitude for teachers, apples are the most recognized school-inspired shape.
- Chalkboard Cookies: Perfect for writing simple math problems, alphabets, or short thank-you messages.
- Pencil Cookies: Long, colorful, and fun to decorate with yellow icing and a pink eraser tip.
- Ruler Cookies: A great way to practice straight lines and add fine detailing with measurement marks.
- Star Cookies: A cheerful way to celebrate students’ and teachers’ success.
- Book Stack Cookies: Allows for multiple colors, giving a vibrant, library-inspired look.
- Coffee Cup Cookies: Ideal for showing appreciation for a teacher’s long days and endless energy.
How To Get Bright And Neat Icing Colors?
Colorful icing makes these cookies look real and eye-catching, so achieving clean shades is important.
- Use Gel Food Colors: They provide bold colors without making the icing runny, unlike liquid food colors.
- Mix In Advance: Prepare icing colors at least an hour before decorating so the shades deepen and set.
- Keep Icing Covered: Royal icing dries fast, so always keep bowls covered with plastic wrap to avoid crusting.
- Separate Consistencies: Use a thicker icing for outlines and a thinner icing for flooding the inside.
How To Pipe Letters And Numbers On Chalkboard Cookies?
Writing on cookies can feel tricky, but with a few tips, your details will look clear and sharp.
- Choose The Right Tip: A small round tip (#1 or #2) gives more control for neat lettering.
- Steady Your Hand: Rest your elbows on the table and pipe slowly for even writing.
- Work In Sections: For longer words or sentences, pause and let parts dry before continuing.
- Practice On Parchment: Test your writing on parchment paper first, then move to the cookie.
Can I Make The Dough Ahead Of Time?
Yes, preparing dough ahead makes decorating day much easier.
- Chill In The Fridge: Wrapped tightly in plastic wrap, cookie dough stays fresh for up to 3 days in the refrigerator.
- Freeze The Dough: Roll into discs, wrap well, and freeze for up to 2 months. Thaw overnight in the fridge before rolling and cutting.
- Pre-Bake Cookies: You can also bake cookies in advance, let them cool, and freeze them undecorated for up to 2 months. Decorate once thawed.
How To Store Decorated Teacher Cookies?
Storing these cookies properly helps keep the designs intact and the texture fresh.
- Room Temperature Storage: Place decorated cookies in an airtight container, layering them with parchment paper, and store for up to 1 week.
- Drying Before Storing: Always allow royal icing to dry completely (8–12 hours) before stacking or packaging.
- Freezing Decorated Cookies: Although possible, freezing decorated cookies may cause condensation and blur the colors. It’s safer to freeze only undecorated ones.
- Gift Packaging: For gifting, seal cookies individually in clear treat bags once the icing is fully dry to keep them neat and fresh.
How Long Does It Take For Royal Icing To Dry On Back To School Cookies?
Royal icing needs time and patience, especially when working with layers.
- Surface Drying: The top layer crusts within 1–2 hours, making it safe to add simple details.
- Full Drying: For stacking, wrapping, or packing, wait 8–12 hours so the icing is completely set.
- Humidity Factor: In humid weather, drying can take longer, so allow extra hours or use a fan on low speed to help.
What Are Some Helpful Tips For Decorating Back To School Teacher Cookies?
Little tricks can make your cookies look polished and professional.
- Outline First, Then Flood: This keeps icing from spilling over the edges.
- Use A Toothpick Or Scribe Tool: Helps spread icing evenly and remove bubbles.
- Work With Drying Layers: Add fine details like numbers, letters, or ruler marks only after the base is dry.
- Keep Colors Separate: Wash piping tips or use different bags for each color to avoid mixing.
Troubleshooting Back To School Teacher Cookies
Even with the best recipe, small problems can come up while baking or decorating. Here’s how to solve the most common ones so your cookies look and taste just right.
- Cookie Dough Spreading: If cookies lose their shape in the oven, the dough was too warm. Chill the cut-out shapes on the baking sheet for 15–20 minutes before baking.
- Uneven Baking: If some cookies brown too quickly, make sure all cookies are rolled to the same thickness (¼ inch). Using light-colored baking sheets also helps prevent over-browning.
- Royal Icing Too Runny: When icing spreads beyond the outlines, it has too much water. Add more powdered sugar, a little at a time, until it thickens.
- Royal Icing Too Thick: If icing is cracking or won’t settle smoothly, add warm water a few drops at a time until it flows better.
- Colors Bleeding Into Each Other: When bright colors touch before drying, they can blend. Let one color dry for at least 30–60 minutes before adding the next shade.
- Air Bubbles In Icing: Pop them right after flooding the cookie by gently swirling a toothpick or scribe tool through the icing.
- Writing Looks Messy: If letters on chalkboards or book titles look shaky, practice piping on parchment paper first. Holding the piping bag higher and letting the icing “fall” onto the cookie gives cleaner lines.
- Cracks On The Cookies: Overmixing the dough or baking too long can cause cracks. Mix just until combined and remove cookies as soon as edges turn lightly golden.
- Cookies Too Hard: If they turn out crisp instead of soft, reduce the baking time by 1–2 minutes. They continue to firm up as they cool.
- Icing Not Drying Properly: If royal icing stays tacky, the room might be humid. Use a small fan on low speed near the cookies or place them in a cool, dry area for longer drying.
You May Also Like To Check Out These Articles
- Preschool Snack Ideas: 25 Fun & Fuss-Free Picks
- 25 Easy & Fun First Day Of School Breakfast Ideas
- 20 School Lunch Ideas For Teens That Beat Cafeteria Food
- 60 Delicious Adult Lunchables For Office And School
- 70 Homemade Toddler Snacks That Are Simple And Nutritious
- 10 Best Low Calorie Healthy Snacks For Teen Athletes
- 11 Best Nut Free Snacks For Kids School Safe On Amazon
- 15 Delicious & Healthy Snacks For Toddlers Heading Back To School
- 50 Best High Protein Snacks For Kids For Sustained Energy
- 15 Parent-Tested School Lunch Ideas For Kids
- Best Field Trip Lunch Ideas To Keep Kids Energized & Happy
- 20 Best Nut-Free Granola Bars For Kids
- 7 Best Water Bottles For Kids School
- 7 Best Lunch Boxes For Kids